I’ve lived in plenty of apartments, and I’m all too aware of the issues of noisy neighbors. As I’m sure many of you will agree, having loud people above you can have a big impact on your enjoyment of your home. By extension, it can affect your physical and mental health.
So, if you find yourself dealing with loud upstairs neighbors, you’re in the right place. Below, I discuss how to reduce noise from upstairs floors for both homeowners and tenants. My tips are divided into these sections, so it should be easy for you to find ones that’ll work for you.
Understanding the Types of Noise
The first step in dealing with a noisy upstairs neighbor is understanding the type of sound you’re trying to block. You should be able to tell when the noise issues are TV sounds, music, voices, footsteps, or something else.
But to put it in soundproofing terms, these are classified as either impact sounds or airborne sounds. We define them as follows:
- Airborne sounds are when a sound wave travels through the air from the source to your ears. They include sounds from speakers, talking, dogs barking, etc.
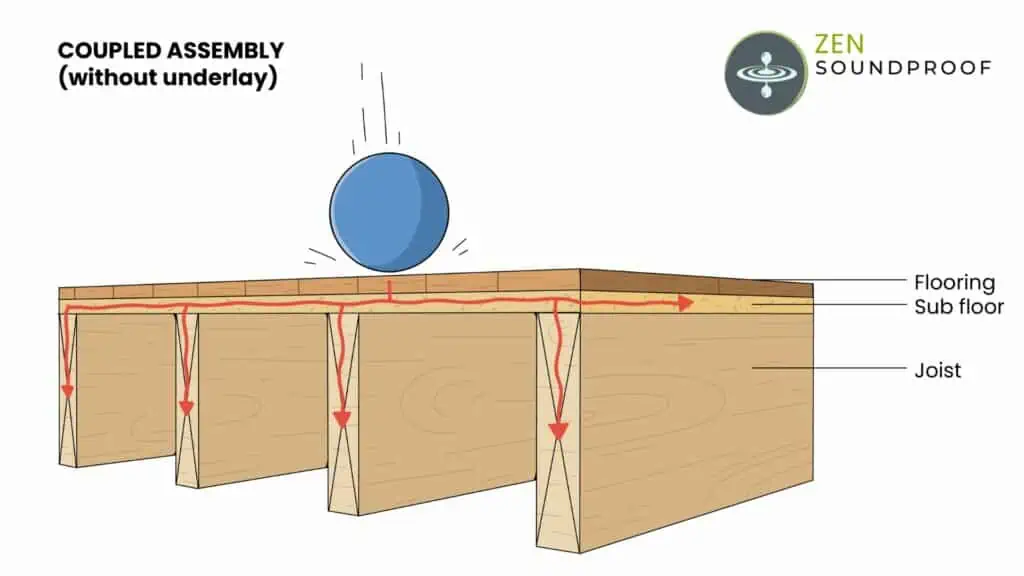
- Impact sounds are ones created when an object hits a surface. This creates vibrations that resonate through a structure to become sound waves when they come out the other side. Some examples include footsteps, furniture being moved, or a ball bouncing.
Why is it important to identify the type of noise? Well, the options for how to reduce walking noise from upstairs floors are different to dealing with talking or TV noise.
Specifically, airborne noises are blocked using insulation and absorption, whereas impact sounds are dealt with using mass or decoupling. These are known as soundproofing principles, and I discuss them in more detail in another article.
My tips are based on these soundproofing principles. For best effect, you’ll often need to combine several, especially as most noisy neighbors will be making more than one type of noise!
Tips to Reduce Noise from Upstairs Floors for Property Owners
We’ll start with tips for property owners. Unsurprisingly, these involve DIY and potential structural changes. Generally, they’ll be the most effective options for upstairs noise, as renters are usually a bit more limited in what they can do to their homes. You could always try speaking to your landlord though, as they might let you make changes provided you put them right when you leave.
1. Use Resilient Underlayment
Underlayment goes under hard or carpeted flooring. While it mostly provides thermal insulation, using resilient materials can help to reduce impact sounds. It’ll have a minor effect on airborne noise, but the carpet itself will be better for that (discussed below).
Resilient materials are ones that absorb energy due to their elastic properties. Basically, this means you step on it, it’ll squish down slightly, and then return to its original state.
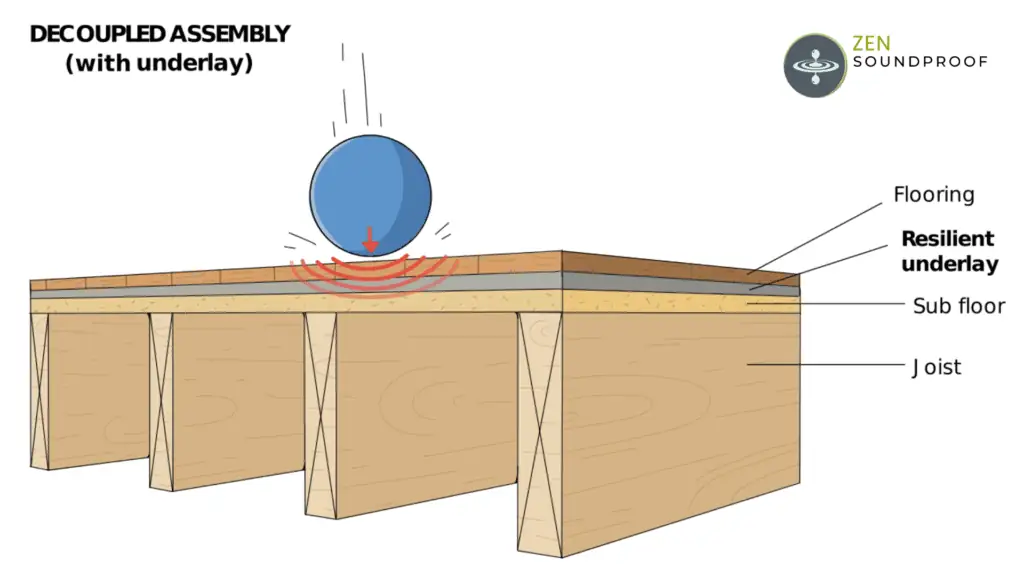
Some examples of resilient underlayment include cork, rubber and foam. We measure their insulation performance against impact sounds using the IIC rating (Impact Insulation Class).
I recommend checking out my article on the best resilient underlayment. It’s got plenty of information to explain why it’s a must-have product to install.
2. Seal Gaps in the Floor or Ceiling
Sound waves act very similar to heat energy – especially airborne sounds. By this, I mean that sound can escape through even the tiniest gap or crack in a room. Think of it in the same way that a draft lets heat out.
Luckily, you can fix this issue by using acoustic caulk. It’s similar to silicone caulk, except it has viscoelastic properties. This means it seals a gap but doesn’t completely harden, so it won’t split or crack over time.
To give you an idea of how important it is to block gaps, a wall that would usually block 40 dB would end up blocking only 20 dB if it had a crack covering 1% of its surface [1].
The point is: do not neglect caulking.
Plus, it’s pretty easy to use: look for any small gaps in the ceiling and floor setup. Seal them with some acoustic caulk, and you’ll hear the difference.
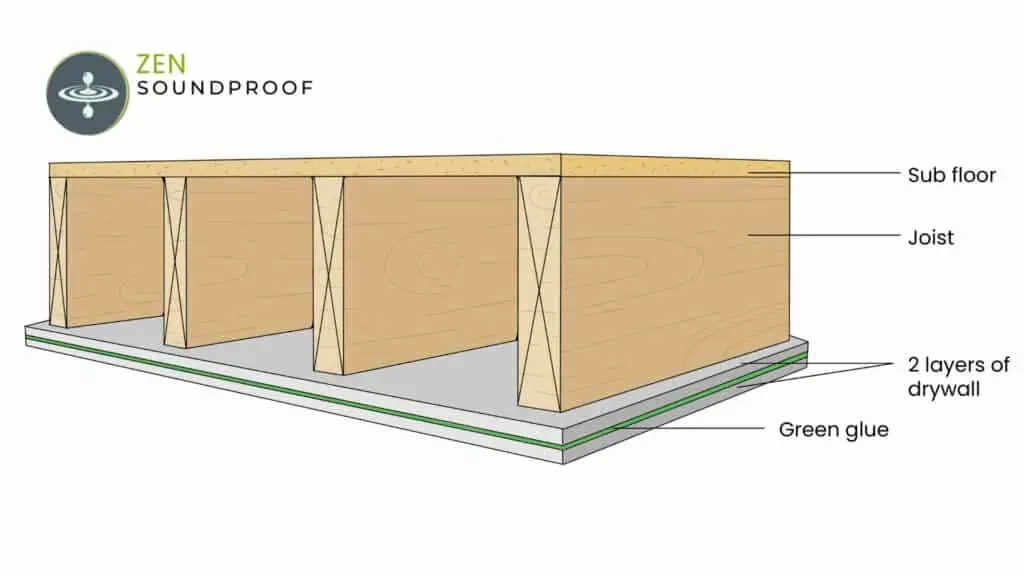
3. Add More Mass to the Ceiling
One way to effectively deal with airborne sound and impact noise is to add more mass to your ceiling. This’ll work in both homes and for an upstairs apartment, as it doesn’t require access to the upper floor.
To add mass, you can use either an extra layer of drywall or mass loaded vinyl. I’d recommend the latter. While it looks expensive (and it is), it’s a more cost-effective option than drywall if you want to see decent results. For best results, you need to cover the entire ceiling.
If you want to get the best results from any changes you make to your ceiling, you’ll need to add Green Glue noiseproofing compound, too. It does increase the project’s budget, but it can help bring the wall’s Sound Transmission Class (STC) rating above building code standards. I explain what all this means in the article linked above.
I have an article on how to install mass loaded vinyl, so check that out for a full guide on using it on ceilings.
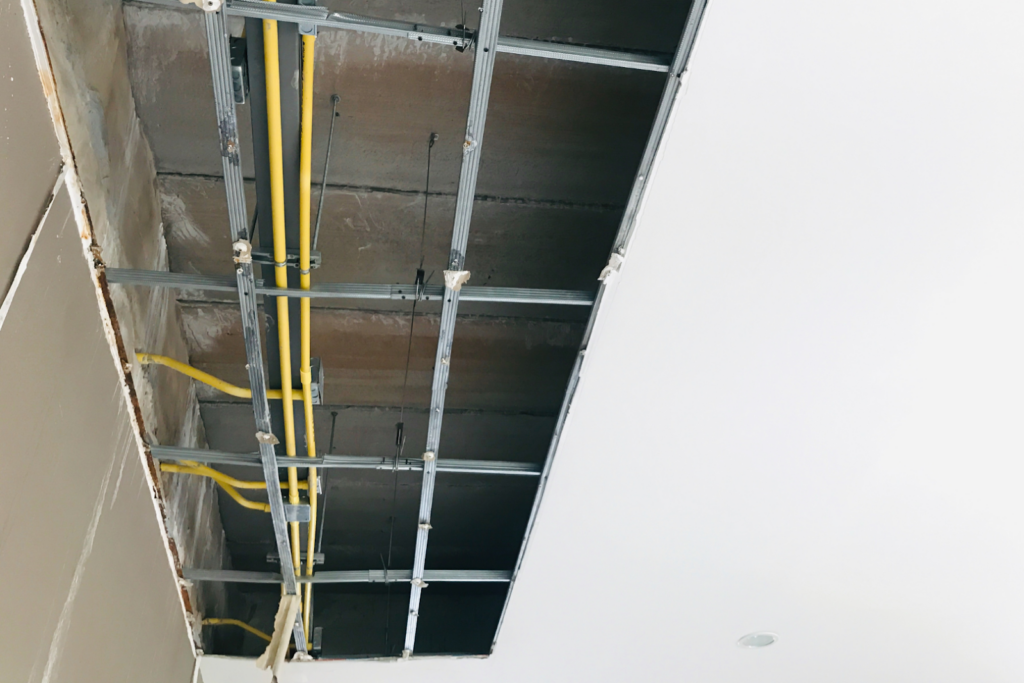
4. Fit Resilient Channels
Resilient channels are a soundproofing product that provide decoupling. Also known as mechanical sound isolation, it means separating one side of a structure from the other. This creates a break in the line of transmission, which effectively cuts off both airborne and impact sounds.
A resilient channel is a strip of metal that you fix to the ceiling studs. You then add sound isolator clips (which have rubber feet) and hang drywall from them.
The setup both blocks transmission and absorbs vibration, making it a very effective soundproofing method.
Check out my article on resilient channels and sound clips for more information on how this works.
5. Install a False Ceiling
Also known as a drop ceiling, this option is similar to the idea of resilient channels. Essentially, you have a suspension grip in which you install ceiling tiles.
This process creates an air gap, which can help reduce the transmission of airborne noise. The air gap functions much like a double-pane window, where a wider gap results in better noise insulation.
While a drop ceiling will also help with impact noise, you’d need to add extra insulation for improved effectiveness. This is because the air gap alone is not tailored for this.
Granted, this isn’t a massively practical option in a home because you can lose quite a bit of space in the room. But if you combine it with other options, it can have a noticeable impact on noise coming from upstairs.
If you decide to install a false ceiling, I recommend looking into soundproof ceiling tiles.
6. Add Insulation Materials to the Ceiling Cavity
As I mentioned above, sound insulation follows many of the same principles as thermal insulation. Another example of where this happens is with cavity insulation. You’re probably familiar with fiberglass or rockwool products – we use them to insulate our walls and ceilings.
Along with keeping heat in, they can do a good job of reducing the transmission of airborne sounds. In my article on soundproofing ceilings, I give a list of the best products, so check that out for some recommendations.
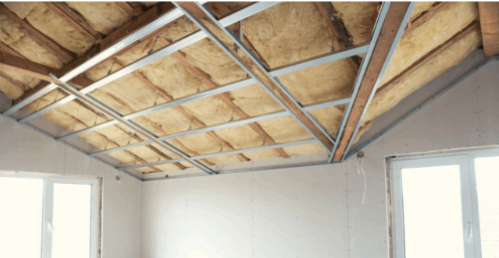
Bear in mind that you need the insulation to be around 3” thick for best results. This might not be possible in all ceiling setups, but any amount of insulation will help.
7. Reduce Squeaking of the Upstairs Floor
Squeaky floorboards might not be a top priority when it comes to reducing unwanted noise from upstairs. However, it can be a pretty easy fix that can make a big difference to overall noise levels.
The noise is usually caused by floorboards rubbing together, meaning at least one is loose. Generally, the solution is to fix the boards back down or to lubricate them.
The most common solutions I know of involve screwing down the floor, subfloor and joist, to close the relative gap.
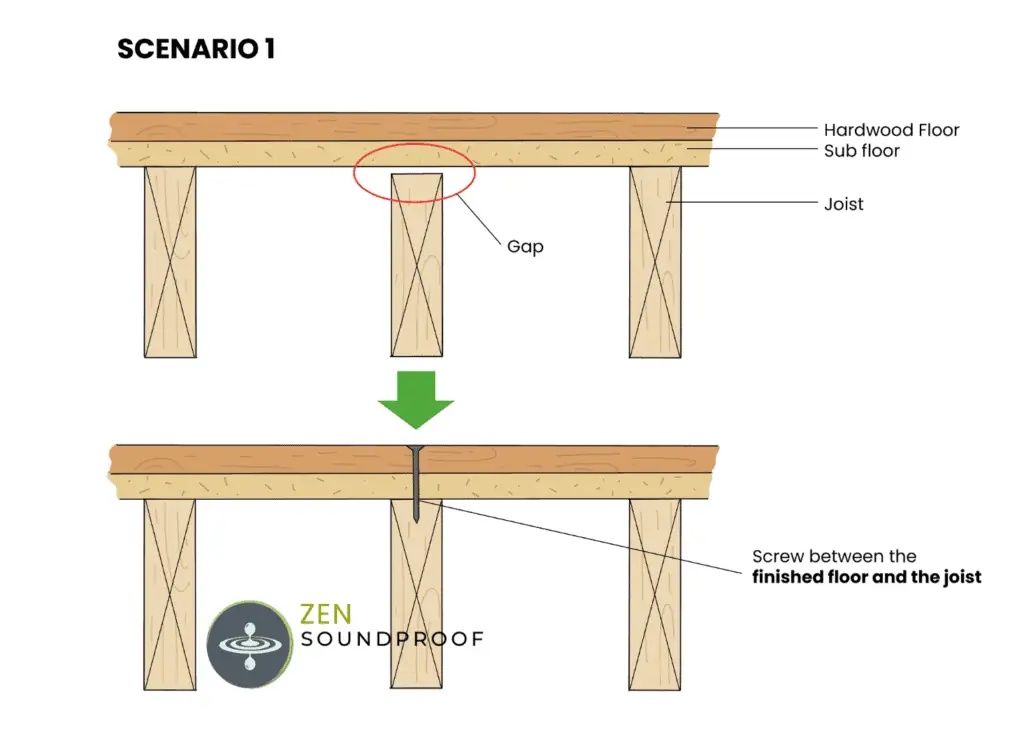
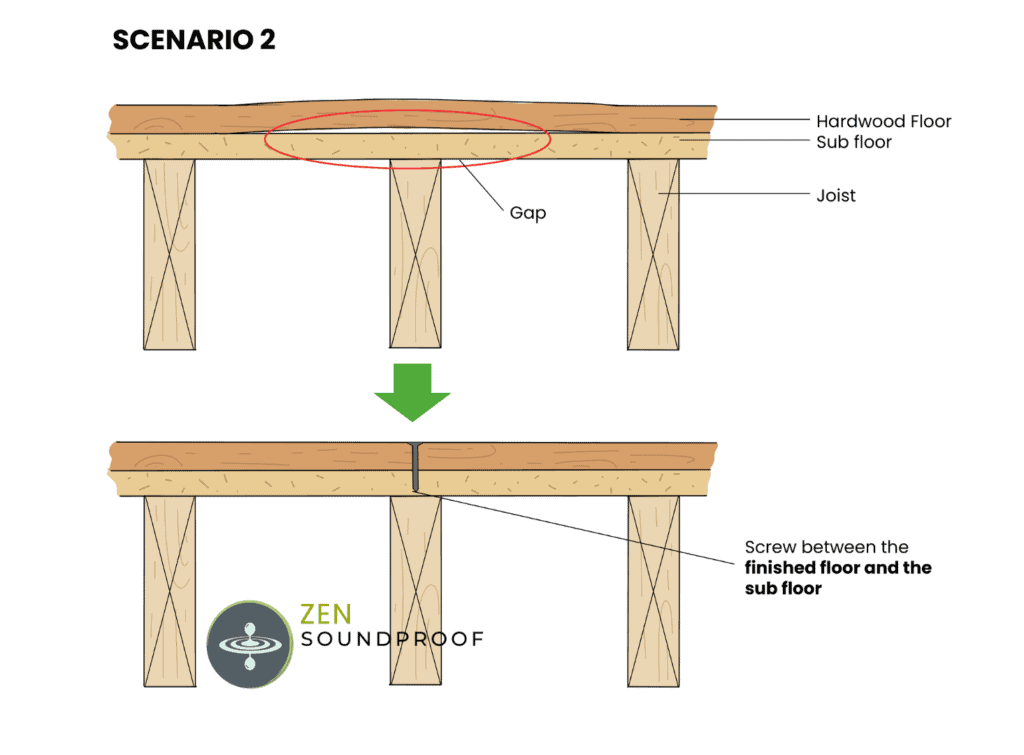
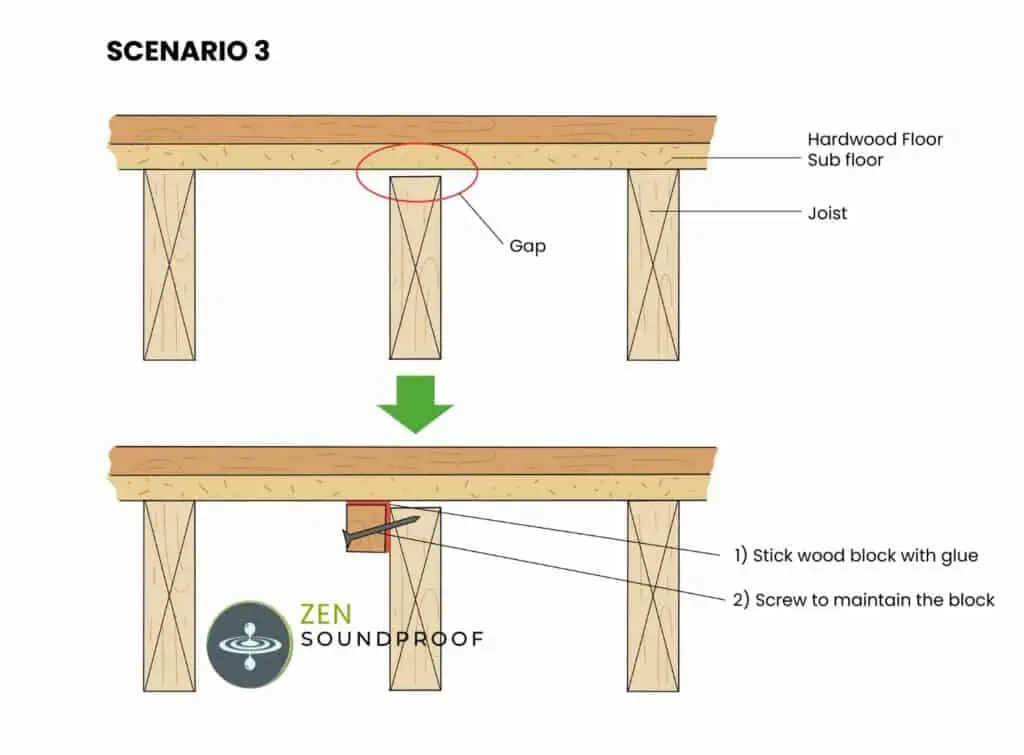
Of course, if this’ll involve pulling up flooring, it might not be that practical.
8. Soundproof Walls
This might sound counter-intuitive, but soundproofing the walls of the upstairs room can reduce overall sound transmission. Specifically, if you absorb some airborne sounds in the room, there won’t be as much sound energy to pass into the floor structure.
To understand more and for some relatively easy DIY tips, check out my article on how to soundproof existing walls.
Tips to Reduce Noise from Upstairs Floors for Tenants
As you can probably realize, renters are more limited in what they can do to reduce noise from upstairs. Not only will they not have access to the upper floor, it’s usually not possible for them to make permanent structural changes.
We therefore have to be a bit more creative with how we deal with noise from upstairs neighbors. Check out my tips below to see if any are practical for you.
1. Add Carpet or Floor Padding
This tip is suitable for both homeowners and renters. I included it here because it’s one of the few practical changes renters can apply (provided they have access to the upper floor).
Basically, you’ll want to add resilient materials under your rug. For example, you could add soundproof floor mats, rug pads, or even just an actual rug. These options can all help with impact noise and, to a lesser extent, airborne noise.
2. Talk to Your Neighbors
If possible, having a polite word with your neighbors can be a good first step. Consider asking them to:
- Keep it down at certain times of day
- Consider wearing slippers to reduce footstep noise
- Wear headphones when listening to music
- Use area rugs or furniture pads
Of course, you’ll need to be careful about how you raise the subject with them and avoid confrontation where possible. Also, I’d recommend this option before moving on to any options below, as it’ll help to have a record of any discussions.
2. Use White Noise
White noise can help mask or drown out airborne noise and a small amount of impact noise. It’s sound that’s played at all audible frequencies to help make other noises seem less distracting. While it won’t do as much as actual soundproofing, the calming sound is a viable option if you can’t do much else.
Check out my recommendations for the best white noise machines.
3. Speak to Your Building’s Management
If you live in a managed building, raising the issue with your landlord or manager is a practical next step. Again, make sure you’ve actually spoken to your neighbor first.
Begin by logging any noise-related issues. I recommend getting a sound meter or downloading an app. Log times, events, witnesses, etc. A good way to do this is by recording a video on your phone. It’ll allow you to keep a timestamped, first-hand account of the event happening.
Check your lease agreement to see if there are any clauses relating to noise. There usually will be, but they’re likely vague. Even so, they give you a good starting point for raising a complaint.
Then, contact your building manager. Ideally, you should do this by text or email because you’ll want a written log of the exchange. If your only option is to contact them by phone, record the call if you can, or send a message after recapping the conversation.
Explain the issue politely and give them all the evidence you’ve gathered. Refer to any clauses in your lease, and request that they do something about it. If this doesn’t work, you’ll want to try again. The next step would be to contact the police and your local Noise Enforcement Team, as explained below.
Bear in mind, though, your neighbor might not take too kindly to being complained about. Provided you’ve dealt with the issue properly, the law is on your side, but be prepared for things to be a bit awkward.
4. Check Your City’s Noise Ordinances
Your city or town should have noise ordinance regulations that state the acceptable levels of noise people can make. Anything outside of this can legally be classed as a nuisance and can be dealt with through the police or similar.
Start by Googling “noise ordinance” + your city. For example, if you search noise ordinance Denver, you get this page. It states that in Denver, it’s acceptable to make noises up to 50dB after 10pm. For context, that’s about the same as moderate rainfall.
Once you’ve got an idea of noise levels, you’ll need to gather some evidence. Follow the steps in the tip above, making sure you log:
- Noise levels, times, dates, etc.
- The names of people making the noise
- How it’s impacting your life
From there, you’ll want to contact your local police department to make a noise complaint. Try them a minimum of 3 times before moving on to the next step. They might have a specific Noise Enforcement Team (NET), so ask about that if you’re not getting anywhere.
For example, New York City has a noise complaints department. It has options for submitting a complaint online or via a dedicated phone number. It’s likely your area has a similar department, which you should be able to find by searching noise ordinances.
The next step is to contact the Health Department. They’ll take complaints pretty seriously and can deal out some harsh punishments.
Bear in mind, this is basically the nuclear option. It’s a last resort that should get some results, but will also damage any kind of relationship you might have with your neighbors.
What to Avoid When Dealing with Noisy Neighbors
Dealing with noisy neighbors can be incredibly frustrating – there’s no denying that. However, it’s vital that you don’t let this frustration get to you, as it can impact your legal (and moral) position.
When dealing with noisy neighbors, make sure you avoid:
- Retaliation by playing loud music or making more noise
- Confronting your neighbors in a hostile or rude way – they might not realize how loud they are
- Threatening to damage their property or anything else that could land you in trouble
- Calling the police without speaking to your neighbors first
The last point is essential. Speaking to your neighbors directly should always be the first step in dealing with a noise complaint.
It probably goes without saying, but dealing with the issue wrongly can lead to numerous issues:
- You could impact your legal position. After all, two wrongs don’t make a right!
- It could escalate the conflict and make the problem worse. Regardless of whether you’re able to resolve it later, it’ll make your life worse in the short-term.
- It could damage your relationship with the noisy neighbors and anyone else living in your building.
Unfortunately, dealing with noise-related issues can often be a long-term effort. If you can make structural changes to soundproof your property, you can reduce this timeline a bit. However, if you’re a renter, you might have to accept the lengthy process of the legal route.
Final Thoughts
Hopefully, you’ve now got some ideas on how to deal with noisy upstairs neighbors. If you can, I recommend introducing some soundproofing solutions to physically block the noise from coming through.
Of course, if that’s not possible, you could always mask the noise or speak to your neighbors about it.
Have you had to deal with noisy upstairs neighbors? How did you resolve the issue? Let me know in the comments section below.
References:
[1]: Glen Ballou, Handbook for Sound Engineer, 4th edition (Oxford: Focal Press), p.78 Figure 4-17
