There is nothing more annoying than trying to get some peace and quiet, only to get disturbed by loud noises from the next door neighbor.
This is when you wonder how to reduce noise through walls to drown out the noise. The ideal solution is to demolish the partition wall and add more soundproofing materials. However, this isn’t always possible as you might be:
- A renter, thus unable to remove the walls
- On a low budget
- Afraid of causing damage to the existing walls
- Not keen on dealing with all the mess and the work that’s involved in such projects
Whatever your reason, trying to soundproof walls without removing drywall can be a challenge. In this article, I’ll cover some options for how to reduce noise through walls.
But before we dig further into these methods, let’s take a closer look at sources of noise and the main soundproofing principles.
Determining the Source of Noise
Before you jump into any soundproofing project, take the time to think about the noise that’s bothering you in the first place.
To determine the type of sound traveling through the walls, place your hand on the exact spot where you hear the noise. If you feel a vibration, the noise is impact based. If there is no vibration, but you still hear the noise, it is airborne based.
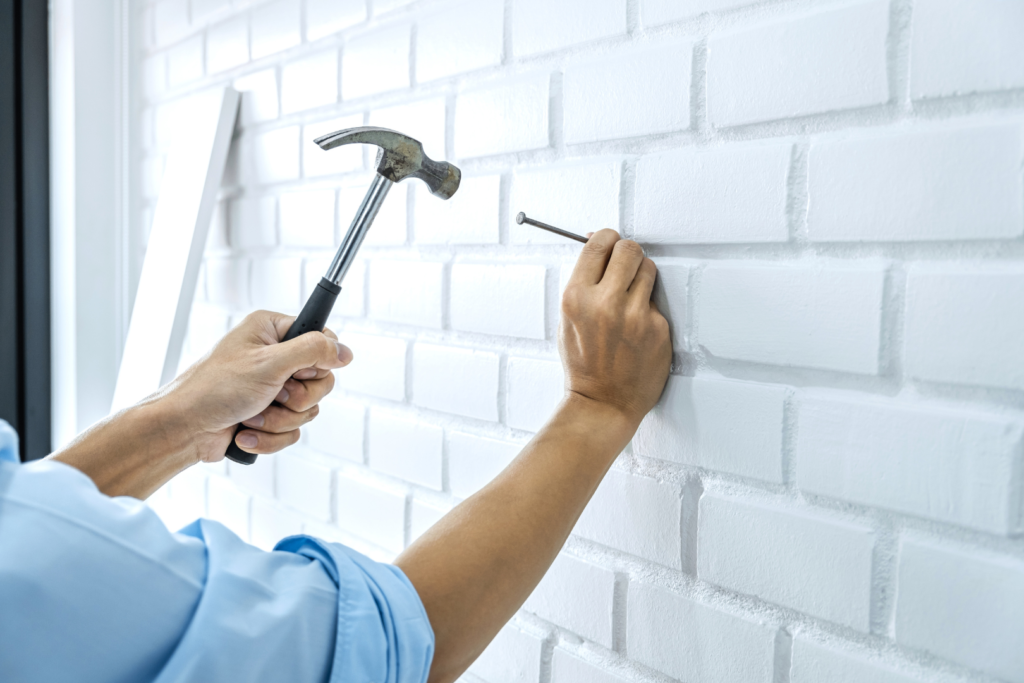
Some examples of impact noise include knocks on the door or banging on the wall. Airborne sound is when you can hear the next door neighbor’s TV, voice or music blaring through your walls.
Consider the Main Soundproofing Principles and Sound Transmission
The truth is, soundproofing isn’t as simple as some people may think. But by using the right materials and techniques, it’s possible to accomplish this task. It’s worth understanding a few key principles based on the physics of sound transmission, too.
Whether it’s for soundproofing walls, floors, or ceilings, the 4 following principles apply:
1. Decoupling
The first principle in reducing unwanted noise is decoupling. Sound is a vibration that travels, especially if it has a direct pathway, like a string between two metal cans. If you cut the string, you’ve decoupled the pathway, thus stopping the sound propagation.
In a wall, this can be done by adding decoupling materials. Even though decoupling reduces vibration transmission to some extent, it isn’t enough to completely stop the noise from propagating.
This is why we need to apply more soundproofing principles. Keep reading to learn more…
2. Absorption
Have you ever blown across the top of a bottle and heard a sound? This sound is actually the trapped air reverberating. A hollow wall traps air much like the bottle reverberating the trapped air. When the wall vibrates by the noise your next door neighbor makes, the air in the cavity also vibrates as a result.
Sound absorbing materials are usually used in wall cavities as much as in ceilings.
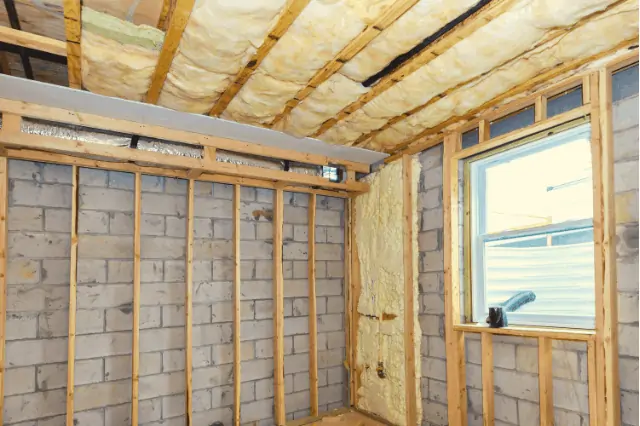
So even though the wall is decoupled, there is still the vibrating air in the wall cavity that will transmit some noise. To absorb this sound, you’ll need insulation materials like low-density cellulose… more about that later.
3. Sound Blocking
Any thick or heavy object you install on your wall is good for blocking noise. Adding mass is important in reducing noise, and one of the most inexpensive sources of mass is drywall. Using two layers will ensure your wall won’t vibrate.
4. Damping
Tap a glass with a fork, and you’ll hear a ringing sound. Now tap it with your finger; the ringing sound will stop right away. This is what’s known as the damping effect.
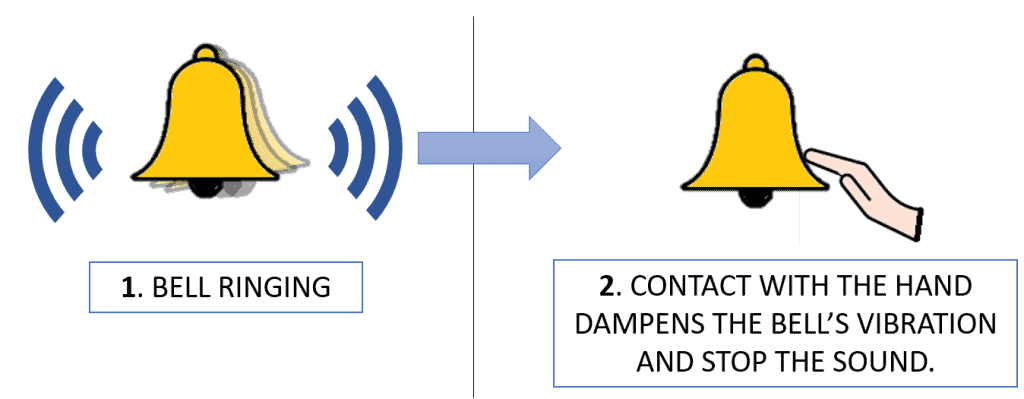
Waterborne damping compounds made of viscoelastic adhesive are effective soundproofing products. If you want to know more, scroll down the article and read about how to dampen sound waves propagating within a wall using a damping compound.
Which Principles to use?
While the four soundproofing principles I’ve talked about work independently, use all four for best results for reducing sound transmission effectively. For example, if you apply plenty of mass to your walls but don’t use damping, your soundproofing effort will be weak.
You’ll want to cover an entire wall to help reduce noise transmission. In a sense, noise control works much like heat control. You’ll hear noise coming through even the smallest gaps, so make sure you plug them with acoustical caulk (as I discuss below).
Here are several easy and inexpensive techniques you can use to soundproof your existing interior walls to reduce both impact and airborne sound.
9 Tips for Soundproofing Existing Walls
1. Fill the Gaps with Acoustical Sealant
Sound can escape through the smallest spaces. By sealing up the holes or cracks in the corners of the existing walls, it can make a big difference in reducing both impact and airborne noise.
I prefer using an acoustic caulk like Green Glue to fill the gaps.
This acoustical sealant makes walls more air-tight, and as a result, it’ll be more difficult for the soundwaves to travel through the walls.
When used in combination with the other soundproofing techniques we’re about to discuss, it will offer decent sound reduction.
2. Install Extra Drywall
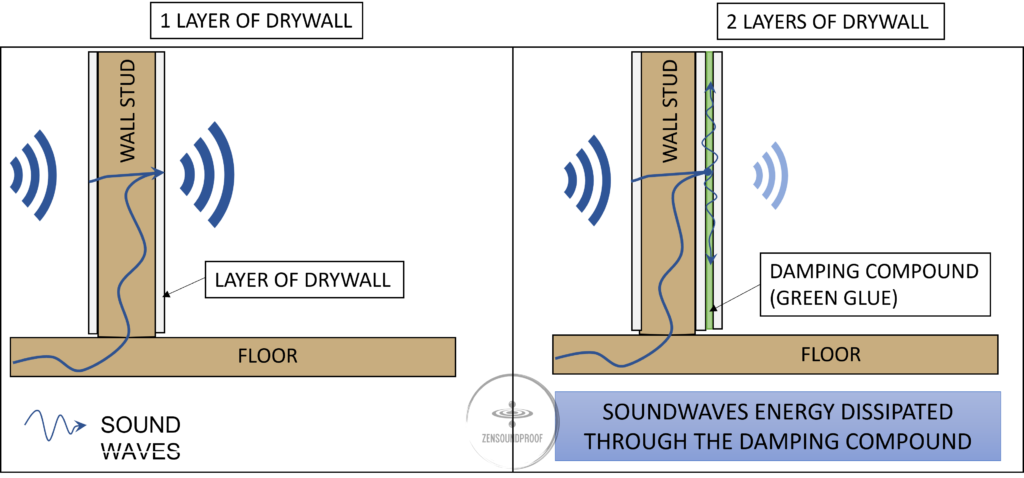
To apply the sound blocking principle to your existing walls, add extra drywall. A double layer of drywall will separate the main wall and allow sound to bounce off the new drywall before hitting the main wall.
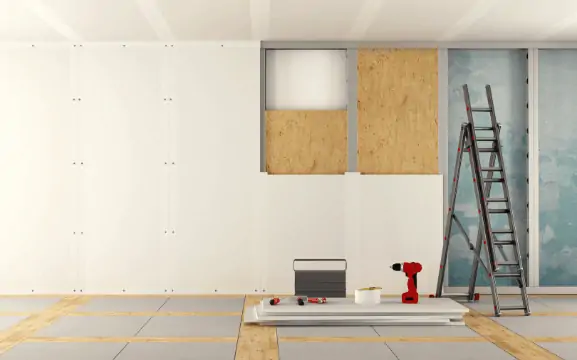
This sound-deadening method is very easy to apply. But before installing the double-layer drywall on the existing wall, I recommend that you apply a layer of noise soundproofing compound on top of the wall.
Despite its similar appearance to the above acoustic caulk, it differs in that it’s meant to be installed between 2 rigid layers, such as 2 layers of drywall. The compound dissipates the sound vibrations between the drywall layers. It’s very effective against low-frequency noise (like bass or construction noises).
After spraying the compound, secure the new drywall to the studs. Once you’ve installed the drywall, use an acoustic caulk to seal any gaps between the drywall panels.
You can even buy sheets of acoustic drywall, which have a higher sound transmission class. However, it’s generally worth installing your own product behind the drywall. This is because it gives you more control over the thickness and material you use.
3. Install Resilient Channels
Resilient channels focus on the soundproofing principle of decoupling. In short, you use metal channels and isolation clips to create a room within a room. You then add drywall to these channels as you would to the room’s original studs.
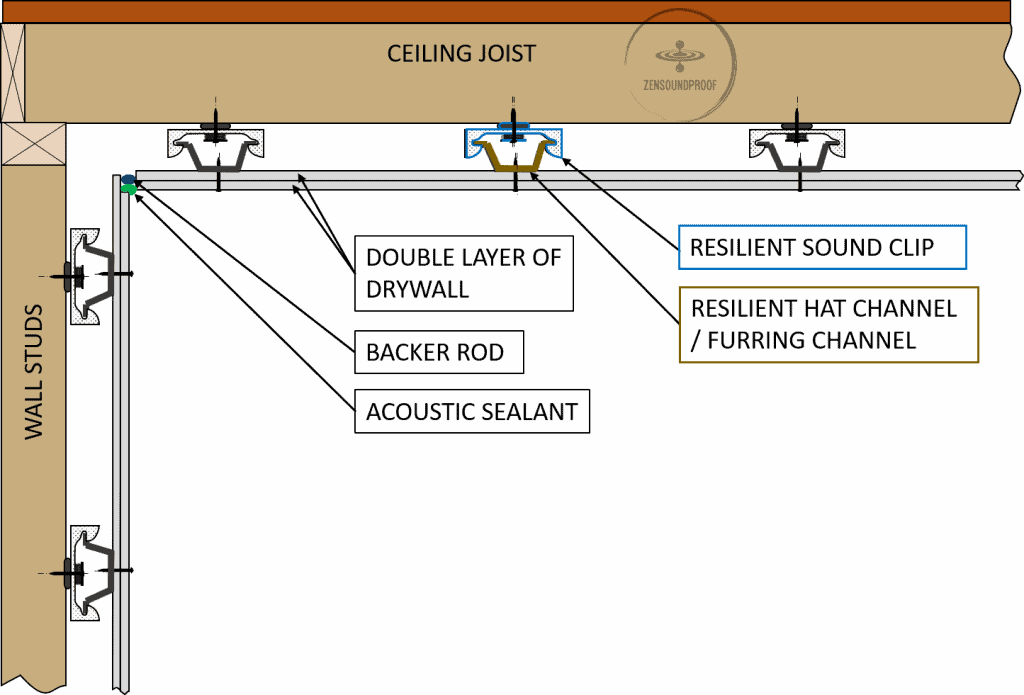
Essentially, this creates a gap between the walls and the surrounding structure, meaning it’s almost impossible for impact noises to travel through. The isolation clips have rubber feet that help dampen vibrations before they reach the structure.
For best results, it’s worth adding some insulation into the gap (discussed below). This helps cut down on airborne sounds passing through the structure. You should also seal gaps with Green Glue’s acoustic caulk.
It’s worth noting that, while this is one of the most effective options for soundproofing existing walls, it’s quite expensive. It also involves the most work, as you’ll need to take down the existing drywall to install the hardware. However, if you’re serious about soundproofing a room, it’s worth considering.
4. Apply Blown-in Insulation
Ok I admit; this soundproofing technique is more expensive and time-consuming than the other methods. But it does work well in reducing the amplitude of sound waves. The idea here is to use the sound absorption principle in your walls to deaden sound.

Blown-in insulation, as the name suggests, is a foam-like material that’s blown into the walls using a blower machine. This type of insulation is made of low-density cellulose and is loose in nature. It works by trapping the air pockets and reducing echoes created from airborne noise. Cellulose is a non-toxic sound-absorbing material that’s recycled and treated to make it fireproof.
Another common insulation material is fiberglass. Its advantage is that it dries immediately once blown into the walls.
It may be wiser to hire a professional insulation installer to do the task for you. But if you’re not keen on spending an extra $15 per square foot for labor charges, then watch the demo video below:
5. Hang Soundproof Blankets
Soundproof blankets are essentially heavy bits of material that help absorb sound waves and to some limited extent block noise. You can get actual soundproof blankets, although moving blankets are a decent alternative. Failing that, soundproof curtains will also help, but not to the same extent as heavy blankets.
While it’s not the most effective option, hanging soundproof blankets is less invasive and much easier than something like decoupling your walls. To hang them, you might need to install curtain rails, or you could use heavy duty adhesive hooks. Either way, it’ll help if the blankets you use have grommets.
Soundproof blankets function in a similar way to acoustic foam panels. By this, I mean they impact absorption rather than provide noise reduction. While you could place acoustic wall tiles around your room, blankets or curtains are less invasive.
Noise reduction is dependent on the weight of the blanket – the heavier the blanket, the greater the sound blocking. Most blankets are too light to actually block noise, but foamy enough to absorb sound waves and prevent them from bouncing off of walls. The heaviest blanket I found so far with decent noise reduction is the Audimute Isolé. It contains a thick sheet of rubber and the blanket weighs 20 lbs. It’s mainly meant for doors though.

I’ve got a full article on soundproof blankets, so check that out for all the information you could need about this option.
6. Opt for Mass Loaded Vinyl
Mass loaded vinyl, or MLV for short, is an extremely dense, but thin rubberlike material. It is commonly used for soundproofing applications. This flexible, environmentally-friendly vinyl material acts as an extra layer on your wall. It gives the wall extra mass to improve its sound blocking efficiency.
MLV will prevent both sound waves and vibrations from traveling through your walls.
How to install mass loaded vinyl? Hang your double layer drywall over the MLV vertically or horizontally. Seal the seams using the acoustical sealant before mudding the drywall seams and finishing the wall to your desired results.
7. Soundproof Paint
Soundproof paint is one of those products that sounds like it’s something of a scam. Surprisingly, this isn’t the case, so does soundproof paint reduce noise?
Soundproof paint can work in different ways. The first is by adding mass, which is what the one mentioned below does. The other is by deadening sound waves, similar to Green Glue compound. Some soundproof paints contain latex, which prevents sound waves from transmitting through the wall but also from bouncing around the room.
One brand of soundproof paint, Coat of Silence, actually has some numbers to back up its claim. Per coat, it showed at least a 2dB reduction in noise at frequencies of 2000Hz and above. It might not sound like loads, but this’ll be enough to make the sound of your neighbors less annoying (or reduce the amount of sound they hear from you!).
| Frequency range | Type of sound |
|---|---|
| ~ 2000 Hz | Chain saw |
| ~ 3000 Hz | Vacuum cleaner |
| ~ 3500 Hz | Whispering |
| ~ 4000 Hz | AirplanePolice car siren |
| ~ 5000 Hz | Birds chirping |
| Between 125 Hz and 8000 Hz | Speech spectrum |
When it comes to choosing soundproof paint, though, make sure you actually research the brand. Unlike something like MLV or acoustic foam tiles, there’s a bit more to noise-reducing paint because it’s less of a commercial market than the other products. By this, I mean that soundproof paints are far more specialist than something like acoustic treatment foam.
In short, make sure the company you’re researching has some numbers to back up its claims. Better yet, see if there are independent tests of the product. A company like Green Glue has numerous independent tests for its acoustic caulk, so you know it’ll actually work. Look for the same thing with your noise-reducing paint.
8. Rearrange Your Furniture
Rearranging your furniture can have a noticeable impact on the amount of noise that transfers through walls. Again, it won’t be as effective as decoupling or mass loaded vinyl, but it’s a cost-effective and quick solution.
You basically need to use your furniture as obstacles to block sound waves from making contact with walls. Work out which walls are most important – it’ll usually be interior walls, as these are thinner and are more worth soundproofing.
The best items of furniture are heavy and soft things, such as bookcases, sofas, and armchairs. As long as the furniture has decent mass or is mostly fabric, it should help.
By the same logic, consider putting a rug down on the floor if it’s a hard material. Carpet and rugs help dampen impact noises, meaning sound transfer through floors is less severe.
9. What if the Existing Wall is not Made of Drywall?
In older buildings, you’re less likely to find the existing wall made of drywall. While this is actually a good thing as the wall material tends to be heavier and more resistant to vibration sounds, it doesn’t mean it is completely soundproof.
Let’s look at how to soundproof walls that aren’t made of drywall:
Brick walls: bricks are dense materials that have a good sound blocking capability. But they lack sound absorption. To improve their sound-absorbing ability, install acoustic isolation tiles on the brick walls. These tiles are more powerful than the traditional acoustic panels, plus you can glue them to the wall without using any other tools.
Plaster walls: plaster is already a great sound stopper. But if your existing walls are made of plaster but don’t meet your soundproofing needs, consider making improvements to them. Follow these quick steps:
- Begin by sealing any gaps or holes in the plaster with Green Glue.
- Next, install MLV to the wall before adding a layer of drywall.
- To finish, apply mud to the drywall before priming and painting.
Clearing Misconceptions
Does Soundproof Wallpaper Reduce Noise?
Soundproof wallpaper doesn’t reduce noise, as that’s not what it’s designed for. It’s meant to manage acoustics in a room, meaning it controls echo and reverberation. So, while it can make acoustics sound better, it won’t soundproof a space. It has a typical NRC rating of 0.4, meaning it absorbs around 40% of noise.
Will Acoustic Tiles Soundproof My Wall?
Acoustic wall tiles won’t soundproof a wall because they’re designed to manage acoustics. Their open-celled structure traps sound waves, stopping them from bouncing around. In short, it means they work on echo and reverberation rather than reducing sound transfer.
You’ll see acoustic wall tiles in large open spaces (restaurants) or areas where sound needs to be perfect – movie theaters or recording studios. I recommend checking out my article about soundproofing vs. sound absorption to understand the topic in more detail.
Summary
The above mentioned techniques are some effective ways to soundproof your existing walls as a DIY project. These budget-friendly soundproofing methods work on eliminating both impact and airborne sounds. But to achieve the best result, I recommend using a combination of these techniques for utmost success.
I hope these few tips will help you sleep better at night or make peace with your neighbor.
Peace & Zen-Up!


1 thought on “9 DIY Ways of Soundproofing Existing Walls: Reduce Noise through Walls”
Great article. Really enjoyed reading it. I found this particular article very useful. Thank you!