Noise pollution in a basement can be a nuisance, but so can spending lots of money to fix it. I thought this, and so researched the cheapest way to soundproof a basement ceiling.
In this article, I’ll cover cheap ways to soundproof a basement ceiling. Many of these solutions use inexpensive or widely available materials to help keep the cost down.
But first, it’s worth covering some of the science about noise pollution to better understand these solutions.
The 2 Types of Noise Pollution
The most obvious starting point is with the 2 main types of noise pollution. You’ll encounter both in a basement, particularly as a house’s first floor is usually its busiest.
The 2 types of noise pollution are:
- Impact noise
- Airborne noise
All sounds will fit into either of these categories. Knowing how to classify them will help you to understand which solutions are most useful.
Impact Noise
Impact noise occurs when an object makes contact with a structure. This results in mechanical energy transmitting into the structure as vibrations. These then exit the other side as sound waves.
Common examples of impact noises include:
- Footsteps
- Dropping things on the floor
- Moving furniture
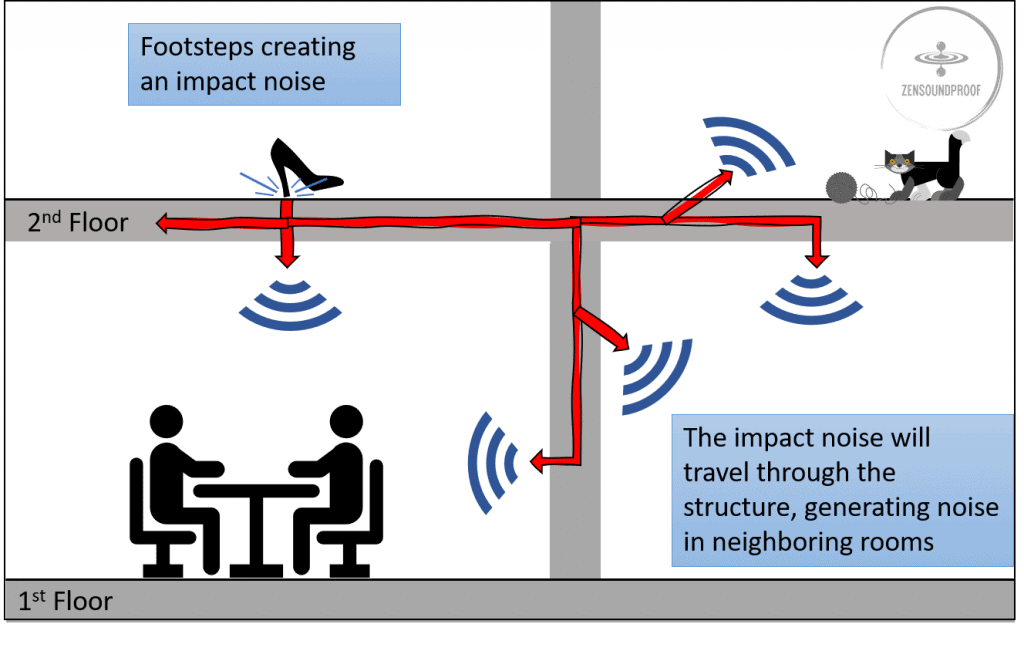
Impact noises will be a common issue in basements, as the basement ceiling is the first floor of the building. This is usually the highest traffic area.
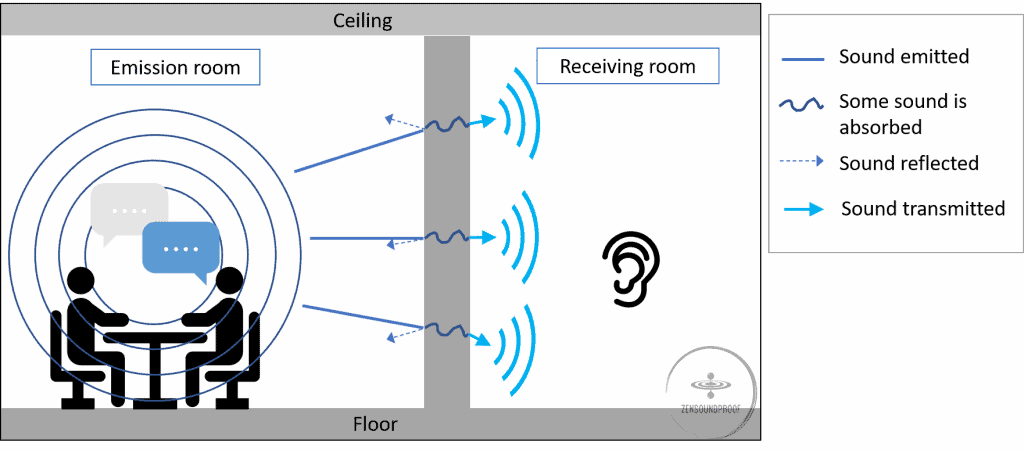
Airborne Noise
Airborne noise is self-explanatory: sound waves leave the source and vibrate through the air. When the waves make contact with a structure, a portion of its energy passes through. Another portion of airborne sound waves get reflected and the last portion is absorbed.
Common examples include:
- TVs and stereos
- Voices talking
- Dogs barking
Airborne sounds are easier to block in the sense that it’s easier to add additional layers to the structure than it is to modify it. To block impact noises, you need to make structural changes that disrupt or change the sound waves’ path.
On the other hand, airborne noises can contain lower frequencies, which are much harder to block. Something like thunder or an airplane passing overhead will be more of a challenge than footsteps on the floor above, for example.
Rating Soundproofing Materials
To understand how effective a material is at soundproofing, it’s assigned one of several ratings. To get a soundproof basement ceiling, we’re mainly concerned with IIC and STC.
Impact Insulation Class (IIC)
IIC is a measurement used to determine how effective a material is at isolating and blocking impact noises. The higher a material’s IIC rating, the better it is at blocking impact noises.
As I discuss in my post about floor underlays, each material in the floor assembly has its own IIC rating. Therefore, it’s useful to consider all materials when determining how effective a structure is against impact noises.
Sound Transmission Class (STC)
STC is the airborne noise equivalent of IIC. It determines how well a material can block and isolate airborne sounds.
While IIC is usually applied to floor assembly materials, STC is applied to other construction materials, such as drywall.
For effective soundproofing of a basement ceiling, you ideally want to consider both ratings. Importantly, they each target a different kind of noise pollution, meaning you’ll have better soundproofing if you use both.
What Type of Basement Ceiling
Considering this project will involve DIY, it’s worth understanding more about your basement ceiling before going any further.
Knowing what type of ceiling you have is useful in knowing what (and how) each kind of noise pollution enters your basement. Also, the solutions you employ will depend on your starting point.
Here’s a brief summary of the most common types of basement ceiling.
Finished Ceiling
A finished basement ceiling will usually consist of drywall sheets fixed to the joists of the floor above. It may or may not have insulation in the cavity too.
This type of ceiling might limit your options slightly unless you’re willing to remove the original drywall and add soundproofing materials. Of course, this’ll drive up the overall cost.
Exposed Joists
Also known as an open ceiling, this type exposes the joists of the floor above, along with the bottom of the floor covering. You’ll likely find sound transfer is particularly high through this kind of structure.
Open ceilings give you plenty of soundproofing potential because you almost have a blank slate to work with. You can add materials with minimal preparation, which helps to keep costs down.
Dropped Ceiling
Dropped ceilings (also called suspended ceilings) are a popular choice in basements. They consist of lightweight tiles fixed to a grid that’s hung from the floor joists above.
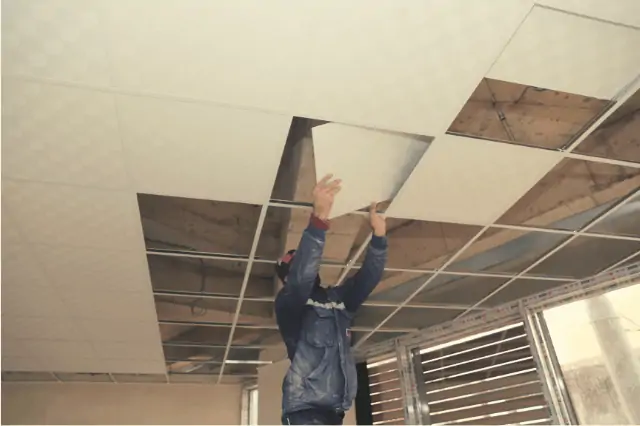
Importantly, this gives you quite a large cavity to work with and the basics of a decoupled ceiling. While noise transfer might initially be quite high, you can soundproof a dropped ceiling quite effectively.
While there may be some variation in the materials used (for example, tin or wood finished ceilings), these are the main types. Take some time to inspect your current ceiling and determine its type. This’ll help you define the cheapest ways to soundproof a basement ceiling.
6 Ways to Soundproof a Basement Ceiling
Now that we understand the types of noise pollution and basement ceilings, we can move on to the most effective solutions.
Bear in mind, though, these solutions use accessible or inexpensive materials. But for best results, you might want to try several together, although this might drive up the project’s cost.
Here are my preferred methods for how to soundproof a ceiling cheap that consider both impact and airborne noises.
1. Block cracks and gaps
Much like heat energy, sound waves can escape through even the smallest gaps in a structure. To put it another way: any crack that lets in air has the potential to let in sound.
For a soundproof basement ceiling, the very first step should be to seal any cracks and gaps.
You’ll want to do this before you try anything else.
The best product for this job is an acoustic caulk, such as Green Glue (which you can check out here).
Green Glue is a viscoelastic compound, which means it never fully sets hard. This helps to dampen sound waves and is particularly useful for blocking up gaps.
You can check out this video for tips on how to apply Green Glue to small cracks.
Again, do this before going any further because if you leave gaps in the basement’s ceiling then your other solutions won’t be as effective.
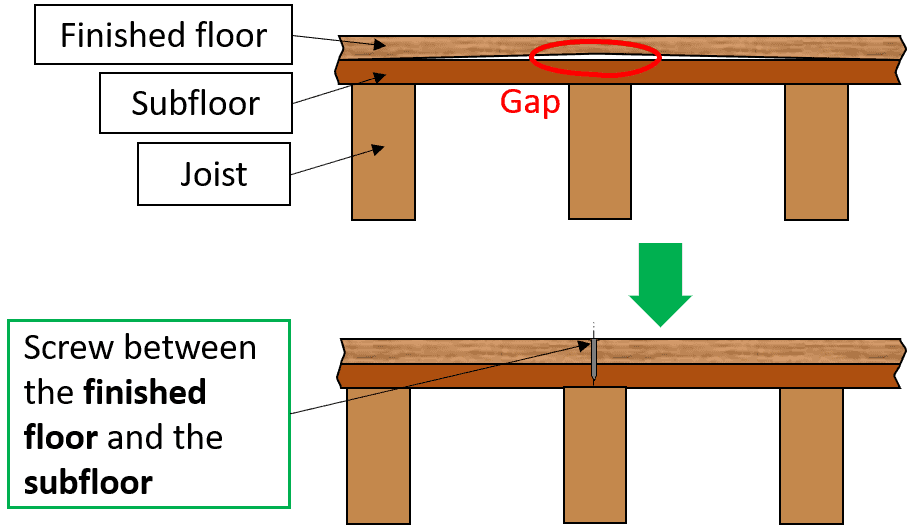
2. Fix squeaky floorboards
Much like the solution above, this one works based on cutting off noises at their source and dealing with minor DIY issues. Fixing squeaky floorboards before applying soundproofing solutions is a good idea and is a form of soundproofing in itself.
There are a couple of options for fixing a squeaky floorboard:
Use talc
Locate the squeaky board and apply talc (baby powder). If you want an effective solution, use a spray talc bottle for easy application. Of course, this solution is temporary because the talc will wear away with repeated movement.
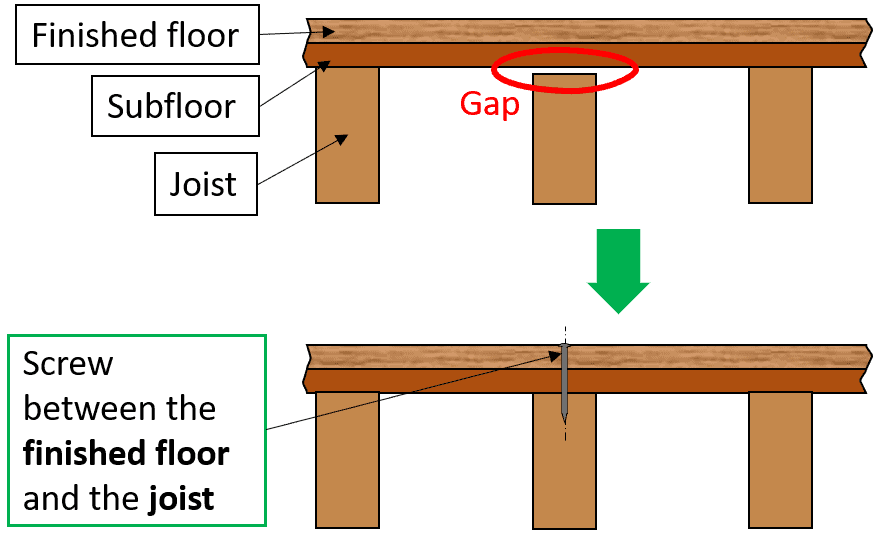
Screw the board down
Again, find the problem board, detect the joist line, and screw the board back down. Be sure to use either flathead screws or ones with a removable head so they don’t stick out of the finished floor. Removeable head screws when driven through the floor will snap 1/4 inch below the surface of the floor. For more information, check out here. It will ensure no part of the screw is sticking out of the floor. Make sure to fill the hole with a wood filler like this.
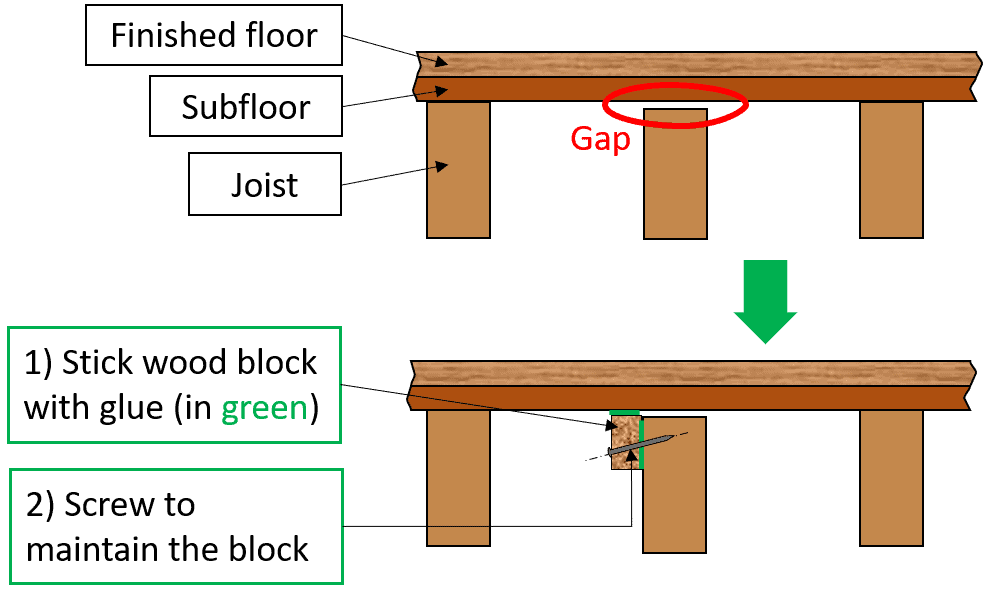
Use a wood block
This option is only possible if you have access to the joists in the basement ceiling, such as in the exposed ceiling mentioned above. Glue the block to the subfloor and joist under the squeaking board.
The block helps to fill the gap beneath the board, which prevents it from bending. You can screw the block to the board while the glue dries to hold it in place.
3. Lay thick rugs on the floor above
One of the most effective ways to deal with impact noise is to reduce it at the source. To do this, lay rugs on the floor above.
Alternatively, carpet the floor above, but this obviously costs a bit more money.
You can further improve this solution by putting some acoustic floor underlay beneath the rug or carpet, such as this one.
Not only will this add further sound damping but it’ll also act as a non-slip mat for the rug. This is useful if you’re laying it on varnished hardwood floors or laminate. You can check out more about how soundproofing underlayments work here.

Opt for the thickest and fluffiest rug you can find. Shag rugs are particularly effective because they have plenty of volume and are quite soft.
This is one of the best options to soundproof a basement ceiling without drywall and is also one of the least invasive.
4. Add acoustic insulation to the ceiling cavity
On its own, acoustic insulation or acoustic foam is the least effective of the soundproofing methods (i.e sound absorption). It’s generally used in wall and ceiling cavities to absorb and reduce sound intensity to limit airborne sounds passing through.
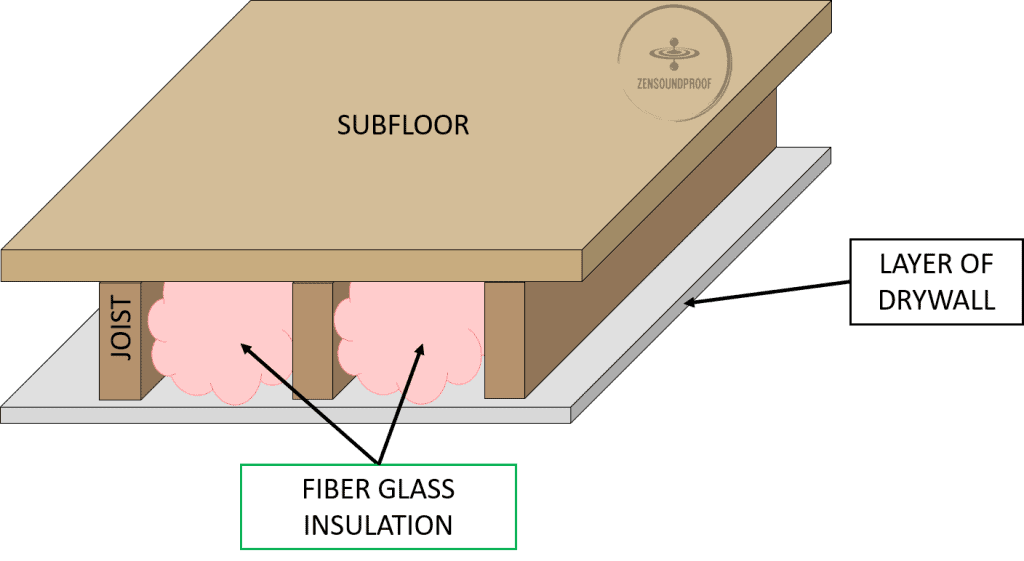
In short, soundproof insulation in the ceiling cavity will help to reduce airborne noises. But it won’t do much for impact noises.
I recommend using this option alongside others as a supplement, rather than a solution on its own.
There are various products you can use, but the ones below all have excellent NRC ratings. Noise reduction coefficient (NRC) is a rating of how well a material absorbs sound waves.
My top recommendations are:
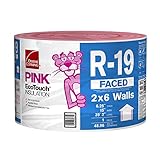
- Fiberglass insulation roll (such as this one)
- Spray foam insulation (you can find it here)
- Mineral wool insulation (such as Roxul)
You can use insulation on open ceilings and dropped ceilings. To insulate a finished ceiling, you’d need to remove the drywall, insulate the cavity, and replace the drywall again.
You can use blown-in insulation for existing walls, but this option is a bit more expensive. As I discuss in my post on soundproofing existing walls, you have to buy materials and pay labor costs, which can add up.
I recommend using insulation 3” thick if possible, and ensure it’s not tightly packed into the cavity. Mineral wool is the most effective and also offers excellent fire resistance.


5. Add another layer of drywall
While drywall on its own has quite a poor STC rating (around 38), it’s an effective base for other, more effective materials.
Also, drywall is very cheap and widely available, making it a good starting point for cheaply soundproofing a basement ceiling.
The option, I would recommend is the use of Green Glue Damping compound.
It’s very effective to increase the STC up to around 49. The addition of a damping compound is very effective agains low frequency sounds (bass noises). The Green Glue damping compound should not to be confused with the acoustic sealant. This compound is effective when used in between two stiff layers for sound damping effect.
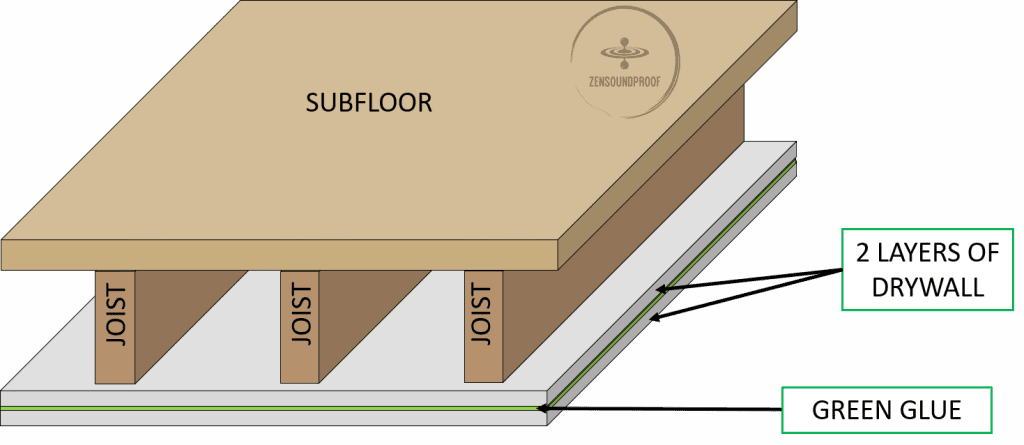
When used in this capacity, Green Glue recommends 2 tubes per 4 x 8’ sheet of drywall. You just have to squeeze it liberally over the sheet, give it 15 minutes to begin curing, and then fix the drywall in place.

6. Rearrange furniture in the room above
While this option isn’t the most effective for soundproofing a basement ceiling, it’s completely free. Therefore, it can be a useful quick-fix option before you start spending money.
This solution works for a couple of reasons:
- Heavy or soft furniture can help to absorb noise in the room above.
- Placing furniture in high-traffic areas can help to reduce footfall, thus reducing impact noise.
Find the areas that have the most noise pollution and put the furniture there. Things like sofas, chairs, bookcases and cabinets are most useful for this.
Of course, ensure your furniture placement is practical and that it can stay there permanently.
More Expensive Solutions for a Soundproof Basement Ceiling
The solutions listed above are all based on commonly available or inexpensive materials. While these will offer some reduction in noise transfer, they won’t be as effective at dedicated soundproofing materials and solutions.
Below are my top 2 picks for more expensive, and more effective, soundproofing solutions.
You can find out more information about these types of methods in my How to Soundproof a Ceiling guide.
1. Add mass loaded vinyl to the ceiling
Mass loaded vinyl (MLV) is an effective soundproofing product. As the name implies, it adds mass, which makes a structure more difficult to vibrate. It also adds damping because it’s limp mass (more on that below).
It comes in various weights, but I recommend using the heaviest possible, such as this 2lb per square foot roll.
If you have an exposed ceiling, staple the MLV to the joists and cover it with drywall. MLV is a very heavy material. So, make sure to multiply the holding points to ensure it’s well maintained.
I highly recommend installing MLV on the joists, as it will allow the MLV to have some freedom between joists. This slack is important because of its “limpness”, it dampens energy from incoming sound waves. Moreover facing it into the cavity looks better.
But if your ceiling is already finished with drywall, you can fix the MLV directly to this. You’ll lose the limp effect, but you’ll still add mass, so it’s not half bad. Of course, if you want it to look better, simply fix another layer of drywall over the top. If you’re really on a budget
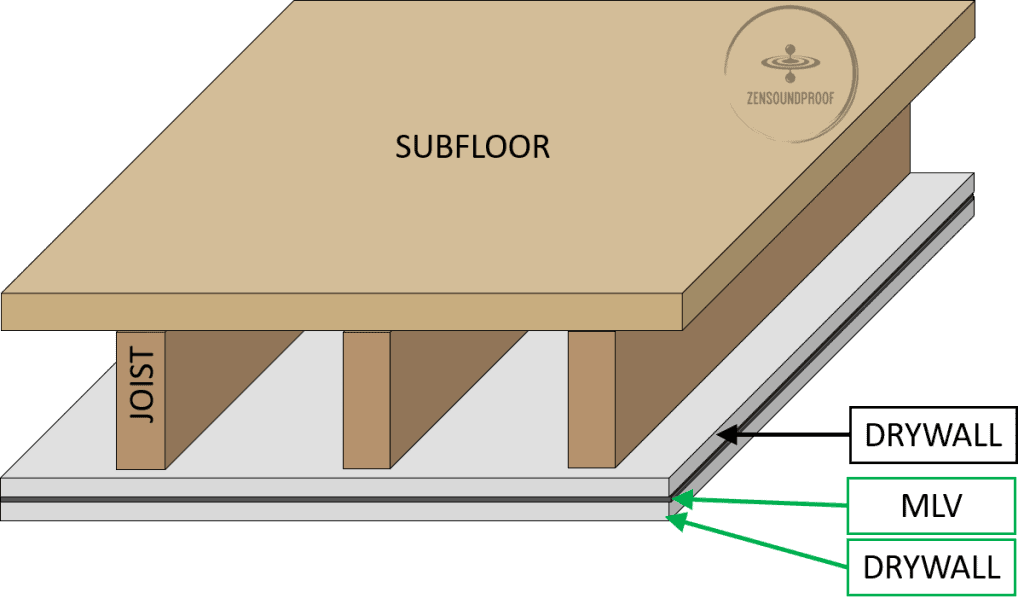
MLV can get quite expensive, particularly if your basement ceiling is quite big. However, it’s a very effective option for reducing airborne noise using mass.
For example, to cover a ceiling that’s 270 square feet, plan a budget of around $450 for a 1lb density. Expect to pay twice more if you opt out for 2lb density.
Its advantage over “household” heavy materials is that it’s thin yet dense, meaning it’s easy to add to ceilings and walls. If you want good results, it’s one of my most highly-recommended products.

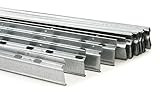
2. Use resilient clips and hat channels
Resilient clips and hat channels offer the benefits of decoupling without the extensive construction or modification needed.
Resilient clips (such as these) screw into the ceiling joists, and you then clip hat or furring channels into these. I’ve covered hat channels and their STC performance in this post.
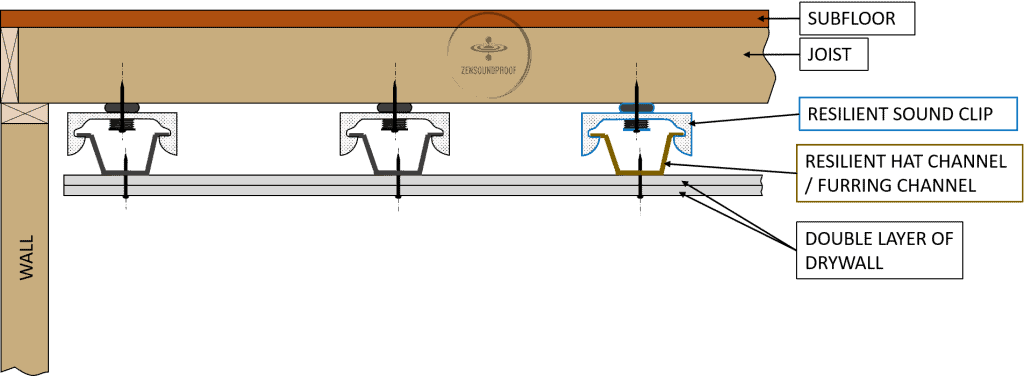
You can also save some money by using resilient channels like this, instead of hat channels. This way you won’t need resilient clips. Soundproofing-wise, this is a bit less effective but remains an excellent sound decoupling method.
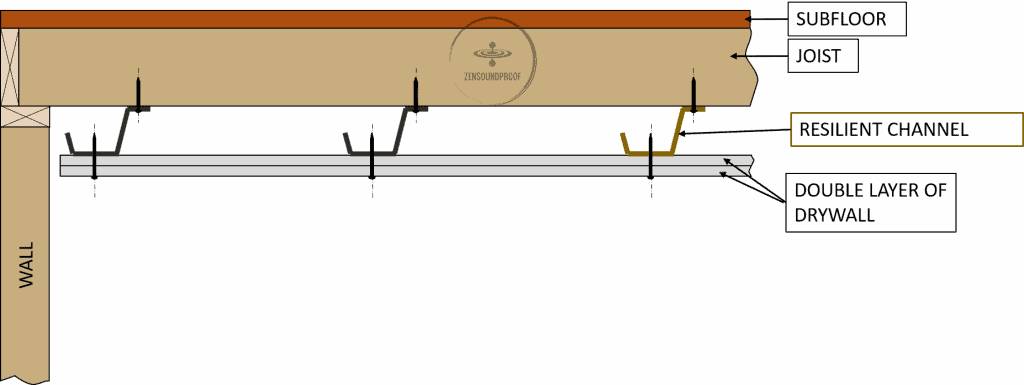
I discuss the steps for decoupling in my post about soundproofing ceilings. While it’s not difficult, it can be time consuming if you have a large basement ceiling.
Also, bear in mind that the costs for this option can stack up due to the materials involved. Use this calculator to determine how much of each product you need to work out the total cost.
Hat channels, for example, will set you back around $190 for 270 square foot. For the same surface, if you decide to add resilient clips, count around $300 more.
Although it’s definitely not the cheapest method for soundproofing a ceiling, decoupling is one of the most effective against both airborne and impact noise.


Summary
I hope this guide has given you some effective options for the cheapest ways to soundproof your basement ceiling.
My top recommendation is to add MLV because it’s specifically designed to block sounds. Combine this with filling cracks and adding insulation, and you’ll have an effective (and inexpensive) setup.
Of course, if you’re willing to spend a bit more money, there are other options available. As I discuss in my article on soundproofing ceilings, you can soundproof the floor above for better results.
Do you have any other helpful tips for cheap soundproofing? Let me know in the comments below.

3 thoughts on “6 Steps | The Cheapest Way to Soundproof a Basement Ceiling”
what about using 2″ insulation foam board? Would it work using those to decouple the 5/8 drywall? or are you not decoupling becuase youre still attaching the same screw to the ceiling joist?
Thanks!
Hi Chris,
What you mentioned about the screws is correct. You’ll likely lose the decoupling effect if they go through the drywall and joists. Even if the insulation foam board is sandwiched between drywall and joists, it won’t help much.
Hope my answer helps,
Hello,
I have a finished basement ceiling (drywall). If I use the MLV and place another drywall layer would I also be able to use green glue to make it even more sound proof?. My main issue is hearing loud noises, footsteps, and barking dogs from the main floor level.