Soundproofing a closet is useful if you have a large space you want to use for another purpose. For example, a walk-in closet can be converted into a practice or singing space, or simply used as a dressing room.
Regardless of what loud thing you plan to do in your closet, adding some soundproofing materials can stop noise from annoying others.
So, in this article, I cover how to soundproof a closet. While these tips are relevant for pretty much any space, materials and costs are catered to smaller rooms like closets.
If you’re looking for instructions on how to make a soundproof closet into a recording studio, check out my other article.
Airborne vs. Structure-Borne Noise
The first thing to cover is the type of noise we’ll be dealing with. This’ll help us determine what kind of soundproofing solutions we need to use and understand where noise is coming from or passing through.
When soundproofing a closet, we’ll be dealing with airborne sound and structure-borne sound. These are defined as follows:
- Airborne noise is sound that travels from the source through the air to your ears. Examples include singing, playing an instrument, using a hairdryer, etc.
- Structure-borne noise is sound that passes from the source into a structure as vibrations, such as a wall or floor, before being heard. An example in this context would be someone playing the drums.
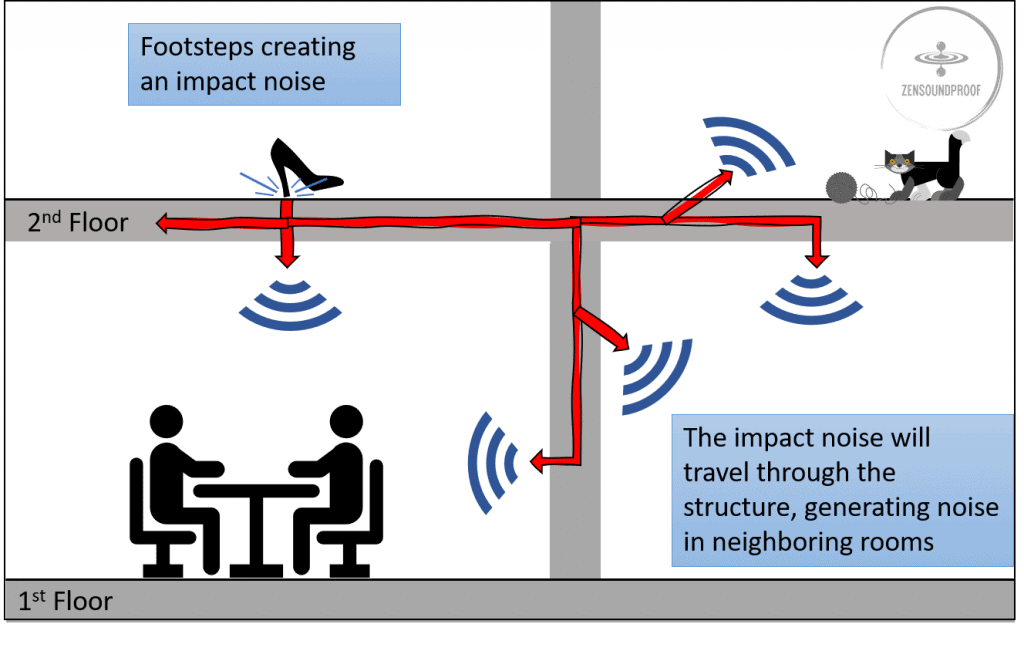
Generally, airborne noise will be the most common when we soundproof walk-in closet. An exception would be playing percussion instruments, like drums, as vibrations would pass from the kit into the floor, which can then be heard in other rooms. The same is true for something like footsteps, but this is generally less of a problem.
Measuring Noise
To measure airborne and structure-borne sounds, we use 2 different metrics. These are STC (sound transmission class) and IIC (impact insulation class). I won’t be using these here because they require fairly complex calculations and only become relevant when jumping into intricate soundproofing projects.
If you’d like to know more about these metrics, check out my article on soundproof underlays.
Soundproofing Principles to Consider
Soundproofing can be broken down into 4 principles, which define the materials we use and what they do. In some regards, we’ll use all of them to soundproof a closet, although in different amounts.
The 4 principles of soundproofing are:
Mass
Also referred to as blocking, mass is a pretty simple principle. You add mass to stop a structure from vibrating as easily. Sound waves are essentially vibrations, so something with more mass won’t transmit sound waves as easily.
Damping
Damping (sometimes called sound dampening) is the process of reducing vibration within a structure. For this, we use viscoelastic materials. In short, these prevent vibrations from passing through them because they deform but don’t transmit vibrations. A popular product for this job is Green Glue damping compound.
Decoupling
Also called mechanical isolation, decoupling is the process of separating 2 sides of a structure, or an object from a structure. In this context, an example would be putting a soft material under a drum kit. Doing so prevents vibrations from passing into the floor.
Absorption
Absorption is essentially the reduction of cavity resonance. It’s probably the soundproofing principle most people are familiar with. Absorptive materials stop echo and reverb around a space. While this doesn’t really reduce sound transmission outside of the space, it makes sounds much “cleaner”. It’s a necessary principle in spaces like recording studios as a result.
5 Ways How to Soundproof a Closet
We’ll use these principles below when discussing how to soundproof a closet. It’s worth mentioning that this won’t be the same as building a recording studio, though. A recording studio requires specific wall treatments and is a much more complex and expensive job.
Instead, these tips focus on preventing noise transmission from inside the closet to outside, such as if you’re using a loud item in a closet.
1. Carpet and Underlay
If you don’t already have some, consider laying thick carpet and soundproof underlay. Both will pretty much eliminate structure-borne noise through damping and minor decoupling. But they’ll also help with absorption, as the soft surface of the carpet prevents reverb.
Aim for the thickest carpet you can, especially if structure-borne noise is a concern. Also, check out my article on soundproof underlays, as these can make a massive difference to even thin carpets.
If you don’t want to carpet the whole closet floor, or just need to focus on a specific area, use EVA foam mats. They’re ideal for decoupling something like a drum kit and are much cheaper than a whole room’s worth of carpet.

2. Add Mass to the Closet Walls
This title is intentionally vague because there are numerous ways to add mass to walls. If you have a decent budget, mass loaded vinyl is a great option. It’s specifically designed for soundproofing and adds lots of mass without taking up too much room. However, it’s expensive.
A cheaper but less effective option is to add another layer of drywall. On its own, drywall isn’t great, but you can get specialist products that include soundproofing materials.
It also allows you to add some Green Glue for damping between layers. You can use it with drywall, MDF, plywood, or whatever material you choose for adding extra mass.
3. Make Use of Clothes
If you’re soundproofing a closet, chances are there are clothes in it. Clothes can be a surprisingly budget-friendly soundproofing solution because they contribute to the principles of mass and absorption.
For example, an average t-shirt can weigh between 4 and 7oz. Stack a closet full of t-shirts and you’ve got plenty of extra pounds of weight. It won’t block sound as much as, say, a layer of drywall because piles of clothing won’t be as air-tight as a solid layer of construction.

Also, clothes are great for absorption because they’re soft and have a decent surface area. These factors mean sound waves can’t really reflect off the surface of clothing, leading to absorption. So, if you want to prevent sound from escaping your closet, simply use it for its intended purpose!
Similarly, you can use other soft furnishings you have lying around. Heavy blankets, cushions, thick fabrics and duvets can all help with reducing reverb in a closet.
4. Acoustic Foam Panels
Acoustic foam is arguably the product for sound absorption. It’s the stuff you’ll see in a recording studio because its open-celled structure and large surface area prevent sound waves from reflecting off it.
As mentioned, absorption doesn’t really contribute to sound transmission reduction because absorptive materials are generally porous or lightweight in nature. Instead, absorption is intended to make sounds cleaner within a space. However, it does help with sound transmission a bit, as sound waves can’t transmit through a surface if they’ve already been absorbed.
Acoustic foam panels aren’t too expensive, but you don’t need to go overboard with them. You’ll generally only need to address first reflection points. Simply put, these are the first points on a wall where sound waves will reflect. Putting an absorptive material like acoustic panels here will have the most significant impact on reverb.
Similarly, you might want to consider installing bass traps (such as these). Bass traps are the same material but typically go in the corners of rooms. Unsurprisingly, they help prevent the reverb of bass and low frequency sounds, which can pass through walls more easily than higher-frequency sound waves.

5. Seal Gaps
Although this tip won’t make a massive difference, it’s important not to overlook small air gaps. Like heat and air, sounds can pass through even the tiniest gaps, such as around doors or through cracks or AC vents.
I’ll address doors specifically below, but seal any gaps you notice with acoustic caulk. It’s a viscoelastic compound that doesn’t fully cure, meaning it dampens sound waves and prevents them from passing through gaps.
As for things like AC vents, these are a bit more difficult to work with. I’ve got a full article on soundproofing AC vents, so check that out for some specific tips.
How to Soundproof a Closet Door
Closet doors will be the weakest point when it comes to sound transmission. Internal doors are typically hollow and very light, meaning sounds can pass through them easily. As such, consider the following tips to soundproof a closet door.
1. Change the Door
The most obvious solution is to replace the hollow door with a solid one. These are heavy (and expensive), but are the most effective solution to reducing sound transmission. Of course, you need to be pretty serious about your soundproofing project to justify the cost, as heavy doors (for sound blocking) are quite costly.
2. Seal More Gaps
It’s common for doors to have gaps around them. Sealing these will reduce the transmission of airborne noise a surprising amount. Luckily, it’s not an expensive or difficult job.
The 2 main products you’ll need are a solid door sweep and weather stripping.
The door sweep goes on the bottom and plugs the gap. You can also get soft ones (such as this), which work better on carpet. I have a dedicated article on how to pick a soundproofing door sweep here.

Weather stripping (such as this) is essentially foam that reduces the gap between the door and the frame. It’s usually self-adhesive, making it a breeze to install.

3. Hang a Blanket
Hanging a blanket over the door can help with absorption and, to a certain extent, sound blocking. The heavier the blanket, the more mass it adds to the door. It’s easiest to install a curtain rod over the door so you can either hang the blanket or draw it back when you need to.
While you can buy a noise blocking curtain, these add nowhere near enough mass for a closet soundproofing project. Instead, you’ll want to use something like an acoustic blanket or moving blanket, depending on your budget and installation method.
Check out my article on soundproof blankets for doors to get some inspiration for the kinds of products you should use.
4. Consider Other Options
The solutions above will be the most effective. Luckily, though, I’ve got a complete article on soundproofing doors. I recommend looking at that for some more options if none of the above is practical for your space.
How Much Does It Cost to Soundproof a Closet?
Soundproofing is never a cheap project, especially if you start using dedicated soundproofing material. Take mass loaded vinyl, for example. This is one of the most expensive materials and can cost a few hundred dollars for around 100 sq. ft.
Even if you’re on a tight budget, you can expect to spend a few hundred dollars for some effective solutions. The most expensive tip above is adding mass to your closet, as this could involve mass loaded vinyl or drywall. The least expensive is using clothes or soft furnishings, as it works under the assumption you already have these.
Based on the standard size of a walk-in closet (100 sq. ft.), a rough price estimation for a closet soundproofing project is:
- Mass loaded vinyl: ~ $200 – $300
- Acoustic foam: ~$50
- Weather stripping and door seal: ~ $35
- Acoustic caulk: ~$20 – $30
- A professional sound-absorbing blanket: ~$80
As you can see, even for some relatively basic materials, you’re looking at around $500 for an average size walk-in closet. If you were to go for something specialist like a recording booth, expect to spend a lot more money when you start adding in recording equipment and a microphone isolation shield.
Can You Soundproof on a Budget?
It’s entirely possible to soundproof on a budget. For example, EVA foam mats are good for decoupling on a floor and are fairly inexpensive.
There are plenty of other options for soundproofing a room cheaply. In fact, I’ve got a full article on reducing echo in a room. It involves things like soft furnishings, extra furniture, and so on.
What you need to realize, though, is that soundproofing is more expensive than sound conditioning (or acoustic treatment). The former is reducing sound transmission exiting the closet, whereas the latter is improving sound quality within the closet.
Figure out which you need and budget accordingly. Unfortunately, a soundproofing project of any quality is going to cost a bit of money if you want good results.
Final Thoughts
I hope this guide has given you some inspiration for soundproofing a closet. Generally, it’s not a difficult job, but the costs can start adding up if you use dedicated materials.
Do you have any other tips for how to soundproof a closet? If so, let me know in the comments below.
