A friend of mine recently moved into a shared apartment and immediately had a problem with how noisy their housemate is. One major issue they noticed is that, despite their walls being fairly thick, a lot of sound came through their bedroom door.
Because they know I run this website, they asked me, why are most interior doors so bad at letting sound through, and how do I fix it?
I realized this information would be helpful for others suffering from the same problem. So, I got down to my research and came up with this ultimate guide on how to soundproof a door.
For the most part, I’ll focus on hollow core doors in interior spaces. Bear in mind, though, that many of these solutions can be applied to exterior doors too.
How Does Sound Pass Through an Interior Door?
Before we discuss the different types of interior doors we might be working with, let’s first recap how sound works.
Sound waves consist of vibrational energy. They travel through a medium – whether this is air, water, or solid objects – by making molecules vibrate. This process passes on their energy but also expends some. Losing energy means sound waves can’t travel forever.
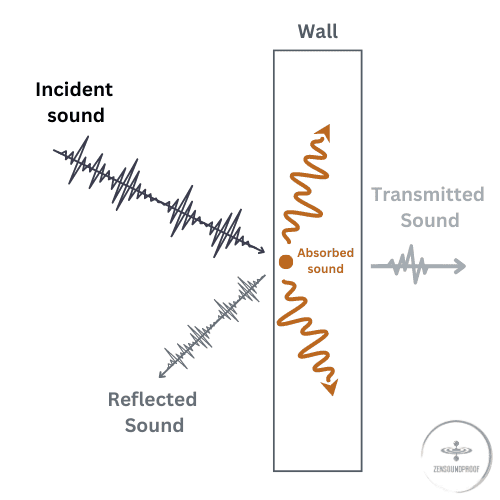
The denser the medium, the harder it is for sound waves to travel through. This is because, in dense mediums, the molecules are more tightly packed. As such, there is simply more mass to vibrate, meaning the sound waves expend more energy trying to pass through.
Interior Doors: A Major Structural Weakness
But how does this apply to interior doors, and what can we do about it?
Doors (and windows) are some of the weakest areas of a room in terms of thermal and acoustic insulation. A door will have air gaps around it because of the way it fits into the frame.
These air gaps allow sound to enter and exit an enclosed space more easily than solid walls. As such, we’ll divide our soundproofing tips into 2 overall categories:
- Sealing the gaps
- Improving the structure of the door
It might not be immediately obvious how some solutions address these issues. I recommend reading through my discussion of the 4 principles of soundproofing to understand the science behind the tips below.
Generally, we’ll rely on 3 of the principles:
- Mass
- Damping
- Absorption
I won’t discuss these here, as I’ve written extensively about them elsewhere. Check out the link above for a good summary of them.
Common Types of Interior Doors
As mentioned, this article will focus on interior doors or bedroom doors. There are 3 types of doors in this category:
- Hollow core doors
- Solid core doors
- Metal doors
I’ll explain how each type functions in relation to sound transmission below. Also, if it weren’t immediately obvious, these doors are all swing doors. For sliding or pocket doors, you’ll need to try some different solutions.
Similarly, if you’re dealing with French doors, barn doors or sliding glass doors, you’ll need other options. Luckily, I have dedicated articles on all these types of doors, so check them out for specific guides.
Let’s briefly go over how the 3 types of interior doors differ in terms of sound transmission.
Hollow Core Doors
These are by far the most common type of interior doors. As the name suggests, they consist of 2 panels built onto a frame with nothing in the middle. This means sound waves can pass very easily through them because the panels are thin and there’s a large air gap in the middle.
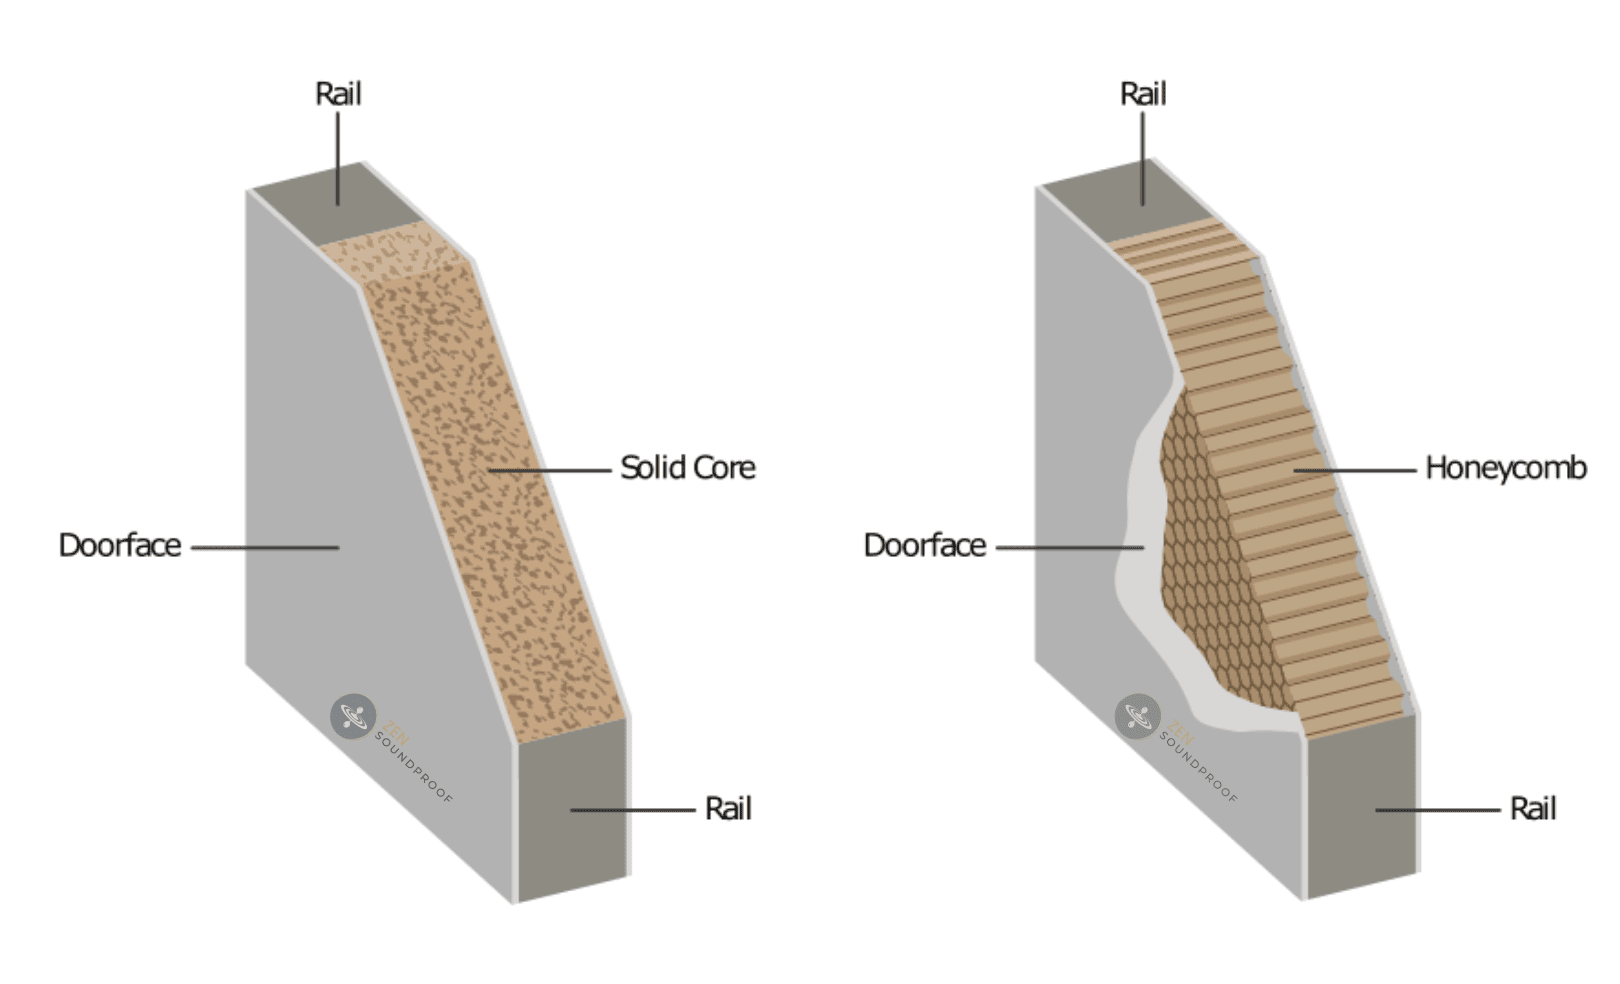
Hollow core doors basically follow the same sound transmission principles as an uninsulated drywall interior wall.
Solid Core Doors
Again, this is a fairly self-explanatory name. Solid core doors have a completely filled interior space with (sometimes) finished outer panels on either side. The core can consist of wood, wood composite, laminated materials, or something else. You can also get solid wood doors, which are – unsurprisingly – just made from solid wood.
Unsurprisingly, the density and weight of solid doors make it harder for sound waves to pass through. More mass means sound waves expend more energy, much like how solid walls are better at blocking sound.
Metal Doors
Metal doors are typically steel but could also be aluminum or another kind of common metal. They’re arguably the least common type of interior door, but you might find them in modern buildings or used as fire doors.
They’re not solid metal, however. A solid steel door would be incredibly heavy and would likely rip the hinges out of the wall. Instead, metal doors usually consist of a lightweight core (such as polyurethane, mineral wool or polystyrene) with a metal sheet exterior.
The sound transmission properties of a metal door will depend on the thickness of the metal and the core material. Lightweight, open-structured plastics are typically used for the interior because of their thermal insulation properties. However, their sound-blocking properties aren’t amazing.
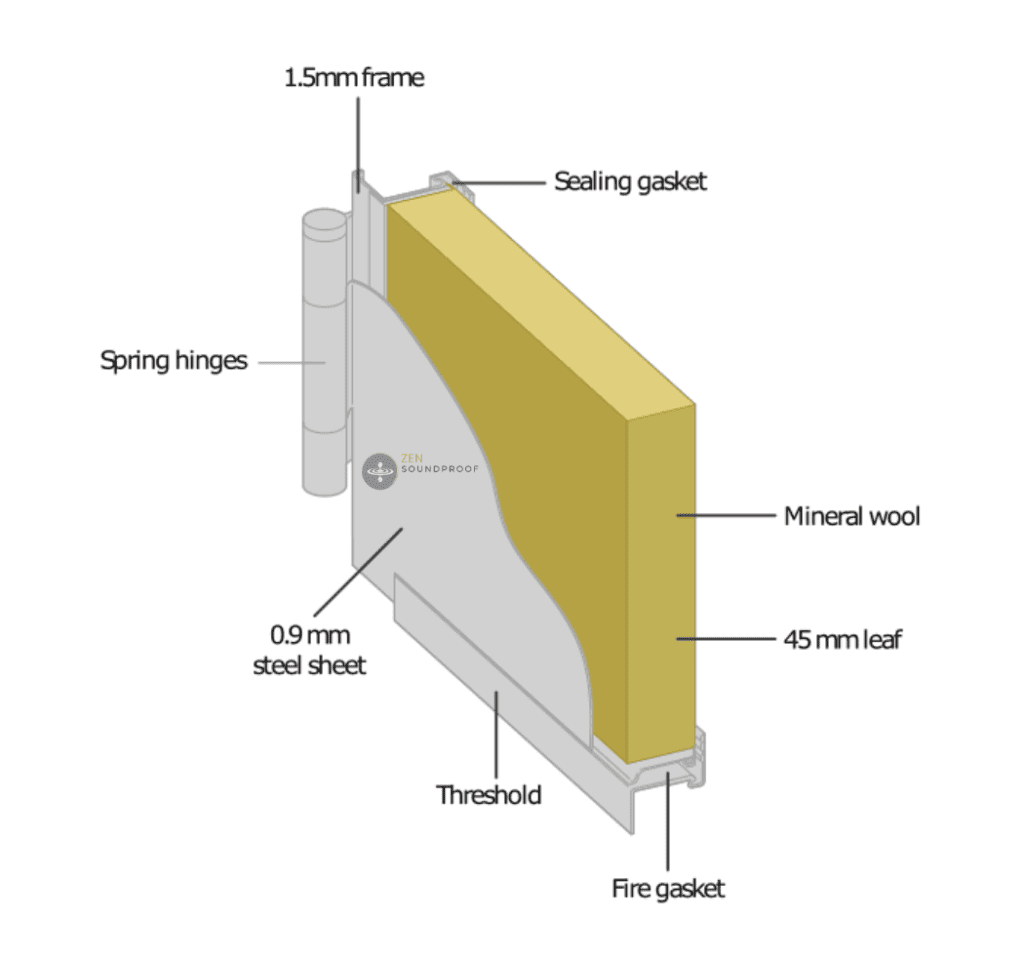
Generally, metal will reflect sound waves more effectively than wood. The effect of this probably won’t be super obvious at the thickness of material we’re dealing with here, though.
Soundproofing a Door: Seal Gaps Or Enhance The Structure
Now that we have a good idea of the types of doors we’ll be dealing with, we can move on to the solutions. As mentioned, I’ve divided these into sealing gaps and improving the door’s structure.
While all the tips will work on all 3 types of doors, some will be more effective than others. For example, adding mass to the door will be less useful on a solid core door than it would a hollow one. In this situation, you’d probably be better off focusing on sealing gaps instead.
I recommend reading through the tips and studying your specific door. Spend some time assessing how much noise is traveling through the structure to best plan which solutions will help.
6 Ways to Seal Gaps Around an Interior Door
1. Apply Weatherstripping
An easy place to start when it comes to sealing gaps is weatherstripping. It’s essentially rubber tape with an adhesive backing that goes between the door and its frame. As the name suggests, it’s designed for weatherproofing, but the principle is effective against sound transmission too.
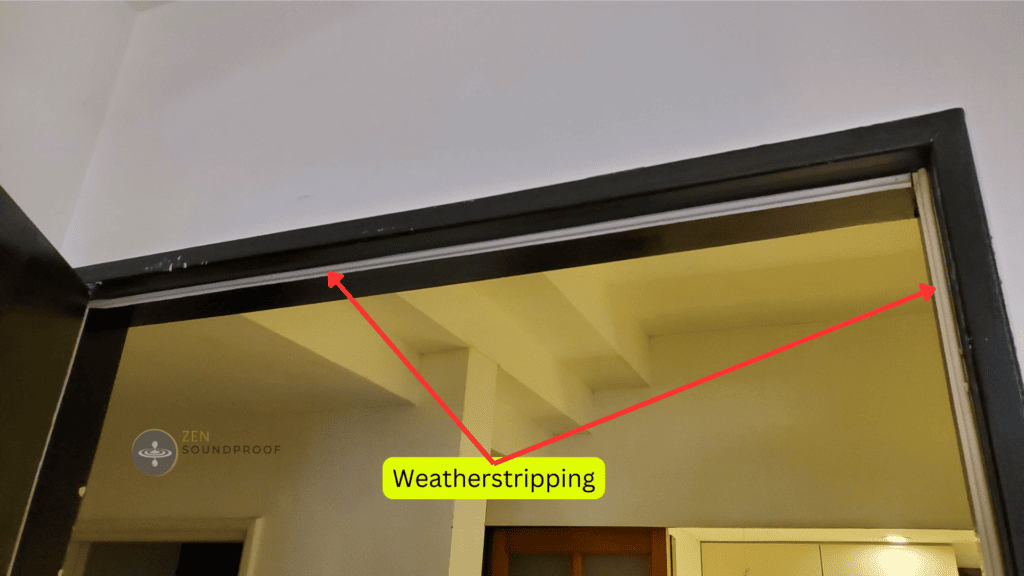
You can also get felt weatherstripping, which may provide a bit more sound absorption than rubber tape. I’d probably recommend rubber weatherstripping because it’ll create a tight seal between the door and the door jamb.
Installation is simple. Measure the perimeter of the door jambs (the bit of the frame where the door sits) around the entire door (apart from the bottom). Cut 3 pieces of weatherstripping to the appropriate sizes (top and both sides) and stick down. That’s pretty much all there is to it!
2. Fit Soundproofing Rubber
Soundproofing rubber is more or less the same concept as weatherstripping. The main difference is that we use it in a different place for a different purpose. Soundproofing rubber is installed between the outer edge of the door frame and the wall to prevent sound transmission into the frame itself. Weatherstripping, however, goes between the door and the jamb.
Also, it’s made from denser materials that provide better sound-blocking and damping properties. For example, the product linked here is neoprene, which is solid and therefore denser than standard weatherstripping.
Bear in mind that it’s more expensive. The TM Soundproofing product is $2.88 per foot as opposed to $17 for 40 feet for normal weatherstripping.
Also, another important note is that we wouldn’t necessarily use the products in the same place.
Installation is slightly more complex in that you’d need access to the gap between the frame and the wall. This might be as simple as taking the molding off or it could be more complex. Either way, you’ll want to add some acoustic caulk (explained below) to further seal the gap.
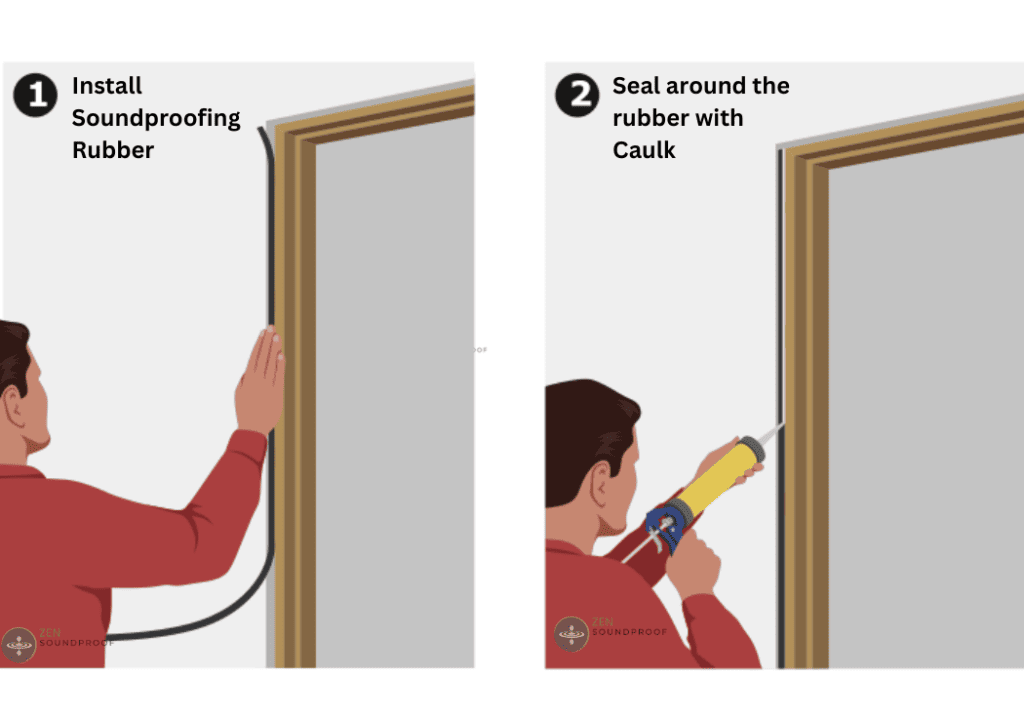
3. Use Acoustic Caulk
If you’ve done pretty much any kind of DIY project, you should already be familiar with caulk. We use it as sealant around sinks, showers, windows, and pretty much anything else that needs a small gap filled.
Normal caulk is usually made of silicone, which can harden and perish over time. Acoustic caulk, however, is made from latex. This means it never fully hardens and so provides some viscoelastic properties.
In soundproofing terms, this helps dampen sound waves. A viscoelastic layer won’t transmit sound waves in the same way as a rigid material, so it makes an ideal resistance layer for soundproofing a door.
We’ll want to use it between the door frame and wall, as this is the most obvious point of transmission. Caulking a door trim is easy enough – I recommend watching this video on how to caulk door trim for a good guide.
4. Fill Gaps with Expanding Foam
Expanding foam is a better option if you have large gaps around your door frame. This will probably be more common in new door frame installations, but you might notice a large gap where the building has settled or the door just wasn’t fitted well.
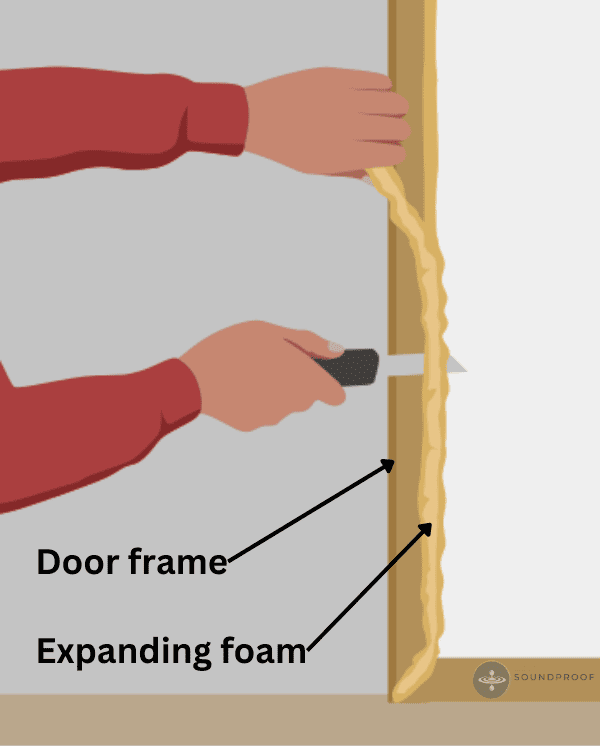
For this kind of job, make sure you buy expanding spray foam for doors and windows. It expands less than typical foam, which could force the door frame inwards, creating problems opening and closing the door. The foam linked here expands by 1” rather than the standard 3”.
Again, this process is easier to show rather than tell. Watch this video on how to use spray foam around doors for a clear visual guide.
5. Fit a Door Sweep
So far, our sealing materials have focused on the door frame and jamb. The bottom of the door (where it meets the floor) deserves its own attention. Depending on your flooring material and the way the door is fitted, there might be a considerable gap there.
Similarly, we need to address this bottom gap in a different way. Our solutions will generally fit to the door rather than the floor, as this reduces trip hazards and won’t interfere with the flooring material.
As such, the easiest solution is a door sweep. These can either be foam draft stoppers or rubber gap sealers. There’s not a considerable difference in results because neither material is thick or dense enough for their specific properties to matter too much.
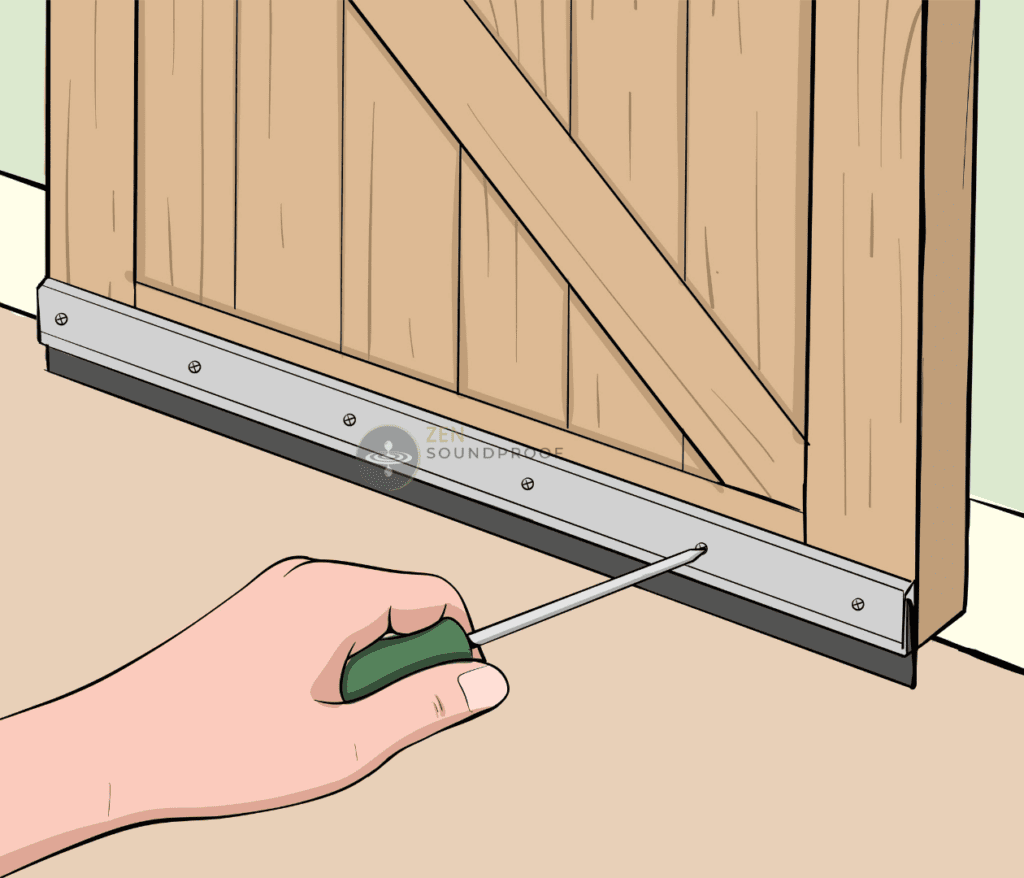
I’d probably recommend a foam draft stopper though, as an under door draft stopper will at least seal the gap more effectively.
An alternative product is an automatic door seal, also known as door gaskets. These generally work by dropping a neoprene insert to fill the gap when the door shuts. While they’re more expensive than door sweeps, they’re arguably more effective.
6. Install Door Thresholds
Also known as a door bar, a threshold is mainly used to level flooring and seal gaps. By extension, they can help with reducing sound transmission under the door.
The most suitable type of threshold will depend on your flooring material and the size of the gap. However, using a resilient material, such as a PVC door threshold, will offer better results than a hollow metal one.
Alternatively, you could look at a threshold with seal. The vinyl seal on this threshold basically combines the logic of weatherstripping and the automatic door seal above with the ease of installation of a threshold.

6 Ways to Improve the Door Structure
The tips below involve adding more mass to the door itself. Of course, this is mainly applicable hollow core doors, although adding materials to the surface of the door is possible with all kinds.
Before proceeding with any of these solutions, you’ll need to check whether the door hinges can handle it.
A hinge’s weight allowance depends on several factors, including:
- Frequency of use (how many times the door is opened and closed)
- How many hinges there are – 3 hinges will hold more weight than 2, for example
- The quality of the hinges – residential hinges on an interior door will likely be “standard duty”
A standard residential hinge with high-frequency usage (more than 25 times a day) will hold up to 200 lbs. The DIY Plan has a helpful guide on hinge weight allowance, so check that out for more information.
The weight of the door itself will vary depending on thickness, but a hollow core door should weigh around 25-30 lbs. on its own. As you can see, you’ve got plenty of capacity for adding materials to even normal hinges.
However, remain aware of the potential weight you’re adding to the door and, by extension, the hinges. Other factors can affect their capacity, such as quality of installation. If you’re concerned that you’re adding too much weight, consider upgrading the hinges.
With that out of the way, let’s cover our options for improving the door itself.
1. Hang a Soundproof Blanket
Soundproof blankets are made from relatively thick and/or dense fabrics. For example, they might include felt and wool, or even have a layer of soundproofing materials. Generally, these blankets are better for sound absorption, but denser ones will provide some blocking too.
I have a full guide on choosing the best soundproofing blankets for doors, so check that out for more information.

You’ll want a product that covers the door and frame and an inch or so of wall on either side. Also, I recommend choosing one that has grommets to make the blanket easier to hang. Bear in mind you’ll need to remove it every time you access the door, so make it as convenient as possible.
Because soundproof blankets focus on absorption over blocking, you’ll ideally want them on the same side as the noise source. For example, if you’re soundproofing a bedroom door against incoming noise, the blanket will go on the outside of the door.
2. Install MLV Sheets
Mass loaded vinyl (MLV) is a great soundproofing material. I’ve written a full guide on how mass loaded vinyl works, so I won’t cover everything here. In short, it’s dense, limp mass, making it an effective sound blocking barrier.

It comes in different weights, but I’d recommend the 2 lb. per sq. ft. MLV for soundproofing a door. How you fix it to the door will depend on the door’s finish, but you could:
- Fix it directly to the door with nails or screws; or
- Fix it to an MDF or plywood panel, which you screw onto the door; or
- Buy a roll (rather than sheets) and hang it only at the top of the door. Doing so keeps it limp, retaining its sound-blocking properties
3. Make a Soundproof Panel
A DIY soundproof panel for an interior door is a surprisingly easy project. In fact, calling it a project is overselling it. All we’re doing here is adding an extra rigid layer to the door, primarily so we can include a layer of noiseproofing sealant.
Green Glue Noiseproofing Compound provides a viscoelastic layer. In turn, this dampens sound waves attempting to pass through the door. It’s a pretty effective product when used properly.
A rough guide for making this panel is:
- Measure and cut a piece of half-inch MDF to the same size as your door.
- Remove the door handle and put to one side.
- Cover the door in a layer of Green Glue. Standard practice is 2 tubes per 4 ft. x 8 ft. sheet of drywall, so a single tube should be fine here.
- Screw the MDF sheet to the door using normal wood screws. Use 6: one in each corner and one in the middle of each side.
- Refit the door handle.
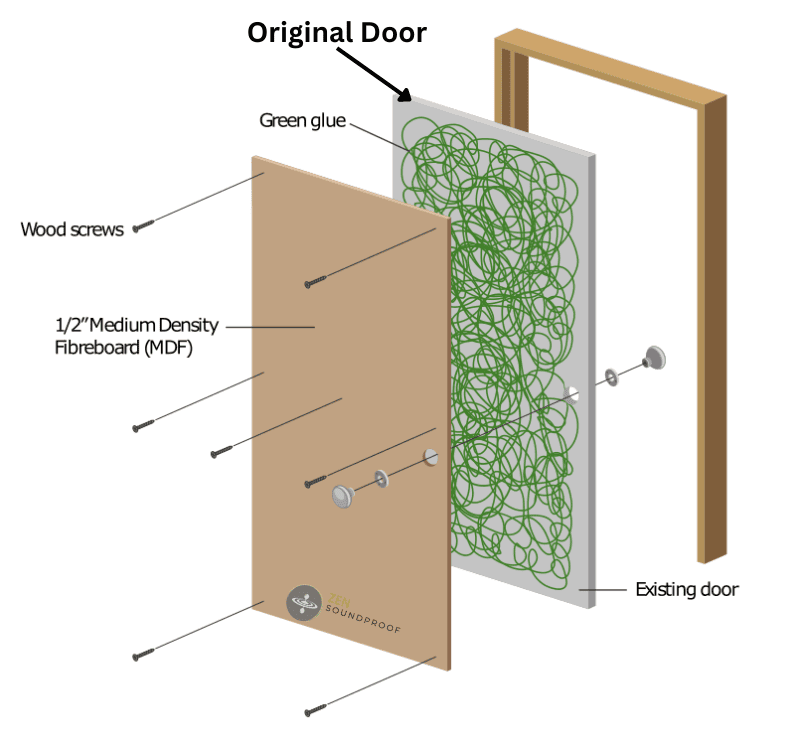
You should use as few screws as possible. Although negligible, they create transmission pathways through the damping material. As such, the more we use, the less point there is in making this panel.
4. Fill the Door Cavity with Sand
This is arguably one of the most resource-intensive solutions for increasing a door’s mass. However, it’s arguably one of the most effective options for making a door heavier without altering its outward appearance.
In short, we’ll want to fill the door cavity with sand. To do so, you’ll need to build pockets inside the door to better distribute the weight. Think of it in the same way that duvets have stitching to keep the filling in place.
As with most of the other practical tips, it’s better to see this in action. Watch this video on how to build a sand filled door for a more in-depth discussion.
Filling the door with sand will obviously add a considerable amount of weight. You should definitely reinforce the frame and fit heavy-duty hinges to compensate for this.
5. Hang Soundproof Curtains
This option is much like the blankets tip above, except using soundproof curtains. Curtains generally have less mass than blankets, meaning they’re geared more towards absorption. However, the main advantages are that they look more normal than blankets and are easier to move out the way (sliding on a curtain rod).
I have an article on choosing soundproof curtains for doors. Read through it for more information on product selection and installation.
If you’re torn between blankets and curtains, I’d recommend blankets. While they won’t look as nice, they offer greater performance than most soundproof curtains.
6. Fill the Door Cavity with Foam
If you don’t want to spend time reinforcing the frame and hinges, an easier option for filling the cavity is to use foam. Your options will be fiberglass insulation, rockwool, or foam insulation sheets.
However, none of these products will add considerable mass, unlike sand. Instead, they’ll help improve the door’s sound transmission class (STC). This is a metric that measures how well a structure attenuates airborne sound.
I explain STC in more detail in my article on how to soundproof a garage. You’ll find information on the difference between STC and NRC and what this means for soundproofing, so check it out.
How Much Does It Cost to Soundproof a Door?
Soundproofing a door can end up being a fairly expensive project for its size. However, the benefit of reducing sound transmission through a door will likely be far greater than, say, a wall. If nothing else, a minor improvement will be more noticeable on a door because its soundproofing properties are so bad!
To give you a rough idea of how much soundproofing a door can cost, here’s a table of material prices. I won’t go as far as comparing them per foot of product, as that’s not relevant in most cases. Instead, I’ve just listed them as how much it may cost to buy the amount you need to work on a standard interior hollow core door.
| Product | Approximate Cost per Door ( USD $) |
| Weatherstripping | 17 |
| Soundproofing Rubber | 45 |
| Acoustic Caulk | 12-35 |
| Expanding Foam | 40-60 |
| Foam Draft Stopper | 15-20 |
| Rubber Door Sweep | 15-20 |
| Automatic Door Sweep | 65-70 |
| Door Threshold | 15-20 |
| Soundproof Blanket | 79 |
| Mass Loaded Vinyl | 100-200 |
| Green Glue Noiseproofing Compound | 35 |
| Soundproof Curtains | 20-60 |
| Foam Sheets | 20-40 |
Understanding Prices and Results
Of course, the raw cost of materials on its own doesn’t mean loads. For example, MLV and an automatic door sweep are some of the most expensive options. However, they’re also the most effective for dedicated soundproofing.
Similarly, cheaper options (door sweeps, weatherstripping) are arguably the least effective. But they’re also the easiest to work with.
You must also consider the extra products needed in many cases. For example, I haven’t included hinges, adhesive, lumber, etc.
The bottom line is that cost will only tell you so much. You must balance it against the results you need and how much time and effort the project takes. I have dedicated articles on many of the specific soundproofing materials, so I recommend browsing the website to learn more.
When Should I Replace My Door with a Soundproof Model?
Although some materials look expensive, they’re drastically cheaper than the cost of buying and installing a soundproof door. The specific construction may differ, but a soundproof door typically consists of a solid core door, neoprene seals, and more.
So, when should you replace your door with a soundproof model?
The short answer is probably never in a domestic setting. For example, a soundproof door can cost as much as $5,000, although there are (comparatively) more affordable options on the market. However, a high-quality studio door (such as this one from Soundproofing America) can cost around $4,000.
While these products offer an STC rating of 56 (which is great for a door), there are few circumstances in which you need these results in a residential setting. Perhaps one example is if you’re building a recording studio, but any of the DIY options above would be considerably cheaper and offer decent results.
For a comparison, some approximate STC values for solid doors, hollow doors and metal doors are as follows:
- Hollow door: 20-25
- Metal door: 25-38
- Solid core door: 30-35
As you can see, soundproof doors offer a drastic improvement on standard hollow doors. However, the cost makes replacement not really worth the effort, as you can achieve similar results with dedicated soundproofing materials.
Soundproofing a Door FAQs
Does hanging acoustic panels on a door help for noise blocking?
Acoustic panels on a door don’t help with noise blocking. They’re designed to improve sound absorption, which isn’t the same thing. Sound absorption refers to echo and reverb in a room and, by extension, audio quality. Sound blocking, however, refers to the transmission of sound into and out of a space.
By all means, include some acoustic panels in your wider soundproofing project if you’re building a home theater or recording studio. But for reducing sound passing through a door, there are plenty of better products.
Does putting a towel under the door work for noise?
Putting a towel under the door (or in front of the gap) will have a minor effect on noise. Towels act like other fabrics in that they trap and absorb sound waves rather than block them. However, covering the door gap with a towel will help muffle sounds a small amount.
If you’re really stuck for something to block the gap under your door, a towel is better than nothing, but not by much.
What is the best type of interior door for soundproofing?
The best type of interior door for soundproofing would be a solid core door. Ideally, you’ll want one that’s filled with wood composite. This is a mixture of wood pulp and polyurethane, which can offer decent sound blocking and absorption properties. Using a combination of materials will block a wider range of frequencies than, say, a solid wood door.
Also, you’ll want to use a swing door rather than a sliding door. Swing doors have the tightest seal around them, which you can further improve using weatherstripping or similar products.
How can I soundproof my door for free?
The only way to soundproof your door for free is to use materials you have lying around at home. However, these won’t be as effective as dedicated soundproofing or insulation materials, but are worth trying in a pinch.
Some options include:
– Towels to block gaps
– Heavy blankets draped over the door
– Duvets and comforters
– Furniture pushed in front of the door (the heavier the better)
– Duct tape to seal gaps
If you’re serious about soundproofing a door, I’d recommend spending money on the project. But if you need an immediate and free solution, these options will help.
Can I fill sand in a door for soundproofing?
You can fill a door in with sand for soundproofing, but you’ll need to reinforce the door and frame and divide the door’s interior into pockets. This helps keep the sand properly distributed and means any leaks won’t be too disastrous. Of course, sand will add considerable weight to the door, so you’ll need to install new hinges and reinforce the frame.
Sand can be an effective soundproofing material because it has mass and its tiny grains make it fairly dense. It can therefore provide damping (vibration reduction), sound blocking, and some absorption. If you’ve got the time to fill a door with sand, it can be a good way to soundproof it.
Final Thoughts
I hope this guide has covered everything you could want to know about how to soundproof a door. The project can be as in-depth as you want it to be, but spending some time and money can provide decent results.
I’d love to hear from you if you have any other tips for soundproofing a door. Have you tried this project yourself and have any guidance? Or have you taken the plunge and fitted a soundproof door? Let me know!
