I spend a lot of my time researching the best soundproofing methods for households of all sizes and setups. I was recently speaking to a friend about their upcoming project, and they asked, how much does it cost to soundproof a ceiling?
It made me realize that, although I often write guides on soundproof products, I rarely discuss how much soundproofing projects actually cost.
So that’s what I’ll cover in this article. Below, we’ll dive into soundproof ceiling cost. This includes a range of materials for different purposes, allowing you to get a clear idea of a budget.
If you’re in a rush, here’s a quick table that lists the costs of various soundproofing materials:
| Material | Cost for 10’ x 10’ ceiling ($) |
|---|---|
| Drywall | 50 |
| Plywood | 150 |
| MLV | 220-1600 |
| Acoustic tiles | 230 |
| Resilient channel | 80-90 |
| Hat channel & Isolation clips | 130-190 |
| Joist tape | 32 |
| Green Glue | 140-190 |
| Fiberglass | 35-150 |
| Mineral wool | 140-210 |
Materials Used for Soundproofing a Ceiling
Before going over costs, it’ll probably be helpful to group together the materials we might want to use for a ceiling soundproofing project. I’ve done so based on the 4 principles of soundproofing, which I explain in more depth in my article on soundproofing vs. sound absorption.
To summarize, these principles are:
- Mass
- Decoupling
- Damping
- Absorption
In the roundups below, I’ll include a brief summary of what each one does and why it’s useful for soundproofing a ceiling.
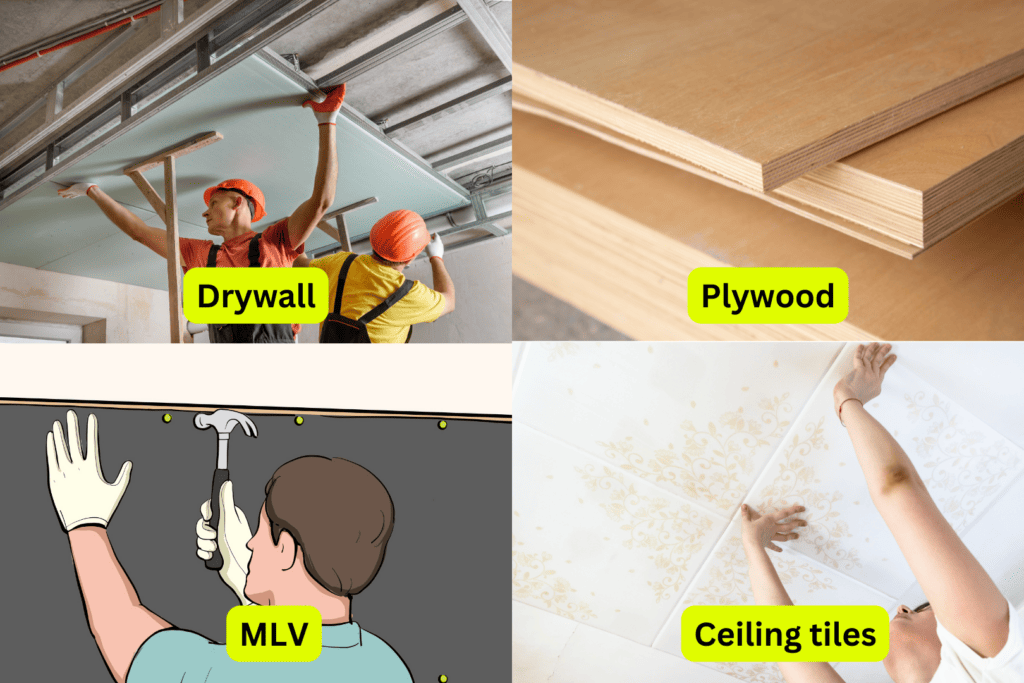
Adding Drywall, Plywood, or Mass Loaded Vinyl
Drywall, plywood and mass loaded vinyl (MLV) all add mass. We add mass to block airborne noise to prevent it from passing through a ceiling construction. In short, materials that are heavy and dense make it harder for sound waves to make a structure vibrate, reducing their transmission.
We might also want to include acoustic tiles in this category. While they’re less dense than the other materials, they provide some absorption too.
Similarly, we could consider soundproof drywall, but I believe it’s easier to just use normal drywall and add soundproofing material elsewhere. Soundproof drywall is quite expensive for what it does and we’d have better luck using soundproofing material like MLV instead.
A rough cost estimate for a sq. ft. of each material is:
- Drywall: $0.50
- Plywood: $1.50
- MLV: $2.20-$16
- Acoustic ceiling tiles: $2.30
Although MLV is clearly the most expensive product per sq. ft., as I explain in my article on mass loaded vinyl for soundproofing, it’s actually quite cost-efficient. Check it out for a longer explanation.
Resilient Channels, Isolation Clips, Spacers
Resilient channels, isolation clips and spacers all help with decoupling. This is one of the most effective techniques for soundproofing walls if you have the time and ability to install the necessary hardware. Helpfully, decoupling works just as well on a soundproof ceiling as it does on soundproof walls.
In short, decoupling breaks the direct contact path between one side of the wall and the other. This reduces the transmission of sound waves, simply because they’re unable to transmit directly through the wall structure.
Whereas adding mass helps with airborne noise, decoupling is effective against impact noise. Because of the way we use these products, it’s easier to give their cost per linear foot rather than square foot. Our measurements are based on other factors, such as the number and spacing of joists rather than the total area of the ceiling.
A rough cost estimate of each material is:
- Resilient channels: $0.83 per foot
- Hat channels and isolation clips: $1.28 per foot and $4 per unit respectively
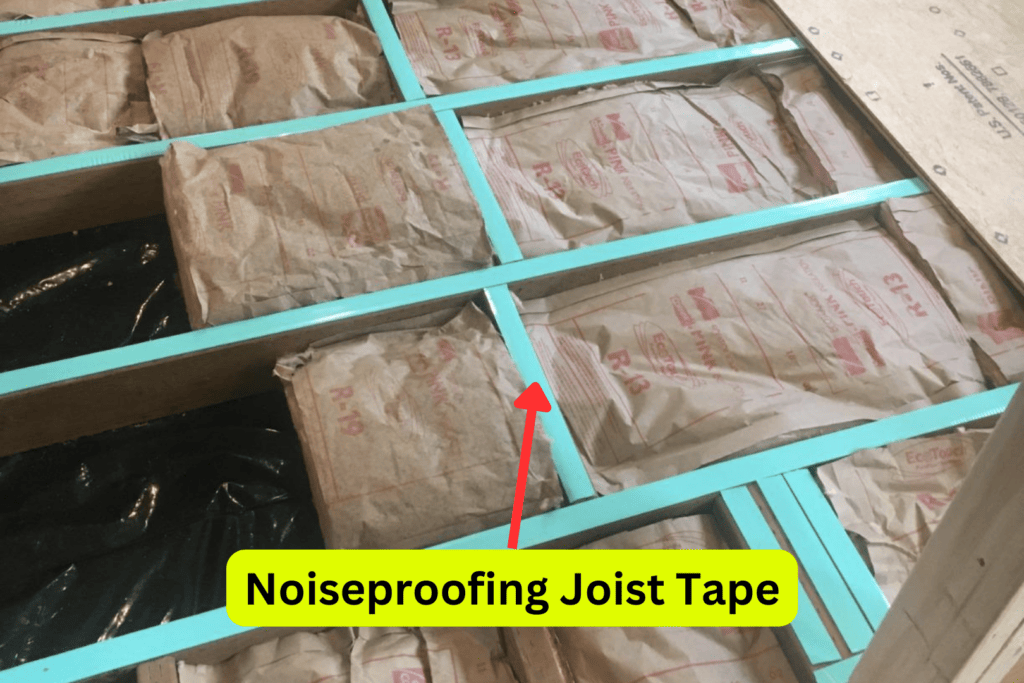
- Noiseproofing joist tape: $0.32 per foot
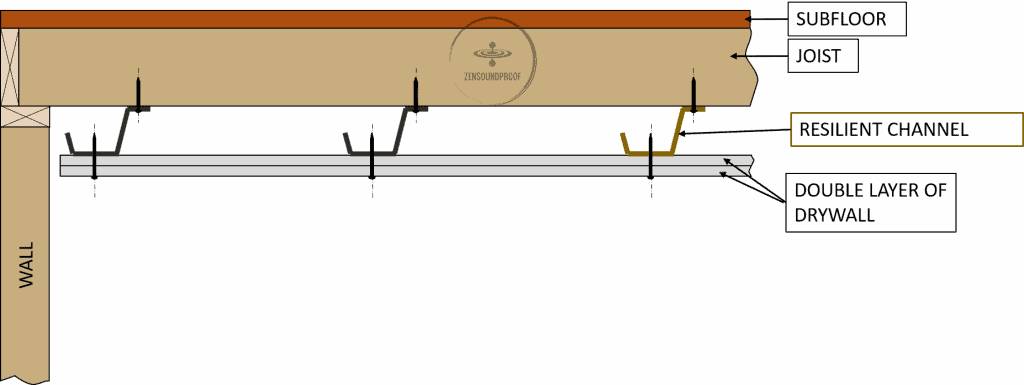
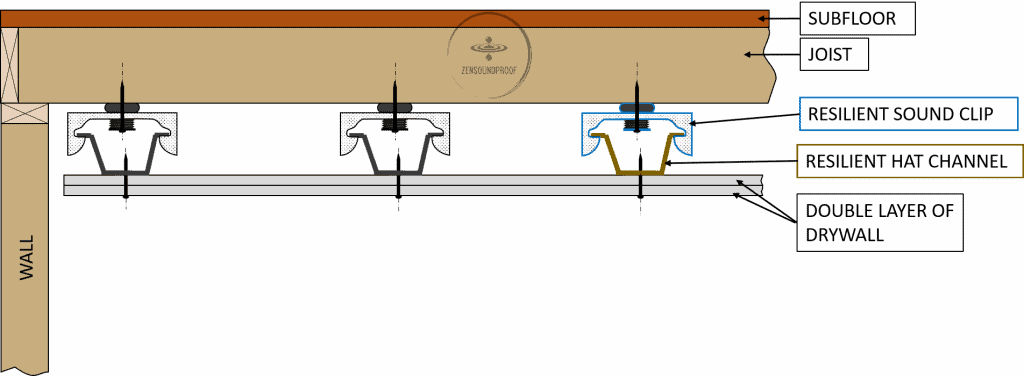
The cost per foot. of each decoupling product is relatively low. However, as I’ll explain later, installation is different to something like drywall, meaning the cost can quickly ramp up.
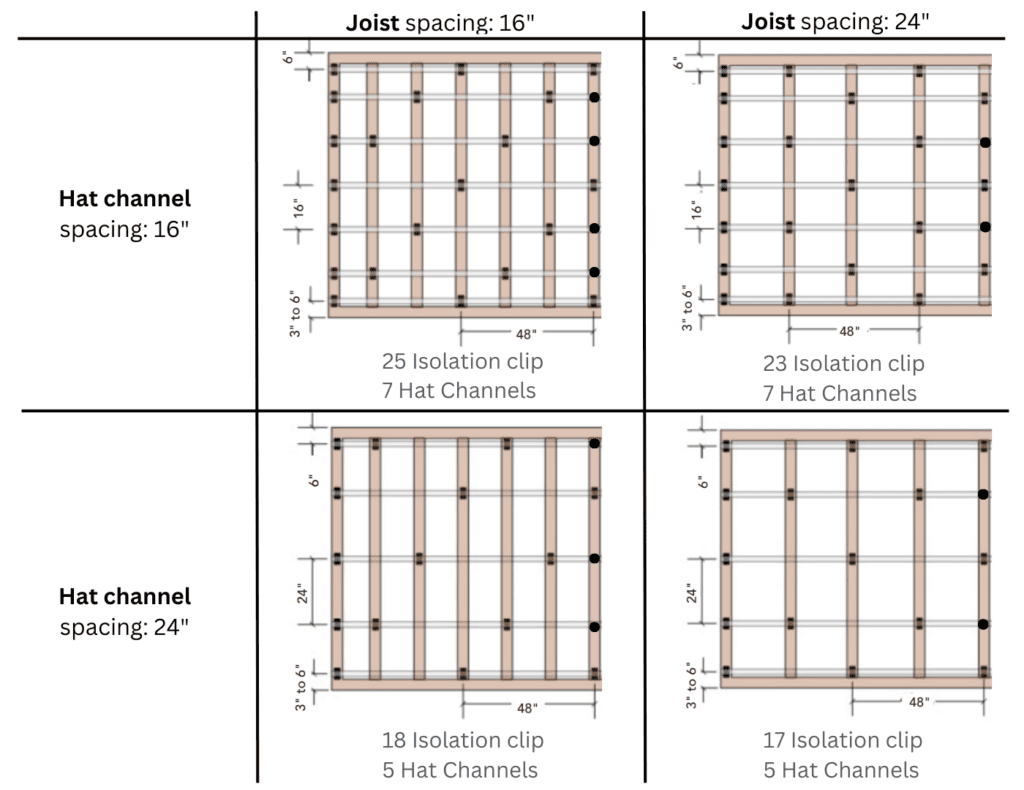
Another important factor to note is that hat channels and isolation clips can be installed in different configurations (see the image below).
Let me explain, you can space the hat channels every 24” or 16”. At the same time, your ceiling joists can be spaced every 24” or 12”. In theory isolation clips should be installed every 48”.
This means the cost can range from around $130 to $190 depending on your ceiling configurations and the spacing you opt for hat channels.
Green Glue
Green Glue provides damping to a ceiling soundproofing project. In short, it helps dissipate or absorb the vibrational energy that transmits sound waves. Damping helps reduce airborne noise by adding a viscoelastic layer between 2 rigid layers.
It’s recommended that you use 2 or 3 tubes of Green Glue per drywall sheet for the best results. As such, its rough cost per sq. ft. is $1.40-$.190 depending on the quantity you buy it in. According to West Coast Sound Solutions, a 12 pack of Green Glue will cover 128 or 192 sq. ft. depending on how many tubes you use per drywall sheet.
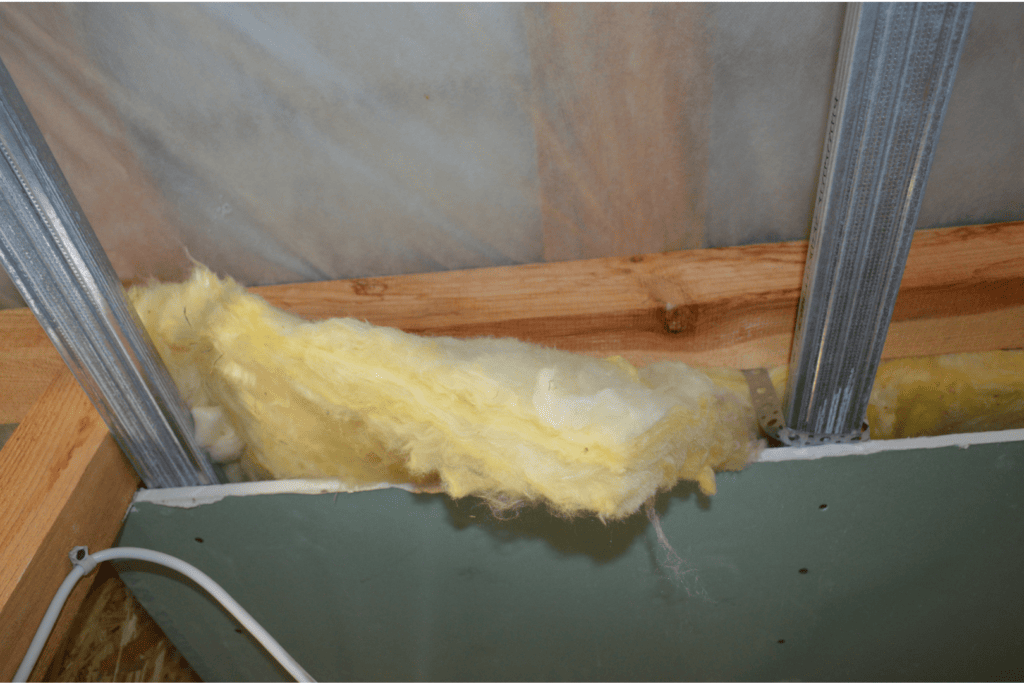
Fiberglass or Mineral Wool Insulation
While fiberglass and mineral wool are primarily designed for thermal insulation, they help with acoustic absorption. Filling the cavity between the upper floor and the ceiling reduces the transmission of both airborne and impact sounds.
A rough cost estimate for a sq. ft. of each material is:
- Fiberglass: $0.35-$1.50
- Mineral wool: $1.40-$2.10
It’s worth noting that insulation alone isn’t an effective sound barrier for ceiling soundproofing. You’ll want to use sound absorbing materials alongside mass at the very least but also decoupling and damping if your budget can stretch to that.
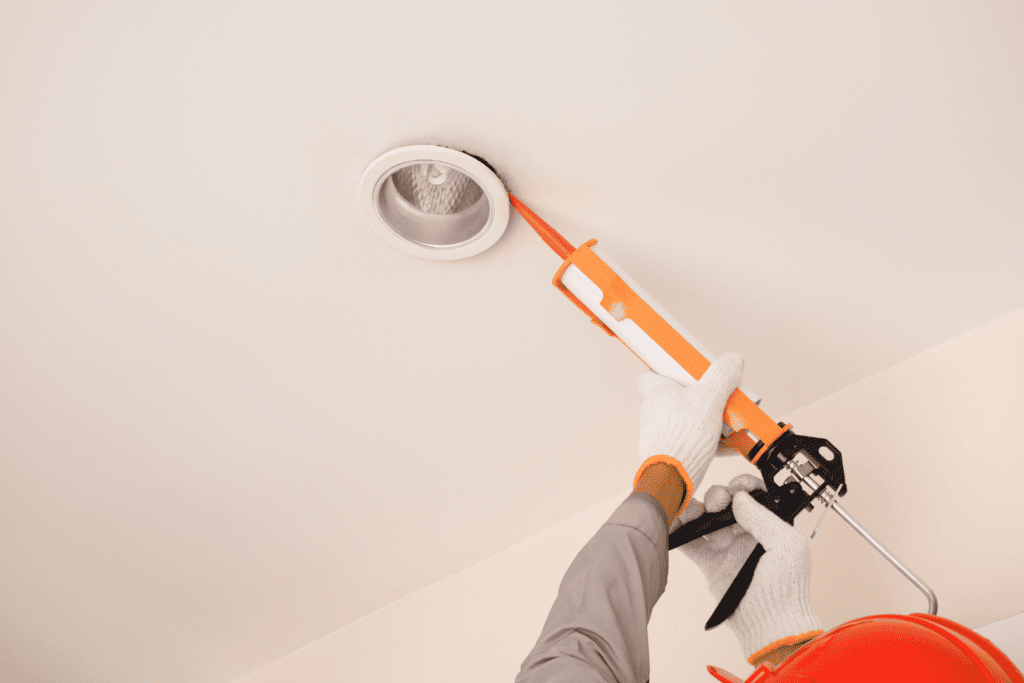
Acoustic Sealant
Finally, we have acoustic sealant. This doesn’t fall under a specific soundproofing principle, but rather helps seal gaps to block sound transmission pathways. You’d apply acoustic caulk around the perimeter of a drywall ceiling, for example, to seal the gaps between panels.
Green Glue acoustic sealant can cover up to 50 linear feet per tube, giving it a rough cost of $1.40 per foot.
Cost Estimate Per Material
Now that we have a cost estimate per square foot of each product, we can look at how much each would cost for a typical ceiling soundproofing project. For ease of comparison, I’ve put everything in a table and used a 10 ft. x 10 ft. ceiling, giving us an area of 100 sq. ft.
| Material | Type | Price per unit ($) | Cost for 10′ x 10′ ceiling ($) |
|---|---|---|---|
| Drywall | Mass | 0.50 | 50 |
| Plywood | Mass | 1.50 | 150 |
| MLV | Mass | 2.20-16 | 220-1600 |
| Acoustic tiles | Mass/absorption | 2.30 | 230 |
| Resilient channel | Decoupling | 1.40 | 80-90 |
| Hat channel and isolation clips | Decoupling | 4.00 | 108.50-159 |
| Joist tape | Decoupling | 0.32 | 32 |
| Green Glue | Damping | 1.40-1.90 | 140-190 |
| Fiberglass | Absorption | 0.35-1.50 | 35-150 |
| Mineral wool | Absorption | 1.40-2.10 | 140-210 |
These values can also be used to work out the cost to soundproof a room. Pretty much everything here can be used on walls too, and if you factor in the cost of a soundproof door, you should have an idea of how much a soundproof room project can cost.
Examples of Material Combination Costs
As I mentioned briefly above, you’ll get the best results from your soundproofing project by combining principles. For example, mass and absorption cover different aspects of sound transmission, and decoupling can also be complemented by absorption.
Therefore, we want to think about combining the costs of materials for a better idea of our overall budget. I’ve calculated some examples of common product combinations below:
Mass and Damping
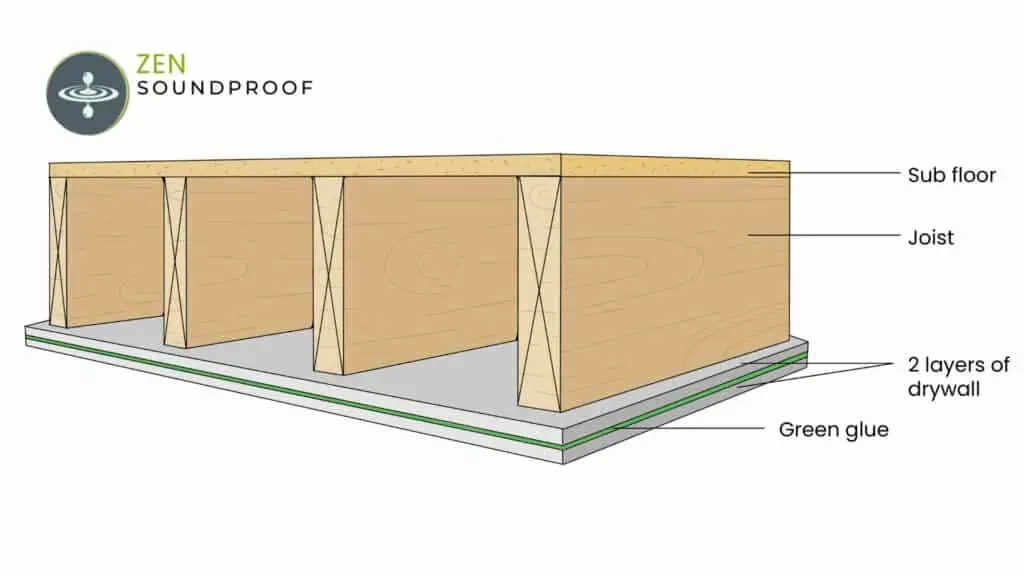
Green Glue should always be sandwiched between 2 layers of rigid material. We’d typically use drywall for this because it’s inexpensive and isn’t too thick. While it’s not the densest product, the Green Glue is doing most of the work in this setup.
Our costs would look like this:
- 2 layers of drywall: 0.50 x 2 x 100 = $100
- Green Glue: $140
Total cost: $240
Decoupling and Mass
When we use decoupling materials (such as resilient channels), we space them around 16 inches from each other. In other words, every 1.25 feet. In this example, we’ll add drywall as the mass, and we only need 1 layer of this.
Our costs would therefore look like this:
- 1 layer of drywall: $50
- Resilient channels: $80-90
Total cost: $140
Absorption
Cavity insulation is fairly easy to work out. You’d need 100 sq. ft. of either fiberglass or mineral wool for this job, which could cost anywhere from $35 to $210.
I recommend using the thickest product you can find to fill as much of the cavity as possible. For example, this ProRox mineral wool board comes in 2ft. x 4ft. panels, which you could cut to size as needed. It’s 3 inches thick and should fill a decent chunk of the ceiling cavity.
Factors that Affect Your Project’s Cost
Looking at the individual costs for products is one thing. However, we must also factor in conditions that influence how much product we use, and what we’re trying to achieve.
In my experience, there are 5 main conditions that impact the overall cost of soundproofing a ceiling, aside from the price of materials. These are:
Noise Reduction Goals
We measure airborne and impact noise reduction using 2 metrics: sound transmission class (STC) and impact insulation class (IIC). I explain these in more detail in my article on how to soundproof a ceiling, so check that out.
The bottom line is that noise reduction is measurable, and we can use these metrics to figure out which materials we might want to use.
For example, if we want high sound transmission class (STC), we might want to use mass loaded vinyl. It’s pricier than drywall or plywood but it’s more cost-effective per STC point gained.
On the other hand, if we want a high IIC rating, we’d probably want to use hat channels and isolation clips. Again, these are on the higher end of the price scale but are absolutely worth it if you want notable results.
Condition of the Existing Ceiling
By this, I mean whether the existing ceiling is finished or unfinished. Generally, a finished ceiling will cost more to soundproof because you’ll need to spend time taking down the existing materials to fit your desired soundproofing products.
An unfinished ceiling should be cheaper because, ideally, you’ll already have access to the joists. You can then add pretty much anything you want before finishing it off with a layer of drywall or similar.
Size and Shape of the Ceiling
Unsurprisingly, a bigger ceiling will cost more than a smaller one. This is why I’ve given the prices per sq. ft., as they should serve as a good basis for your calculations.
But then you must also consider the shape of your ceiling as well as any “obstacles”. These might include HVAC vents, pipes, ducting, etc.
The shape of your ceiling may result in material wastage because you’ll need to cut things to fit. As such, you’ll need to increase your square foot calculations to accommodate for material you’ll be losing.
Type and Thickness of Materials
While this doesn’t apply to all materials you could use for a soundproofing project, it applies to most. For example, drywall comes in a variety of thicknesses, and thicker ones are more expensive.
A similar consideration is true for MLV. It comes in 3 densities: 0.5, 1 and 2 lbs per sq. ft. The thickness ranges from 1/16 inch to 1/4 inch, too. While 2lbs. per sq. ft. MLV will provide a higher STC rating, it also takes up more room and costs more.
Labor and Installation Costs
Finally, you should consider labor costs. This might not apply to everyone, as all of these soundproofing materials can be installed with a reasonable level of DIY knowledge. Generally, they all involve cutting, measuring, drilling and hammering.
The most complex products to install are MLV, resilient channels and isolation clips. However, the actual installation is simple enough (screwing and hammering). The complex part is understanding how you install them.
MLV, for example, must be fitted with enough slack for it to remain limp. Resilient channels must be installed 16 inches apart vertically. But once you’re aware of these, fitting them to your ceiling isn’t actually difficult.
Common Scenarios You Might Face
We can now look at some scenarios that might pop up when soundproofing a ceiling. I’ve only listed 3 because they cover pretty much every use case that could come up. By now, you should have a good idea of what products would be most suitable for your needs, but here are some explicit examples.
Scenario 1: Unfinished Ceiling with Airborne Noise
If you have an unfinished ceiling where airborne noise is a problem, you have plenty of options. As mentioned, an unfinished ceiling offers more flexibility than a finished one. You could try:
- Hat channels and isolation clips, which are the best products for airborne and impact noise. These are fitted directly to the ceiling joists, and you hang drywall from them.
- Mass loaded vinyl or Green Glue are options for airborne noise only. Install the MLV directly on the ceiling joists and then fit drywall over it.
- Cavity insulation, drywall and acoustic sealant are advisable for any soundproofing project. Insulation and sealant will help address weaknesses in the other materials, improving the overall results of the project.
Scenario 2: Finished Ceiling with Impact Noise
Generally, impact noise is harder to deal with on a finished ceiling, as the most successful method is decoupling. Even so, your options include:
- Adding rubber underlayment to the floor above. I have a list of the best soundproof underlays, so check that out.
- Removing the existing ceiling, reverting to scenario 1. Again, isolation clips and hat channels would be the best option.
- Insulation and acoustic panels are not effective for impact noise. They provide absorption rather than blocking.
- Your new ceiling setup should consist of isolation clips, hat channels, drywall and acoustic sealant.
Scenario 3: Finished Ceiling with Airborne Noise
Finally, we have the issue of airborne noise coming through a finished ceiling. There are 2 main options to help with this:
- Blown-in cavity insulation. Provided you can access the gaps between the joists, this’ll be easier than removing the whole ceiling. Blown insulation is a decent alternative to sheet or rolled insulation.
- Adding a second layer of drywall with Green Glue compound in between.
- Finally, seal the perimeter and any new gaps with acoustic sealant.
FAQs
Does Acoustic Foam Work for Soundproofing a Ceiling?
Using acoustic foam on a ceiling involves installing tiles that have sound-absorbing properties. They’d need to go on the outer surface of the ceiling (facing into the room), meaning you’d fix them directly to the drywall.
Some examples of the products you might use include acoustic foam tiles, cork, fabric, felt sheets, etc.
However, these materials focus on absorption rather than blocking sound transmission. Absorption helps improve the acoustics within a space by reducing echo and reverberation. This isn’t the same as reducing sound transmission.
As such, acoustic foam doesn’t work for soundproofing a ceiling but would be a useful addition in spaces such as home theaters, recording studios, etc.
What’s the Cheapest Way to Soundproof a Ceiling?
The cheapest way to soundproof a ceiling would be to add more layers of drywall with Green Glue in between. 4 layers of drywall (2 on the ceiling and 2 on the floor above) and 2 layers of drywall can add 17 STC points. It works out around $37.50 per STC point gained.
The major cost here is the Green Glue. If you wanted to bring the cost down, you could skip it, but an extra layer of drywall on its own won’t do much.
Is it Cheaper to Soundproof a New or Old Ceiling?
It’s cheaper to soundproof a new ceiling, provided this means an unfinished one. If the ceiling currently consists of an unfilled cavity and exposed joists, you can use any soundproofing method you want.
Of course, if you want to keep costs down, you might want to avoid hat channels and isolation clips. Even focusing on less effective options should be cheaper than soundproofing an old ceiling.
As mentioned, a major cost here is taking down the existing ceiling. While it can be a fairly quick job, you have to factor in time and labor costs and the potential for unseen complications. Even a quick job objectively involves more time and money than not doing it at all.
Does Acoustic Paint Work for Soundproofing a Ceiling?
Soundproof paint doesn’t help soundproof a ceiling because it aids absorption not blocking. It typically consists of a liquid viscoelastic compound that forms a layer of resilient material over the existing ceiling.
One product, Coat of Silence, claims it can add 3-7 STC points to an existing ceiling setup depending on the room’s design and application methods. However, you need a minimum of 3 coats – 2 base coats and a finish coat. Then, you need to paint it the desired color.
Based on the time it’d take to apply, and the cost, it’s not really worth it. You could achieve better results by adding another layer of drywall with some Green Glue, which is faster and cheaper.
Final Thoughts
I hope this guide has given you some ideas on how much it can cost to soundproof a ceiling. The short answer is that there’s no definitive cost but, using the figures given above, you should be able to work out an estimate for the ceiling in question.
Have you soundproofed a ceiling in your home before? If so, I’d love to hear about your experiences. How much did it cost? What materials did you use? Do you have any tips to share with your fellow soundproofers? Let me know!

1 thought on “How Much Does It Cost to Soundproof a Ceiling?”
Great info. A well-done website. Super informative audio details.