A staggered stud wall is an effective solution for improving a room’s noise transmission properties. In short, it involves building 2 separate sides to a wall, making it harder for sound waves to pass through.
Providing you have some DIY skills, building a staggered stud wall is a fairly easy soundproofing project. In this article, I’ll cover why you might want staggered studs and how to build them.
What Does a Staggered Stud Wall Do?
A staggered stud wall consists of studs (drywall supports) for each side of an interior wall (or partition wall). These are offset from each other to ensure sound transmission is minimized. Inside, there will usually be insulation of some kind, such as fiberglass or blown-in insulation, or rigid foam.
On a typical wall, you have one set of studs for both sides of drywall. In a double stud wall, you have a separate set for each. If you know anything about soundproofing, you can probably guess why this helps.
But if you’re unsure, here’s a clear breakdown of why double studs provide superior soundproofing.
Decoupling
The most obvious change is decoupling. By using a double wall construction, you’re separating both sides of the wall, making it harder for vibrations to travel from one room to another by creating sound isolation. In a normal setup, vibrations would pass through the drywall into the studs and then out the other side. By separating them, you’re preventing this from happening.
Mass
Adding mass means a structure is simply more difficult to vibrate, which reduces airborne sound transfer. More studs mean more mass, but we could also use soundproofing drywall or mass loaded vinyl in the staggered stud wall construction for better results.
Absorption
Drywall and studs aren’t particularly absorptive because of their rigid nature. But by filling the inner cavity with insulation, we can trap and absorb sound waves that make it through the drywall. Doing so means we’re addressing both major types of sound transfer.
Damping
Damping means stopping vibrations within a solid object (like a layer of drywall) before they can turn into sound waves. Again, the base materials we’re using aren’t great for this. However, we can add some Green Glue damping compound during construction to address this.
For more information on these 4 principles, check out my article on the basics of soundproofing. It explains them in more detail, which you can apply to this scenario.
4 Steps: How to Build a Staggered Stud Wall Construction
While it takes a bit of work, double stud wall construction isn’t difficult compared to other soundproofing projects. Of course, it involves taking down the existing wall, so make sure you can actually do that. Also, check local building codes to ensure everything you do is by the book.
Here’s how to build a staggered stud wall.
Materials
- 2×4 lumber (and possibly 2×6)
- Hammer and nails
- Green Glue damping compound
- Cavity wall insulation
- Circular saw
Method
1. Getting ready
The first step is to remove the drywall from the existing wall, but only on one side. The method we’re using doesn’t involve taking the whole wall down.
Now is also a good time to remove any insulation that’s inside the wall. Make sure you wear PPE for this, as fiberglass is bad for your skin and insides.
2. How to frame a staggered stud wall
A furring strip is simply a thin strip of wood that extends or raises the wall. Here, we’re using it to make the wall deeper so we can attach a new staggered stud framing.
Start with 2×4 lumber, which you’ll want to cut into 2×1 on a circular saw. Measure the perimeter of the existing wall (including doorframes) to know how much lumber you need for this step.
To fix in place, use nails every 8-16 inches. While nails will affect sound transmission, the impact is negligible here. Continue this until you’ve framed the entire existing wall.

3. Install new studs
For the new studs, you can use either 2×4 or 2×6 lumber. Using 2×6 lumber means the cavity inside the wall will be larger, so you can add more insulation. If opting for this, it might be worth using normal 2×4 lumber for the furring strips so the whole setup is deeper.
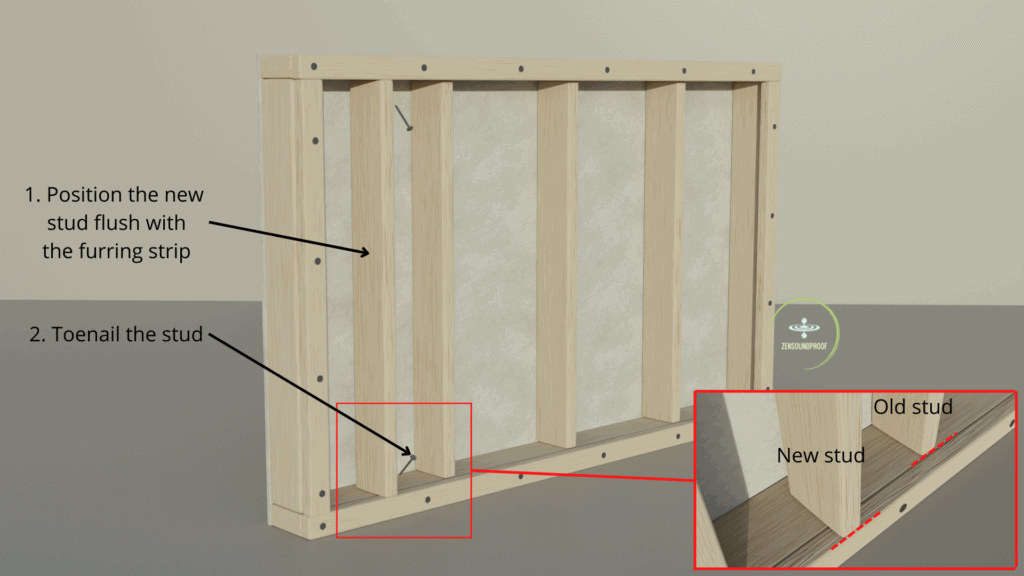
Cut your studs to the correct length and space them 16” apart. By extension, they should sit roughly 8” between each of the existing studs. The edge of each stud should be flush with the edge of the furring strip in such a way that adding drywall will be easy.
To fix them in place, use toenailing, which means positioning the nails at a 45-degree angle through the top and bottom of the studs.
4. Rebuilding the wall
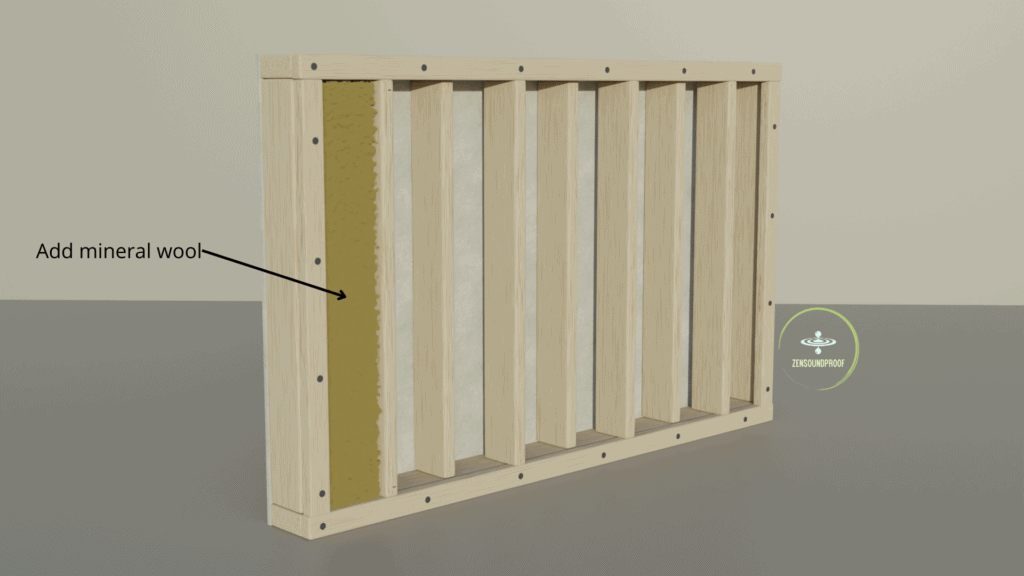
Refill the cavity with insulation. Mineral fiber or fiberglass insulation are the best products because they come as rolls, making this step much easier.
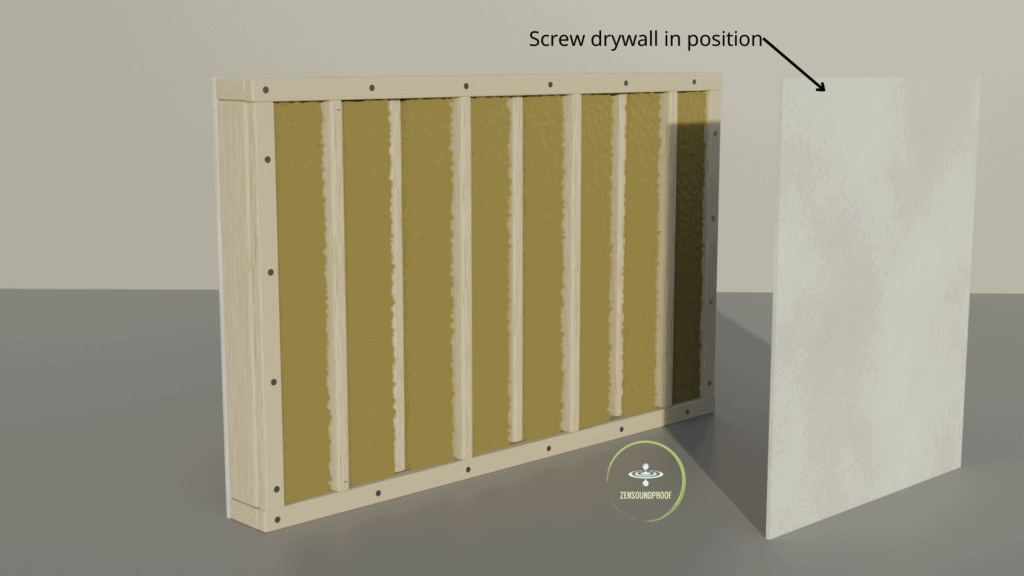
Once that’s done, you can cover the studs in drywall. For this, use either normal or soundproofing drywall, filling the gaps between panels with acoustic sealant. Alternatively, you could add mass loaded vinyl or extra layers of drywall for more mass, sandwiching together with Green Glue damping compound.
The following video delivers great tips on how to screw drywall panels onto studs:
How Soundproof is a Staggered Wall?
To measure how soundproof a wall is, we can use the STC rating system. It stands for Sound Transmission Class, and a higher rating means better sound insulation. Setups and materials are tested in a lab to determine their STC ratings. As such, the ratings given below might be slightly different to what you’ll get in your staggered stud construction.
According to STC Ratings, a staggered stud wall system with insulation in the cavity can have an STC rating of 46-47. When compared to a single-stud wall’s rating of 34-39, you can see there’s a noticeable improvement.
To put this in real terms, an STC rating of 45 means you can still hear loud music or other sounds but they’re not audible, even less than two feet away. An STC rating of 35 means you can hear loud speech and understand it.
As you’ll see on the link above, adding extra drywall further improves the STC rating, as does using resilient channels for full decoupling. The latter is a decent option if you can’t install staggered studs because it does almost the same job.
Double Stud Wall vs. Staggered: Which is More Soundproof?
A double stud wall is essentially a step above a staggered stud wall. In short, it consists of two standard wall frames with an air cavity in the middle. Another way of looking at it is that it’s double the setup you’ll currently have for an interior wall.
Using the STC Ratings link above, we can see that a fully decoupled double stud wall has an STC rating of 56-59 depending on the materials used. So, if it’s this much better, why would we not go straight for this option?
Let’s look at the pros and cons of staggered and double studs to understand.
Pros & Cons of Staggered Stud Walls
PROs- A staggered stud setup is easier to install because it takes up less room. In theory, you’re only adding 50% more depth to the wall, meaning you’ll lose less space in the room.
- By extension, they’ll also be cheaper because you won’t need to completely remove the existing stud wall setup. Rather, you can just add a new wall.
- An STC rating of 46-47 is already a substantial improvement on a single stud wall, and you’d have to be pretty loud to need more. It’s equivalent to the STC of a 6” thick concrete wall. Not too bad for a partition wall.
- On the flip side, there’s only so much a staggered stud wall can achieve, as is evidenced by the better STC rating of a double wall.
- There will still be some transmission of sound waves, as both sets of studs are attached to the same wall frame. So, it doesn’t completely solve the issue.
Pros & Cons of Double Stud Walls
PROs- Double stud walls are true decoupling, meaning it’ll isolate loud noises as much as possible with this kind of setup.
- An STC rating of 59 is pretty amazing. It almost entirely reduces airborne sound through an interior wall.
- Facing and framing a double stud wall is easier because you’re basically building 2 separate normal walls rather than 1 staggered one.
- A double stud wall is twice as wide as a normal wall, meaning you’ll lose more space in each room. By extension, the air cavity is much larger, so you’ll need to be careful with your insulation to avoid reverb issues.
- It’s a very time- and resource-heavy project because you’ll need to remove the existing wall completely.
- While the performance of a double stud wall is clearly better, the extra benefit isn’t outweighed by the extra effort. In most cases, a staggered wall will be enough.
Final Thoughts on Staggered Stud Walls
I hope this article has addressed the process of staggered stud walls. From a soundproofing perspective, they’re worth the hassle because they address mid and high frequencies of airborne and impact sounds.
Of course, building them does take considerable work, so make sure it’s the right decision for your needs before jumping into the project.
Have you built staggered stud walls before? If so, let me know below because I’d love to hear any tips you might have for those interested in setting them up.
