As you may already know, windows are one of the worst areas in a room when it comes to sound pollution. I’ve lost track of the properties I’ve visited where all the great wall insulation is let down by a single noisy window.
If, like me, you’re on a quest for the best noise-blocking solution for windows, I might have the answer: window plugs.
Soundproof window plugs address many of the biggest problems associated with sound transmission through window panes. And, while you can certainly buy window plugs, making them is fairly straightforward.
In this article, I’ll go over my method for a DIY window plug. First, let’s discuss what we mean by a window plug and how they work.
What are Soundproof Window Plugs?
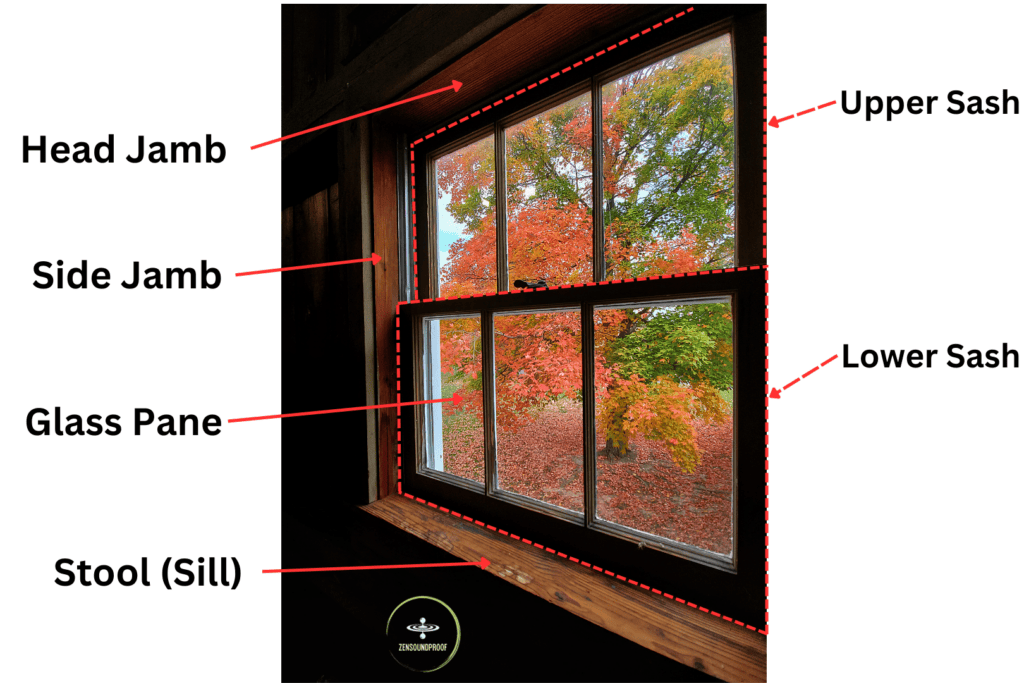
In the most basic terms, a window plug functions much like a bath plug: it creates a seal around the window opening to block sound waves from coming through. Essentially, you push a window plug into the jamb (the indent surrounding the window), sat on the interior window sill, to add extra mass and insulation.
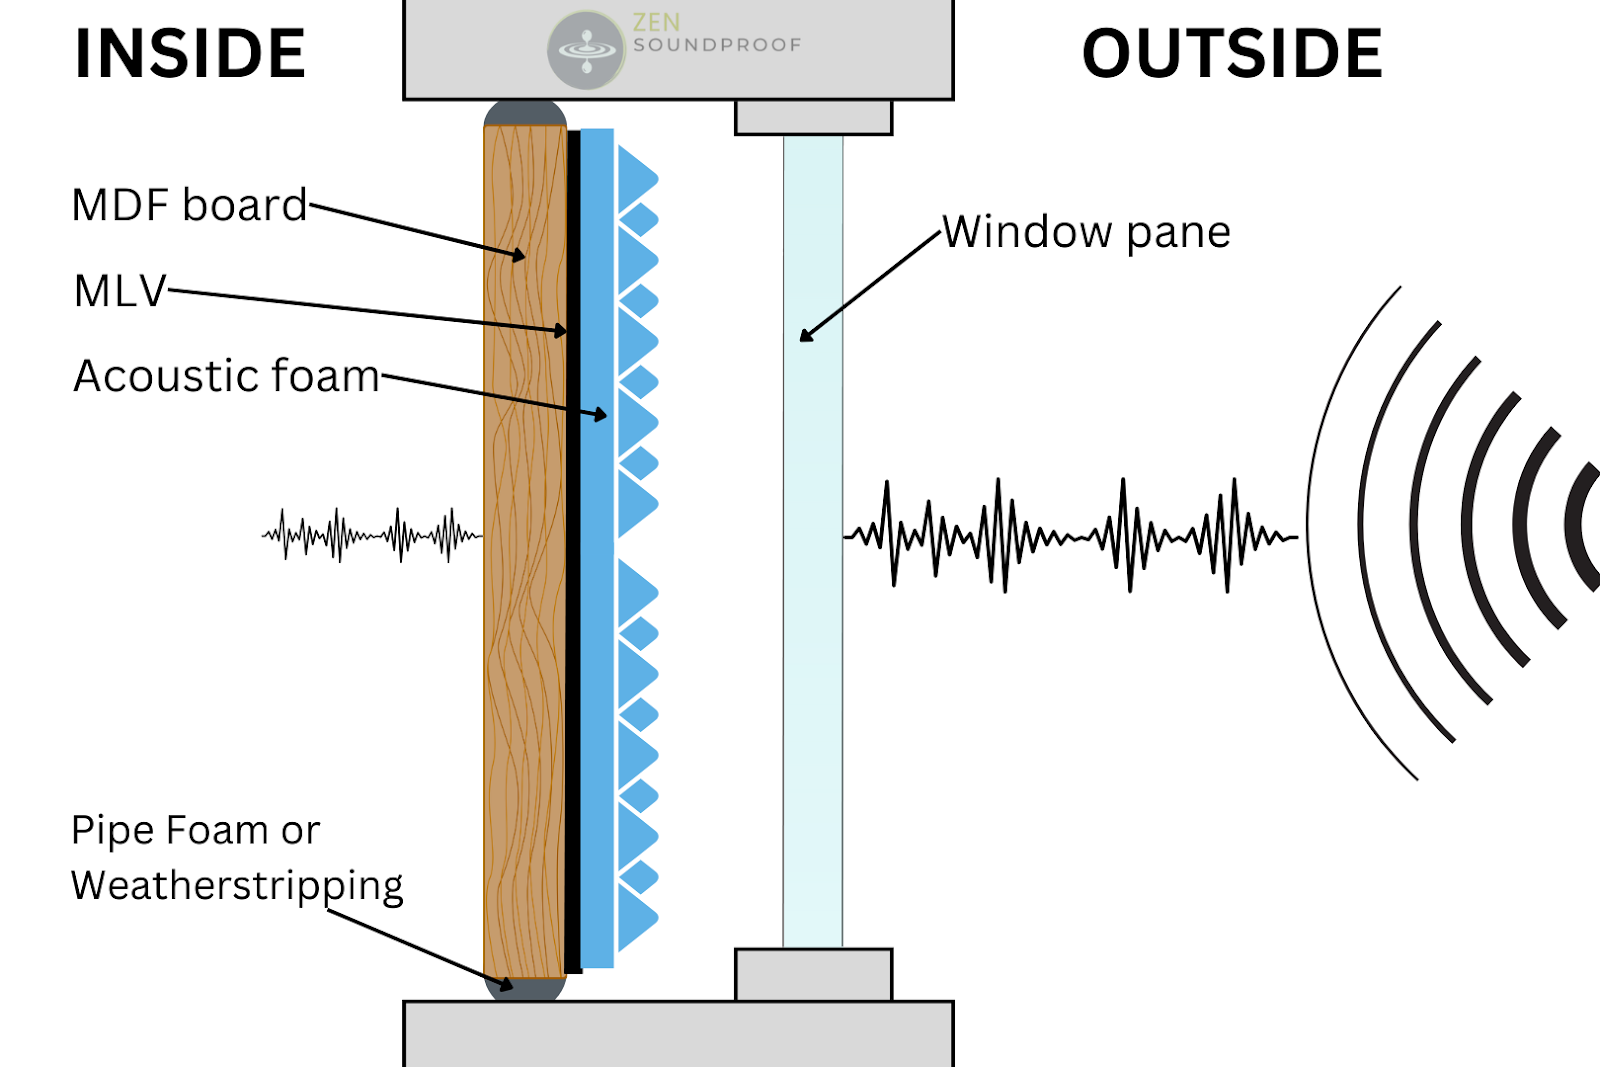
The general components of a window plug include:
- Wood board – the foundation onto which you add the soundproofing materials
- Mass loaded vinyl – this provides mass to help block sound waves
- Acoustic foam – this provides sound absorption
- Fiberglass insulation – while not present all the time, this can also help provide absorption
- Handles – a practical component so you can pick up the window plug
How Do These Materials Work?
Window plugs rely on 2 of the 4 overall principles of soundproofing: mass and absorption. I discuss all 4 in more detail elsewhere, so check that article out for all the information you could need.
But how do these principles help with windows?
Mass makes it more difficult for sound waves to transmit through a structure or material. Sound waves are vibrational energy, so if something has more mass, it’s harder to vibrate. In turn, sound waves expend more energy trying to pass through it.
Mass loaded vinyl (MLV) is ideal for this. We call MLV limp mass, which means it doesn’t vibrate much when sound waves hit it. Similarly, the materials used are very mass-rich for their size, meaning the final product is fairly thin and flexible.
Absorption requires an open-celled material, such as foam. The sound waves pass into the material and then get trapped in its open structure, expending their energy reflecting off all the surfaces. This converts them into heat energy.
It’s worth noting that absorption isn’t soundproofing in the traditional sense.
If absorption is used on an open face of a room, like on the face of walls or ceiling (for example, acoustic foam or carpet on walls), it’s called acoustic treatment that’s meant to reduce reverberation.
If you use it in a wall or ceiling cavity, absorption is a great way to reduce sound transmission. A good example is the use of mineral wool or fiberglass in walls or ceiling cavity, which provide thermal and acoustic insulation.
Going back to window plugs, absorption materials will have different effects if you use them on the open face of your plug or on the face near the window. Acoustic foam on the open face and you’re good for reducing reverb in your room, while adding acoustic foam on the window-facing side will improve your plug’s ability to reduce sound transmission.
How Effective are Window Plugs Against Noise?
Soundproof window plugs can be an effective option against incoming noise pollution. The logic of window plugs basically involves taking typical wall construction materials and using them to cover your window openings.
The easiest way to measure the impact of this is with STC, or Sound Transmission Class.Without going into too much detail, this is a measurement of how much sound a material blocks across all frequencies, rather than providing a value for each.
A higher STC value means more sound is blocked. A dual pane window, for example, has an STC value of 33-35, which isn’t great. On the other hand, MLV can have an STC value of 31. Although this is lower, it’s a thinner material and is generally considered a good option for sound blocking.
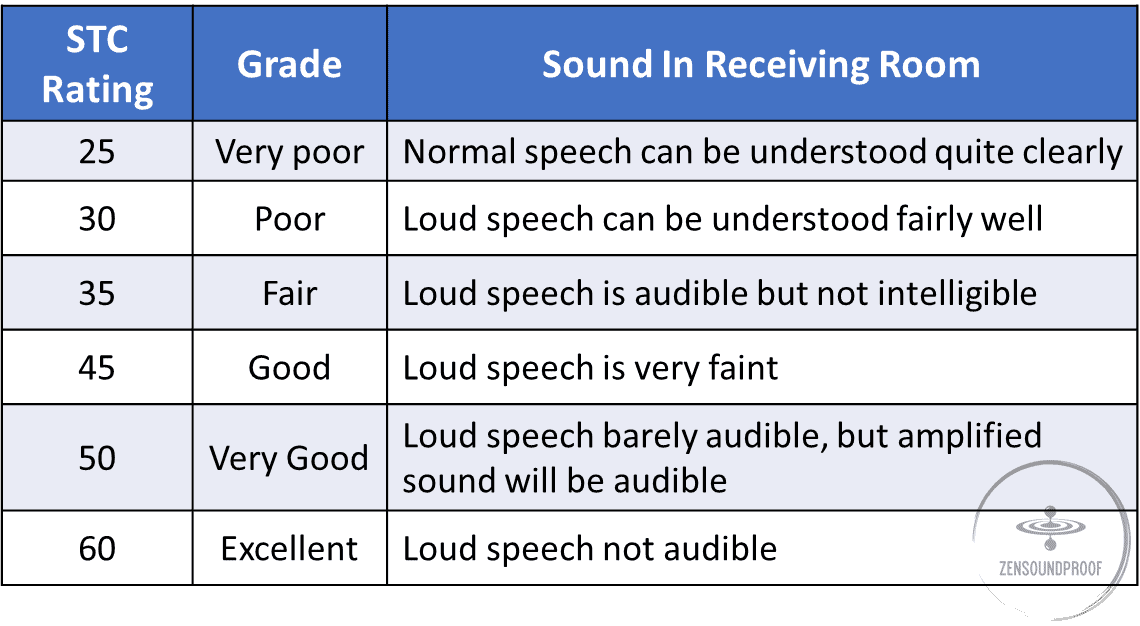
There isn’t readily-available information on the STC values of window plugs, but we can piece together some existing information to give a rough idea of how well a DIY soundproof window plug will perform.
Soundproof Window Plug STC Value
In a previous article, I wrote about the STC values for interior storm window inserts, which are typically made from acrylic. These values are as follows:
| Material and Setup | STC Rating |
|---|---|
| Single pane window | 25 |
| Dual pane window | 33-35 |
| Single pane window & Insert | 39 |
| Dual pane window & Insert | 42-45 |
We can assume (based on performance information) that a window plug will perform better than a storm window insert. This is for a few reasons:
- The window plug can use heavier and denser materials (MLV, plywood, etc.) because it isn’t limited by material transparency. Heavier materials mean better sound blocking.
- The addition of acoustic foam in a cavity (in this case, between the window and plug) can increase the STC value by 2-3 points. This estimate is based on the STC improvement with the addition of insulation in walls. Insulation is something storm inserts lack.
- MLV can add 3 STC points or so to this setup due to its sound-blocking properties. This estimate comes from the performance of MLV in wall assemblies. MLV adds about 6 STC points when properly installed. To be conservative, I divided it by 2.
To put all this together, we could expect as much as a 5 STC point increase when using a window plug compared to an acrylic storm window insert. Although these are fairly rough numbers, they reflect the superior performance of the noise-blocking materials we’re using here.
| Material and Setup | STC Rating |
|---|---|
| Single pane window | 25 |
| Dual pane window | 33-35 |
| Single pane window & window plug | 39 (+5) |
| Dual pane window & window plug | 42-45 (+5) |
Do Window Plugs Work?
So, all this begs the question: do window plugs work?
Window plugs do work to block out low frequency noise, compared to both untreated windows and other noise-blocking options. The main advantage is that window plugs use materials designed for insulating walls at the expense of visibility. As such, they’re an ideal option if you need high levels of sound blocking and don’t mind losing some light!
Assessing Window Plugs as an Insulating Solution
On the whole, soundproof window plugs are a good option for acoustic insulation. They offer more benefits than drawbacks, but let’s cover both so you know exactly where you stand with this solution.
Benefits of Window Plugs
Noise Reduction
A no-brainer, soundproof window plugs are a good option for reducing noise coming into and out through a window space. They’re more effective than many other solutions, including storm windows, soundproof curtains, etc.
Thermal Insulation
While not their primary purpose, choosing to install window plugs can provide decent thermal insulation. This is because the extra mass makes it more difficult for heat energy to pass through, and the plug itself creates a dead air space between the window and the room.
Blocking Light
If it wasn’t clear, window plugs are completely opaque. As such, they let no light through and, provided they’re fitted properly, no light should creep around the edges either. Light blocking can be a big advantage in some noise-reduction scenarios, such as a home theater.
Inexpensive Solution
Compared to solutions that perform on the same level, window plugs are fairly inexpensive. Sure, there are cheaper options, but these won’t provide the same level of noise blocking.
Drawbacks of Window Plugs
Blocking Light
Blocking light is both a pro and a con depending on the room in which you’re fitting the window plugs. For example, if you’re trying to reduce noise pollution in your bedroom, you might not want to completely block all natural light. The solution to this is to only use them at night.
Don’t Look Great
There’s no getting around the fact that window plugs are pretty ugly. While something like a storm window insert maintains a window’s functionality and appearance, window plugs are all about performance. To combat this, you might want to make them look more aesthetic.
How to Build and Install a DIY Window Plug
Now that we’ve covered the performance of a window plug, let’s look at how to build one. Luckily, it’s a fairly straightforward process that you can do with some basic tools and materials. These are:
- Plywood or MDF
- Mass loaded vinyl (I recommend the 2lbs. per sq. ft.)
- Acoustic foam
- Foam pipe insulation
- Glue
- Handles (any drawer handle will be fine)
- Utility knife
- Drill and screws
- Saw
- Staple gun and staples
The steps are as follows:
1. Measure Your Window
The first step is to measure your window. By this, I mean the inside of the window jamb (the space surrounding the window). Take 6 measurements: 3 vertical and 3 horizontal, following the guide in the image below. Doing so means your window plug will be as accurately sized as possible.
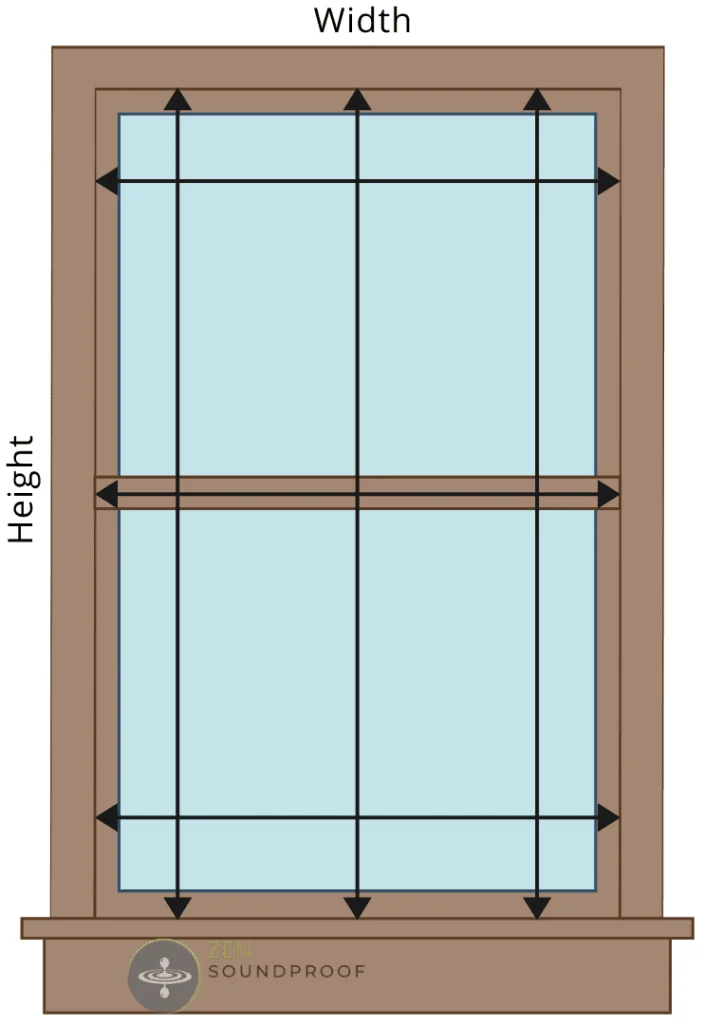
Draw an image of your window and copy the measurements onto it. Subtract an inch from each measurement to accommodate the foam pipe insulation.
2. Cut Your Materials to Size
Start with your wood board. Cut it to size with a saw, sanding down the edges if necessary. Each wood type has its own advantages, but I’d recommend going with plywood for extra rigidity or MDF for a material that’s easy to cut.

Next, cut your MLV to size. How you do this will depend on whether you’re using a roll or squares. Either way, make sure you have enough to cover your wood board. If you have a deep interior window, you could consider using more than one layer.
3. Assemble Your Plug
Start by laying the wood board flat on the floor. Cover it with your sheet of MLV that’s cut to size and staple it down. Staple the top edge first and then work down the sides to ensure there aren’t any creases or folds.
Then, stick the acoustic foam on top of the MLV. Glue is better for the foam, but MLV could peel off if glued down due to its weight.
4. Attach the Handles
Once the glue is dry (leave it for a day or so), flip the board over and attach the handles. Simply screw them onto the board. Be careful when choosing the screw length as you want to avoid screwing all the way through the board.
5. Finish the Edges
Next, you’ll want to attach the foam pipe insulation. Cut a slit using a craft knife so it can be opened up, and then cut 4 pieces to size. You’ll want one for each edge of the plug. Then, open the slit and fit the foam over the edge of the wood board.
The advantage of using pipe foam in this way is that it’ll create a tighter seal around the window frame than the board itself. When you push the plug in, you’ll want it to fit as tight as possible to block sound properly.
Alternatively, you can use weatherstripping. It’s what I recommend using in my DIY storm window instructions. You could use it here if the gap isn’t too big between the plug and the window. Plus, it’ll look a bit nicer than pipe insulation.

6. Improve the Appearance
Finally, you might want to make the window plug look nicer. How you do this depends on your budget, your room’s overall appearance, and simply how much you care about the plug’s look.
Some options include:
- Painting the wood the same color as your walls
- Covering it with fabric (so it looks like a blind)
- Stick a poster to it
Alternatively, you could draw the curtains or close a blind to cover it up completely.
How Much Do Window Plugs Cost?
Earlier, I mentioned that soundproof window plugs are a fairly cost-effective solution. But what does this mean in actual numbers? Well, some rough estimates for the main materials are:
| Material | Cost Estimate (in USD) |
|---|---|
| Mass loaded vinyl | 16-129 |
| Acoustic foam | 20-40 |
| Pipe insulation | 10-35 |
| Wood board (plywood, MDF, etc.) | 10-50 |
As you can see, some costs vary wildly. Mass loaded vinyl, for example, can be very expensive. This is because it can come as either 1’ x 1’ squares (the $16 option) or larger rolls. I’ve linked a 40 sq. ft. roll above, which should be enough do make up to 2 window plugs for standard-sized windows.
How much you need will obviously depend on how many plugs you’re building, and how big your windows are. If you’re only building one plug, buying it by the square foot will be fine. For several windows, a roll will probably be a more cost-effective option.
The bottom line is that you could make a window plug for as little as $50, or even less if you source the wood for free. Again, window plugs aren’t the cheapest option, but they’re infinitely more effective than less expensive solutions.
Final Thoughts
And that just about rounds up my guide on DIY window plugs. I hope the instructions are clear enough for you to follow, and that a window plug ends up being the solution you’re looking for when it comes to noise blocking.
Have you tried building your own soundproof window plug? If so, let me know how it went and whether you have any tips or hacks for those planning to build their own in the future. Drop your thoughts below!
