The concept of storm windows was unfamiliar to me. Where I’m from, houses usually have shutters fitted to serve the same purpose. However, I was talking to a friend who explained the idea of storm windows, and I realized they’d be a great foundation for acoustic insulation.
This led me to dive into some research and I came up with the idea of DIY interior storm windows for soundproofing. While you can buy them, making them yourself gives you far more flexibility over the material choices.
So, this is what I’ll cover below. In this article, we’ll look at how to build DIY window inserts, aka interior storm windows.
What are Interior Storm Windows?
You may already be aware of exterior storm windows. Exterior storms windows are extra panels that attach to the exterior of your window opening to offer protection in bad weather.
Well, interior storm windows are a similar idea, except they go on the inside of the window. In this article, I’ll use the terms removable interior storm windows and window inserts interchangeably.
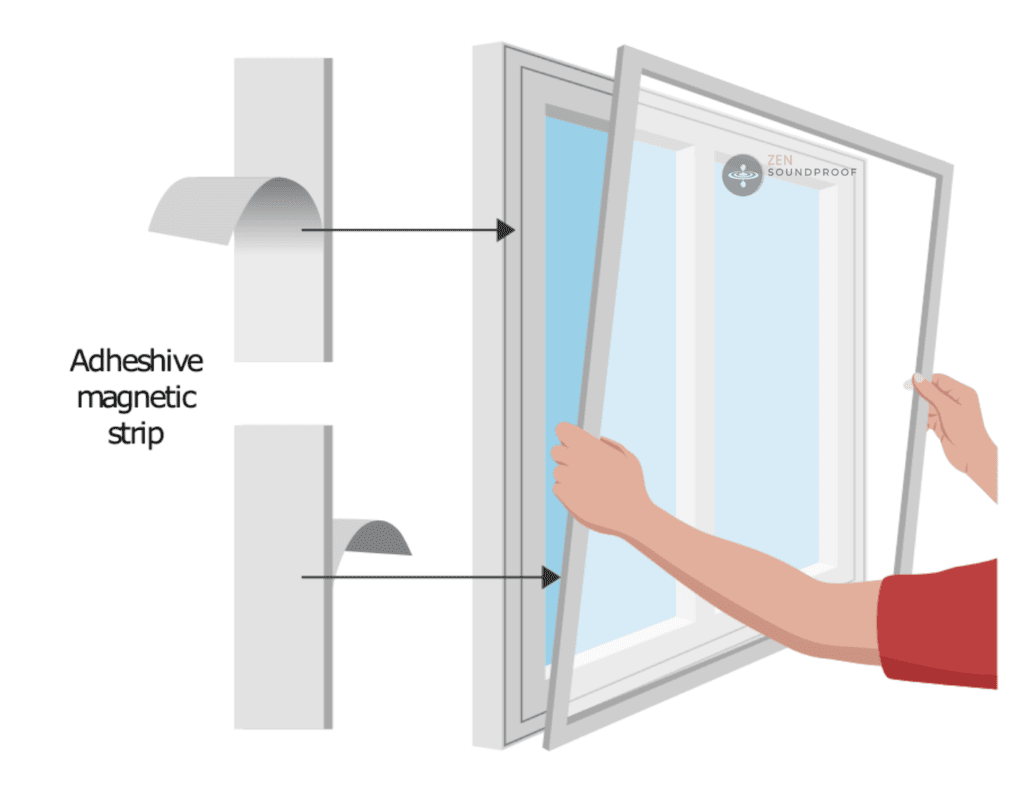
To put it simply, window inserts consist of a pane of glass or sheet of clear plastic. This could be acrylic, plexiglass, or similar. Window inserts attach to window frames using magnets, tracks, or adhesive (such as double sided tape), or can simply be pushed into place.
The Benefits of Window Inserts
There are 2 major benefits to adding window inserts in your home: thermal and acoustic insulation.
I’ll explain this in more detail later in the article, but it basically comes down to adding more mass and creating an air gap. Although glass and acrylic aren’t particularly mass rich, even a small addition will provide some benefit.
Similarly, the air gap improves insulation because air is a poor conductor of heat and sound energy. By trapping a layer of air between the window and the insert, you create a space that effectively “traps” this energy and prevents it from passing into your room.
Ideally, you want to make this air gap as large as possible. As I illustrated in my articles on soundproof glass and window glass, the air gap can easily increase the STC of your window by 2-3 points (More detail about STC below).
Preparatory Phase: Gathering Your Supplies
Before we jump into the method, I’ll list all the materials you’ll need for building interior storm windows DIY. I won’t bother listing quantities, as this’ll depend on the size of your window, how many you’re building, etc.
To make DIY interior storm windows, you’ll need:
- Clear plastic panel (acrylic, plexiglass, polycarbonate, etc.), or glass
- Foam weatherstripping tape
- Magnets
- Electric drill
- Wood screws
- Small handles
For the insert sheet material, you can basically choose anything you want. Obviously, it helps if it’s see-through, but this isn’t necessary if you don’t mind it being dark in your room!
I recommend laminated plexiglass if you can find it. Based on my experience, it’ll provide the best acoustic insulation properties out of all the available materials. This is because the middle layer (PVB) provides sound dampening to help block sound waves.
Failing that, polycarbonate sheets have a better STC rating than acrylic (more on this below). However, it’s more scratch-resistant, making acrylic a more durable option.
7 Steps Guide to DIY Interior Storm Windows
Provided you know your way around some basic tools, making these window inserts shouldn’t be too difficult. I’ll detail each step and provide an image so you’ve got a good idea of what needs doing.
1. Measuring for DIY Window Inserts
The first step, unsurprisingly, is to measure everything. Ideally, your windows are in a window well, which is the recessed section in which the window sits. It doesn’t need to be especially deep, though – anything over ¾” will be fine.
Begin by taking some measurements of the area around the window. I recommend taking 6 measurements:
- 3 horizontal: at the top and bottom of the frame, and somewhere around the middle.
- 3 vertical: one in the middle, and one each side around an inch or so from the edge.
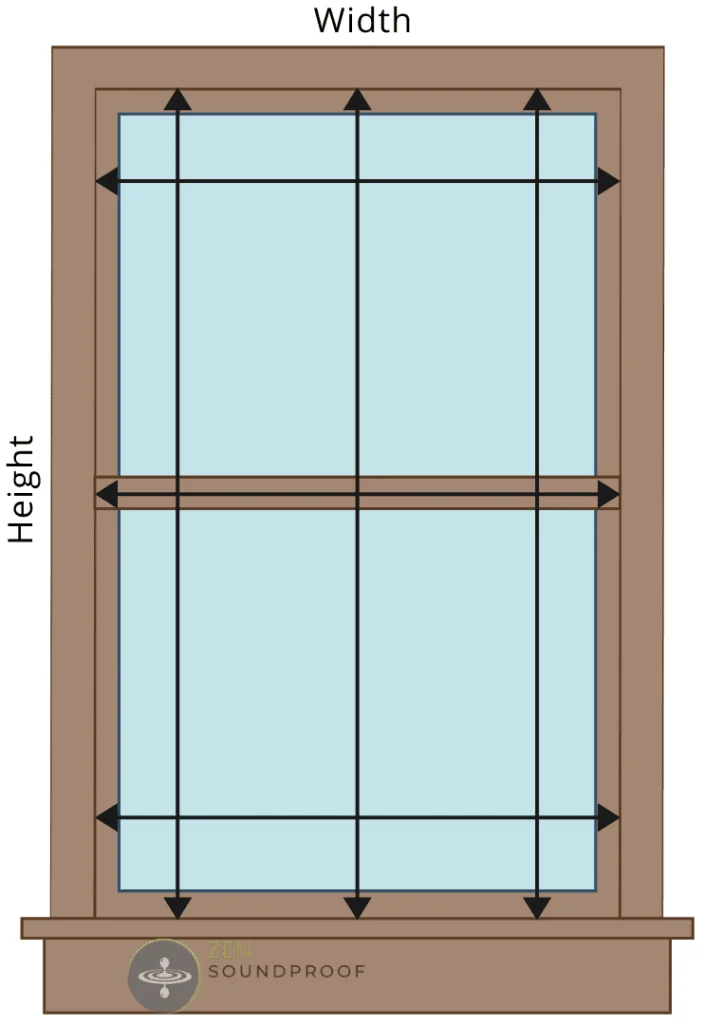
Having 6 points allows you to compensate for bowed windows and old buildings. I’ve done plenty of DIY in older homes, and they rarely have straight lines!
Once you have your measurements, subtract half an inch from each. This is to compensate for the weatherstripping.
It’ll help to draw your window out on some paper and copy the lines and measurements onto it.
2. Cut to Length
You’ll likely need to cut your acrylic to size, unless you’ve bought a custom piece already measured. The method you use to cut your material will depend on its thickness and composition. I recommend watching this video on how to cut plexiglass to understand the options.
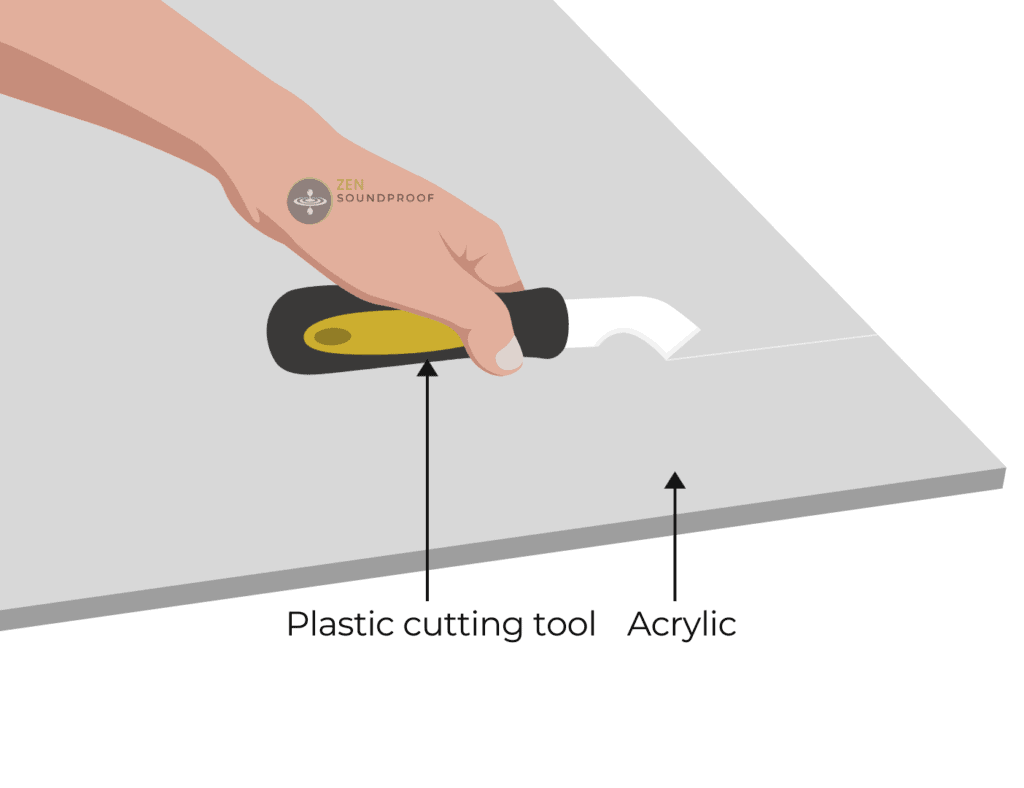
The best tool for thin sheets of plexiglass (up to 3/16” thick) is a box cutter knife or acrylic cutting tool. You’ll need to score the sheet 10 or so times, flip it over, and repeat. It should eventually be thin enough for you to snap it off using a sharp downward motion.
For thicker pieces of plexiglass, you’ll want to use a circular saw or table saw. Choose a fine-tooth blade that’s ideally designed for cutting acrylic. Of course, if you don’t have access to a power tool, you can do it manually, either with a fine-tooth handsaw or with the scoring method above.
3. Add Weatherstripping
Once you’ve cut your acrylic to size, it’s time to add weatherstripping to the edges. You can use foam or felt tape. I prefer foam tape because it’s more resilient than felt and allows you to get a tighter fit.
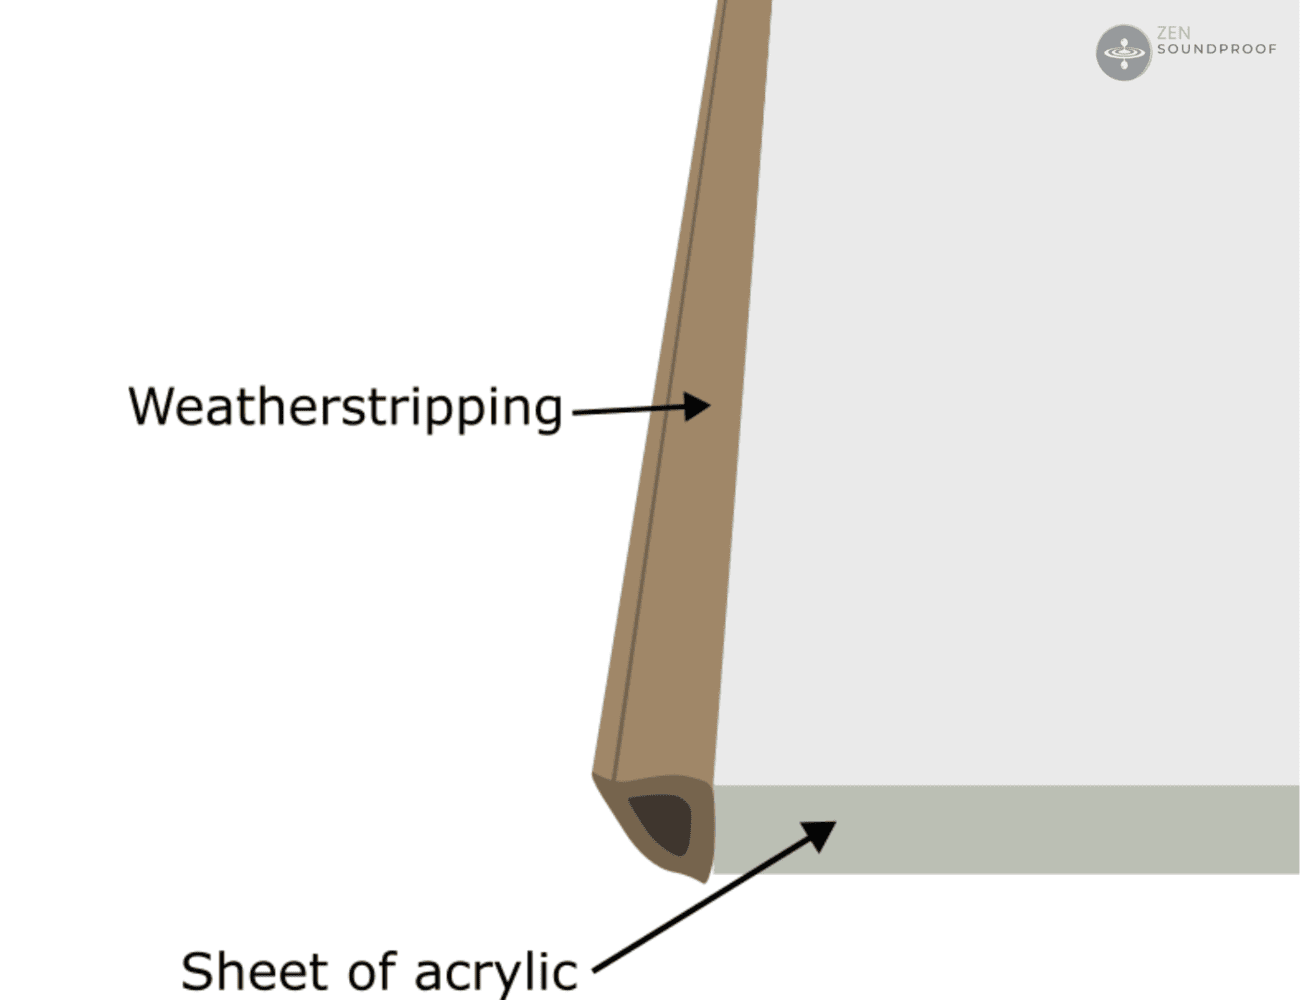
Start at the bottom and extend the strip by around a quarter-inch to either side. This is so you can overlap and then cut the weatherstripping to size. Repeat this process on the top side.
Next, do the two sides and ensure the weatherstripping meets snugly at the corners and there’s minimal gap.
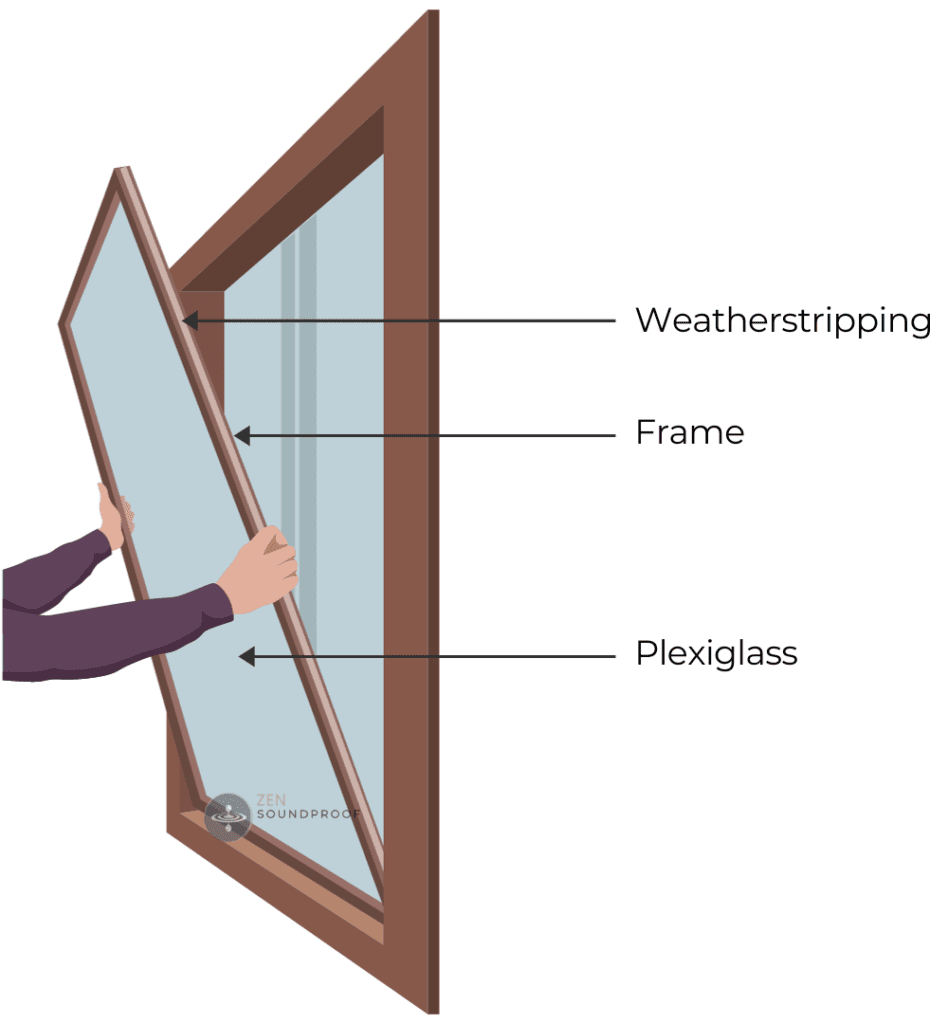
4. Fit the Acrylic
Test your acrylic against the window to check it’s a good fit. If not, add more weatherstripping. If you can’t get it in place, you might need to remove some instead.
5. Add the Finishing Touches
Provided the acrylic sheet is fitted, you can move on to the finishing touches. Specifically, you’ll want to fix some handles to the side facing into the room.
The simplest handle will be a rectangular piece of lumber, roughly 4 inches long. You can screw it directly to the acrylic, but you’ll want to tape some holes using a tap wrench. The holes can go all the way through because the lumber will cover them.
Alternatively, you could use suction cup grab bars (such as these). The benefit here is that you can remove the handles when not in use, so they don’t affect the appearance of the interior storms window.
That said, you don’t necessarily need handles. You could use the flexibility of the weatherstripping to remove the insert with little difficulty.
Finally, fix 4 magnets to the window insert – one in each corner. Match these with magnets on the window itself. You can get self-adhesive magnets, but a dot of super glue will work fine too.
You could also use screen retainer clips if it’s easier. In theory, you don’t need magnets or clips, but they help provide a bit more security.
7. Install
That’s all there is to it! The last step is to simply install your interior storm window. Make sure to sit your insert as far as possible from your window pane to increase the air gap. Lastly, enjoy all the thermal and acoustic insulation it provides.
Variations in Mounting Interior Storm Windows
In my method above, I recommend fitting the insert inside the window recess. In my opinion, this provides the best fit for acoustic and thermal insulation. However, there are a couple of variations you could try:
1. Mount it outside the window frame. Essentially, this involves fixing the storm window to the wall instead of inside the recess. Measure the window frame and add an inch to each of your measurements. The benefit is that it doesn’t sit on the windowsill and can be used if your windows are flush with the wall.
2. Joining several pieces of plexiglass. For very large windows (including French doors), I recommend mounting outside the frame. You can join several pieces of plexiglass together using joiners, which simply slide together.
3. Mounting on hooks. Instead of magnets, you could mount the storm window on hooks outside the frame. This’ll make it easier to take down but will mean a less snug fit.
Benefits of Interior Storm Windows
As mentioned, the two main benefits of window inserts are acoustic and thermal insulation. Let’s cover these in more detail to understand how they work.
Minimizing Window Noise
I’m sure it comes as no surprise that glass isn’t a great acoustic insulator. In the soundproofing world, windows are seen as one of the biggest weaknesses in a room. Window inserts help us deal with that by adding mass and an air gap, thereby improving a window’s STC value.
STC stands for sound transmission class. It’s a measurement of how well a building material attenuates (blocks) sound waves. Higher numbers mean better sound attenuation.
To give you a better idea, a 90mm (3.5”) concrete wall has an STC of 40.
Indow Windows has a helpful chart that shows the benefit of adding a window insert. It uses an acoustic grade insert but doesn’t state what materials this includes. As such, the figures in this table are representative of the kind of difference you could hope to achieve with the window insert above.
| Material and Setup | STC Rating |
|---|---|
| Single pane window | 25 |
| Dual pane window | 33-35 |
| Single pane window and insert | 39 |
| Dual pane window and insert | 42-45 |
These values show that adding an acoustic window insert and air gap can result in an STC increase of 10-14 points. An STC rating of 50 and above is considered a professional standard, so 45 is a pretty good result.
Improving Thermal Insulation
While a secondary concern for our needs here, one of the main reasons for storm windows is the extra thermal insulation. To measure thermal insulation, we use R-value, which is the ability of a material to reduce heat transfer.
Although acrylic and plexiglass aren’t amazing insulators, the air gap is what matters here. It’s a similar idea to double-glazed windows, except that gap is filled with argon gas.
Essentially, air is a poor thermal conductor, so adding an air gap helps reduce thermal transfer.
Similar to Indow’s values above, we can look to the window insert Climate Seal for some example R-value measurements:
| Window Type | R-Value of Standard Window | R-Value with Climate Seal | Increase in R-Value |
|---|---|---|---|
| Single pane | 1.12 | 2.38 | +112% |
| Dual pane | 2.22 | 3.45 | +55% |
As you can see, adding an acrylic insert to a single-glaze window makes a considerable difference. It’s less obvious on a double-glazed window, but that’s because its R-value is already double that of a single pane window.
Potential Cost Savings of DIY Interior Storm Windows
Making your own acoustic window inserts could save you quite a bit of money compared to buying them. However, this’ll largely depend on the size of your window and your chosen material.
For example, Acme Plastics has extruded and cast acrylic, and plexiglass. The price for a piece for an average window could range from $72 to $150.
On the other hand, a readymade acoustic insert from Indow could cost anywhere from $372 to $588 for an average window. This price depends on thickness and performance.
Indow Windows is probably your best bet if you want a premade solution. While they’re more expensive, it at least saves you the job of building it. But if you have awkward windows, want to save a bit of money, or want more flexibility over the materials, the DIY option is the way forward.
Final Thoughts
I hope this guide will be useful for helping you build your own interior storm windows. In my experience, the process can be a bit fiddly, but it can make a noticeable difference to the soundproofing and thermal properties of your existing windows.
Have you tried building window inserts before? I’d love to hear any tips you might have for squeezing that extra bit of performance out of them. Let me know below!

1 thought on “7 Steps – How to Build DIY Window Inserts, aka Interior Storm Windows”
The instructions fail for me in step 3 when you add the weatherstripping. The narrowest on the Amazon link is 5/16. Most plexiglass for window applications is 1/8, 3/16 or 1/4.
As much as I want to do this, I can’t figure out how to get the weatherstripping to work on a narrower edge. And for my purposes, the thinner the plexiglass the better.