If your bathroom fan makes noise that’s loud or unpleasant, it can often be a sign that you need to carry out some repair work. Luckily, there are plenty of options for how to deal with a noisy bathroom fan.
And that’s exactly what I address in this article. Below, I’ll cover some suggestions for dealing with a noisy bathroom exhaust fan. First, it’s worth looking at how these fans work and what we can consider normal noises.
The Sources of Noise in a Bathroom Fan
Before looking at the sources of noise in a bathroom fan, we should discuss how we measure sound emissions. Typically, this is done with decibels – a scale you’re probably familiar with to some extent.
But for bathroom exhaust fans, we use a scale called sones. While it still measures the loudness of a sound, it does so in relation to air speed or cubic feet per minute. When air is blown by a fan, the pressure creates noise. As such, the faster the fan, the louder the perceived noise.
Whereas decibels are logarithmic (an increase of 10dB is a doubling of loudness), sones are linear. It’s therefore a much easier scale to understand, as 2 sones are twice as loud as 1 sone.
But how loud are bathroom fans supposed to be? A typical bathroom fan can be anywhere from 1.5 to 5 sones. In decibels, this is roughly the equivalent of office noise (45-50dB) to a busy restaurant (70dB). As you can see, this is quite a range of loudness.
Noise Sources in a Bathroom Fan
A bathroom fan will always produce some noise, as there’s little we can do about the moving parts and airflow. However, some of the main culprits for producing excessive noise are:
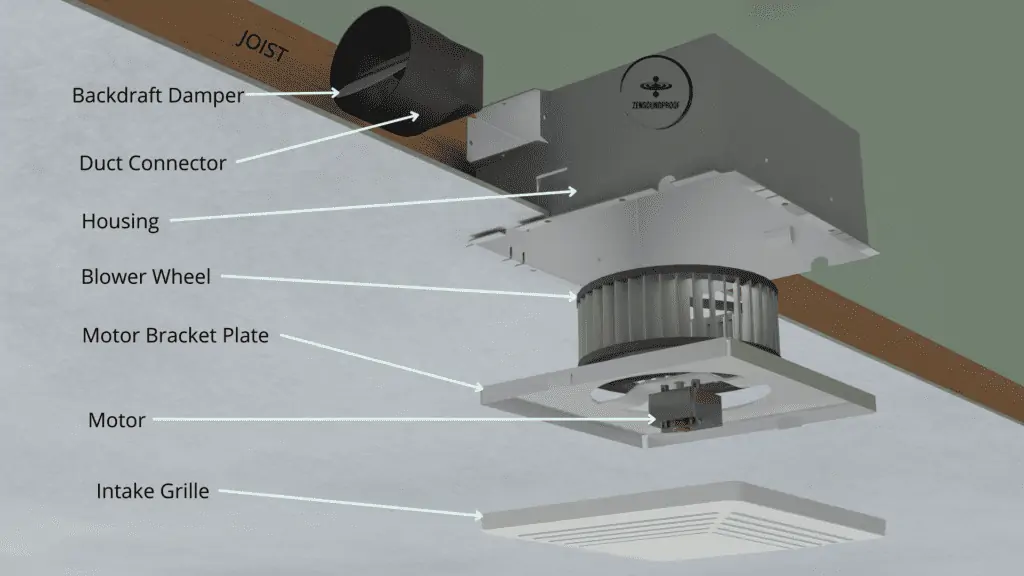
Fans/Blower
Noise type: airborne
Despite being called a bathroom fan, these appliances generally use a blower. While the basic principle is the same (moving air), a fan has its inflow and outflow in the same direction. A blower, on the other hand, moves air in one direction or at a specific area.
Regardless, blowers and fans make noise due to moving air, which creates a delta pressure between the inflow and the outflow. This air movement creates vortices, which, in turn, make noise. However, it’s generally one of the least offensive sources of noise in a bathroom fan.
Motor
Noise type: impact
Motors consist of moving parts and will produce vibrational energy as a waste product of movement. Bathroom fans are typically mounted to the room’s ceiling joists, so any vibrations they produce pass into the structure. We consider this to be impact noise, but it’s also called structure-borne noise.
In theory, a perfectly balanced motor would create minimal vibrations, or at least a barely noticeable amount. Higher levels of vibrations occur in an imbalanced rotor, be it the fan blades or the motor shaft itself.
These vibrations pass into the ceiling joists and transfer elsewhere in the building. Eventually, these can resonate out of the structure to become sound waves elsewhere.
Exhaust/Ducting
Noise type: airborne
Exhaust fans have ducting to direct air away from the bathroom. Typically, this ducting is flexible piping fixed to the fan’s housing. Noise created by the fan can travel down the ducting by bouncing off the surface. This can create echoes, but, much like blower noise, it’s not usually a massive issue.
Unit Age
Noise type: impact
Over time, the fan’s components can become loose or worn out. While there are some steps you can take to deal with this, the easiest solution for an old fan is usually to just buy a new bathroom exhaust fan.
Why is My Bathroom Fan Loud or Squeaky?
Some noises made by a bathroom fan are perfectly normal (e.g., light humming or a quiet rattle) and are caused by the fan’s natural vibration. However, other noises can be signs of a worn or malfunctioning unit. Some to listen out for include:
- Squealing. This can indicate friction between parts rubbing together, particularly plastic and metal.
- High-pitched sounds. This is quite a broad category, but is often a sign that the motor is worn out.
- Rattling can indicate the mounting or housing is loose or something in the unit is misaligned.
- Grinding is usually a sign that there’s debris caught in the fan blades or shaft.
- Crackling or banging. These sounds indicate a loose or misaligned fan blade and are knocking against the housing.
It’s possible to fix a noisy bathroom fan yourself, provided the noise source is a minor issue. However, for something like a worn motor, your best bet is to buy a new bathroom fan. If you’re concerned about a loud noise that isn’t on this list, it might be worth calling in a HVAC professional.
How to Fix a Bathroom Fan Making Noise
Now that we have an idea of the main sources of noise in bathroom exhaust fans, let’s go over some solutions for dealing with them. Most involve some level of DIY, so make sure you’ve got your toolbox handy!
Also, watch this video on how to unmount and reinstall a bathroom fan. It’s pretty short, but it should give you enough information for every solution given below.
1. Clean the Unit
Most of my solutions below involve getting inside the fan housing unit, so it makes sense to clean it while you’re in there. In fact, I’d recommend doing this before any other maintenance jobs, as it’ll be easier to do and will reduce the chances of you getting dirt where it shouldn’t be.
You’ll need to take off the bathroom fan vent cover to expose the unit. Wipe the fan blades down and clean the cover itself. Do this by washing it in soapy water.
Although compressed air can be useful for cleaning the fan blades, you’ll likely need to use a damp cloth. The presence of moisture in the air will cause all the dirt and debris to stick to the blades.
Continue cleaning any parts you can access with a damp cloth. This is also a good time to look out for damage and wear or loose parts, which you can address in the later steps.
2. Lubricate the Motor
You lubricate the bathroom fan motor and fan blades shaft using silicone lubricant spray. With the motor exposed, spray a few squirts onto the shaft and motor itself. Newer units should have permanently lubricated motors, but this isn’t the case on older models.
To properly lubricate the unit, you’ll probably need to remove the fan assembly. The most common method for holding it in place is clips, which you should be able to access once you’ve removed the vent cover. You’ll probably have to remove 1-4 screws, too.
Some older units might have wiring directly into the fan assembly, but it should unclip easily. If there isn’t any wiring, just remove the assembly.
Now you should have the fan assembly in front of you. You can take the unit apart further, but it’s not necessary. Providing you can access the shaft and motor, you can lubricate it. Then, just follow the disassembly steps in reverse.
3. Check the Fan Blade
While the fan assembly is still in place, spin the fan using your finger. Look out for signs of misalignment, such as the blades scraping against the housing. Rotate it a few times and look out for it being unbalanced.
If you have a blower, it should look like a squirrel cage, the steps to check any misalignment are the same, though.
To remount the fan, you’ll need to take everything apart and adjust the shaft. Provided the shaft itself is still straight, it should be as simple as tightening everything back into place. However, if you notice the shaft is bent, you’ll need to replace it.
4. Decouple the Motor
One of the most effective ways to deal with vibration transfer is to decouple the motor from its housing. The process is pretty simple, but you’ll need to properly inspect the unit first to ensure you can do this.
In short, you’ll install some polyurethane sheets between the motor and any hard surfaces that can transmit vibrations. These sheets are typically around 3mm thick but are quite compressible.
Here are some areas that you can cover to decouple the noise of your bathroom fan:
- Between the HOUSING and the ceiling.
- Between the HOUSING and the joists.
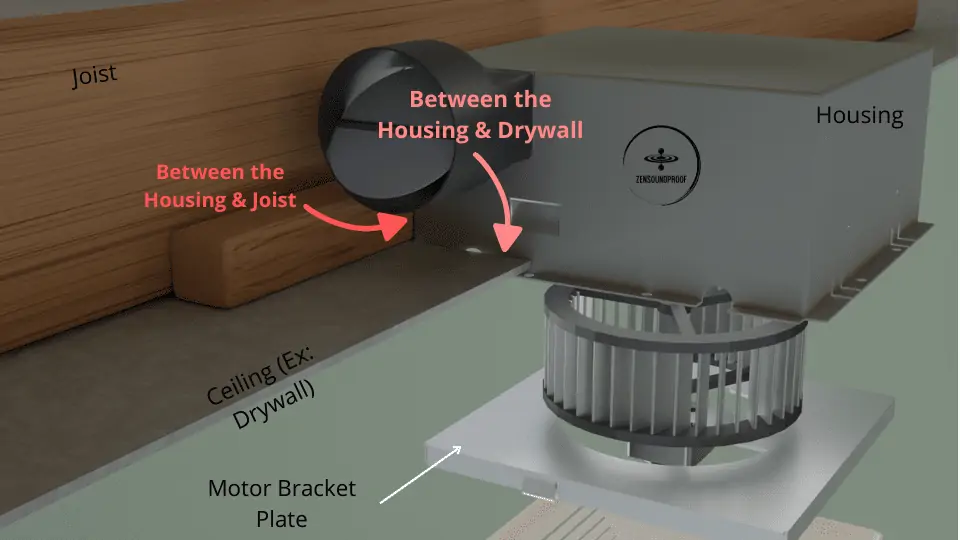
Cut small strips from the sheet and fit in some around the HOUSING. This will require you to disassemble the housing from the ceiling for easier access.
You might also want to try fitting some around the unit’s joist clips for extra damping. The easiest way to do this is to just glue it to your ceiling joists where the fan attaches to them.
5. Tighten Screws
This is one of the simpler options for how to fix a noisy bathroom fan. As mentioned, components can become loose over time, causing rattling noises. If you noticed any issues while you were cleaning the unit, tightening everything can be a good solution.
You’ll need access to all fixings, including the mounting screws. Your first step should be to tighten loose mounting equipment and then work your way through the exhaust fan, tightening any screws you can find.
For the mounting screws, you might need to access your attic. Some units have screws through the fan assembly into the joists. You should be able to reach these from your bathroom.
However, other units will fix to hangers that mount to joists above the ceiling drywall. For these, you’ll need to get into the attic. As long as you can get up there, the actual process of tightening the screws is easy.
6. Duct Adaptor
When air flows into a larger section of ducting, pressure increases, but airspeed decreases. Considering speed is what generates noise, having wider ducting can help reduce overall noise emissions.
Of course, completely replacing the ducting is a lot of effort. You can do this instead with a duct adaptor, to increase the size of the fan’s outflow.
Also, harsh bends in your ducting can impact air pressure and speed, so try straightening the ducting. It’s not uncommon for there to be a 90-degree bend at some point. If possible, replace this with two 45-degree bends, as this’ll reduce air pressure. You can do this with 45-degree elbow connectors.
7. Replace Components
All the moving parts in your bathroom fan will have a finite lifespan. If you’re confident that you can identify what’s causing the issue, replacing individual parts can be a more cost-effective option than buying a new unit.
However, this won’t be an option for everyone. Most bathroom fans manufacturers will offer parts replacement, such as Broan NuTone. You’ll need to know the model number, which will usually be on the motor plate. It could be a sticker or printed onto the metal directly.
Rather than listing the steps for this, I recommend checking out this video on how to replace a bathroom fan motor. This is probably the most common part to replace, but there will be plenty of other videos out there depending on what you need to do.
Before going down this route, it’ll be worth researching the price of brand new fans compared to the price of replacement parts. Although the latter will usually be cheaper, you should think about whether the return on investment is worth it. For example, a new unit will have a warranty and should last 10 years or so, whereas a new motor could last for 10 years and another component gives out in the meantime.
8. Repair the Backdraft Damper
Bathroom fans have a component called a backdraft damper. As the name suggests, it prevents air from traveling the wrong way up the ducting (i.e., from the outside in). The damper could either be a section of the ducting with a 1-way flap or it could be a set of shutters over the vent. In some cases, you might have both.
If your backdraft damper is damaged, it can let air flow back into the fan’s ducting. This can cause rattling noises and air blowing back into your bathroom.
Replacing it can be a bit more work than the other jobs, as you’ll need access to either the vent on the outside wall or the ducting in the attic. Replacing a ducting damper is fairly easy, though.
You’ll just need to remove the ducting and damper and fit the new one. Replacing the grille on the outside wall also isn’t difficult, provided you can access it. Importantly, this isn’t something that replacing the fan itself can address, so it’ll be worth looking into.
When to Upgrade to a Quieter Bathroom Fan
Although there are numerous solutions for fixing a noisy bathroom fan, in some situations, it makes sense to just replace the whole unit with a quieter model. Here are what I consider to be the most common situations for where this is the case.
1. Age
The general lifespan for a bathroom fan is about 10 years. If you believe your unit to be 10 years old or older, it’ll probably be worth just replacing it. Newer models are far more efficient, which in turn can help with noise emissions.
Also, you might find that a new bathroom exhaust fan has extra features. These might include lighting or even a heater. While it might not be worth upgrading specifically for these, they can improve functionality and help with damp issues, too.
2. Cost
Replacing individual components in an old bathroom fan shouldn’t be too expensive. For example, this generic fan motor unit is around $25. But once you start looking at replacing several parts, it makes sense to just buy a completely new unit.
Plus, as I mentioned above, you get the added benefit of a new warranty. Replacing the fan motor is fine, provided no other components need replacing during that part’s lifespan. But as that’s not something you can guarantee, having a 1-5-year warranty on the whole unit is generally more cost-effective.
3. Energy Efficiency
Bathroom fans aren’t energy-intensive appliances. Standard energy usage is around 36 watts, which is very little. Of course, it’ll be more if the unit has features such as a heater.
That said, upgrading to a new unit means you can get a far more efficient model. Some modern bathroom fans are even Energy Star certified, which can save you some money. This shouldn’t be your main reason for upgrading, but it’s worth bearing in mind if you are in the market for a new fan.
4. Better CFM Rating
CFM stands for Cubic Feet per Minute, which measures the airflow of a vent fan. It’s fairly easy to calculate what you need for a room, as it correlates almost directly. For example, a 150 sq. ft. room will need a fan rated at 150 CFM.
However, you can use this to your advantage to get a quieter fan unit. For this, you’ll need a model that has a variable-speed fan, rather than just on and off settings.
Essentially, you’ll want to buy a fan that’s rated for a larger room. Then, you can run it at a lower speed to get the airflow you’ll need. It should run quieter than a fan rated for that CFM running at full speed.
That said, don’t rely on this as your first option for getting a quieter bathroom fan. Instead, look for specifically quiet models, as you won’t have as much control over a variable-fan speed’s CFM. For example, running a fan at speed 3 of 5 will be more guesswork on airflow than one running at full speed.
Quiet Bathroom Fan Noise Levels
As stated above, a standard bathroom fan will sit between 1.5 and 5 sones depending on its CFM rating (measurement of airflow). Therefore, a quiet bathroom fan is anything below 1.5 sones.
Your current fan may have just been a standard model, or it could be noisy because it’s old. Either way, the difference a quiet bathroom fan makes will be immediately noticeable.
Luckily, I have an article covering my top picks for a quiet bathroom fan. My top pick is a mere 0.3 sones, which translates to around 10dB. In real-world terms, that’s quieter than a whisper and is almost imperceptible. As you can see, that’s a considerable difference from even a low-noise normal model at 1.5 sones, which is around the same as office noise.
Final Thoughts on Noisy Bathroom Fans
I hope this article has given you some guidance on how to deal with a loud bathroom fan. Although you’ll need some DIY skills to address the issues, they’re generally easy to solve with a bit of preparation.
Do you have any other suggestions for how to fix a noisy bathroom fan? If so, let me know in the comments below because I’m sure other readers will benefit from them.

1 thought on “8 Tips| My Bathroom Fan Makes Loud Noises: Why & How to Fix”
my bathroom exhaust has always been fairly quiet but when they replaced my roof they extended the duct work to vent it outside on roof when previously it vented to the attic. Now when it is windy outside the bathroom sound like the wind in inside my bathroom near the ceiling how can this be fixed it is loud when the wind is strong ? thanks for your help