If you’ve looked into hardcore soundproofing options, you might have come across the hat channel vs. resilient channel debate.
Both hat channels and resilient channels offer some of the most foolproof sound isolation techniques. However, deciding which is right for your project isn’t always easy.
So, that’s what I’ll cover in this article. Below, I’ll look at hat channels and resilient channels, along with sound isolation clips. By the end, you should know what these terms mean and how to use them in your soundproofing project.
Understanding Noise Decoupling
Before getting into the definitions of a hat channel and a resilient channel, we must first look at noise decoupling. The bottom line is that both of these products provide decoupling, so we should understand what this means to know what they do.
Decoupling, in the soundproofing world, refers to mechanical isolation of a structure to remove the direct sound path. Although this sounds technical, it’s a pretty easy concept to understand. In short, it means taking a “solid” structure, such as a partition wall, and separating the 2 sides.
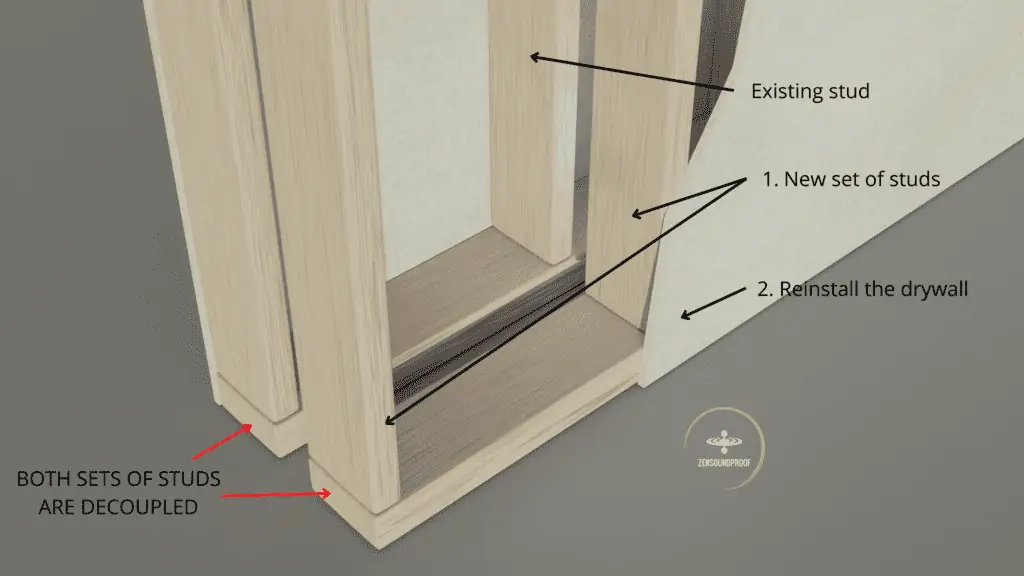
We do this so they vibrate independently of each other. This reduces (or completely eliminates) the ability for sound vibration movement to pass through. There are different ways to decouple a wall (hence the different products), but the full process is as follows:
- You start with a stud partition wall, where each side has a sheet of drywall attached.
- After removing the drywall, you build a second set of studs for one side of the wall.
- You insulate the wall cavity with fiberglass or similar and then reinstall the drywall.
Decoupling is by far the most effective option for soundproofing, but works best when used alongside one or more of the other principles. You can learn about the 4 principles of soundproofing here.
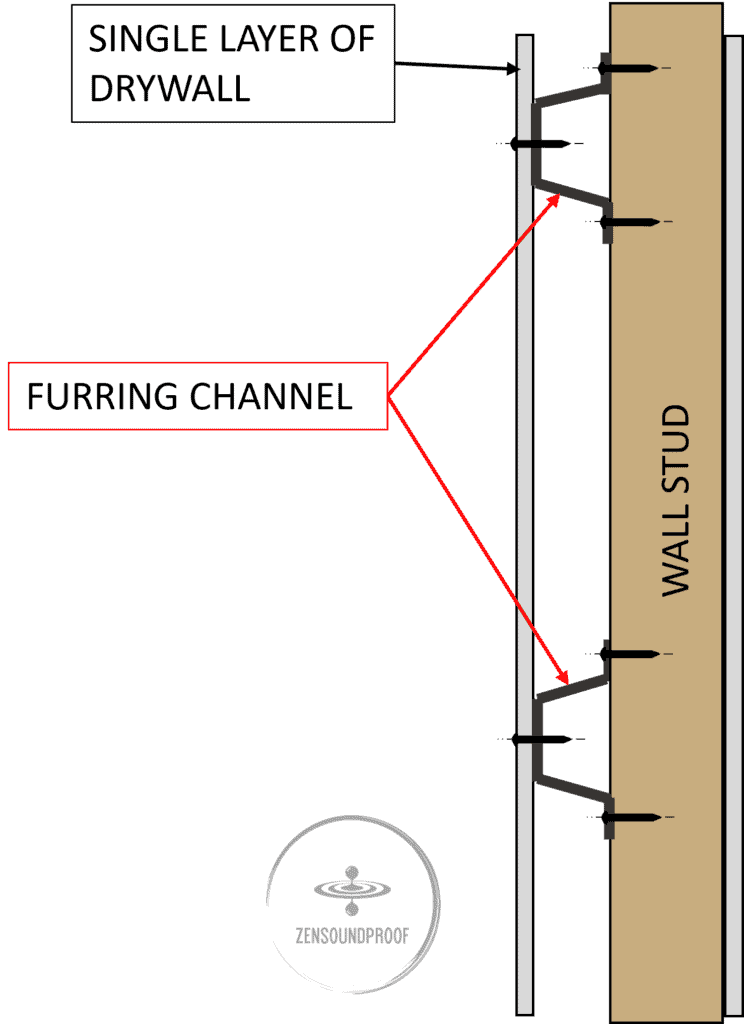
What is a Furring Channel?
A furring channel is a strip of metal onto which you attach a wall or ceiling material. Specifically, you fix the furring channels to wall or ceiling joists and then install drywall or a similar product.
Typically, furring channels are used to create air space between the wood structure and the wall material. It helps with air circulation, leveling out surfaces, and reducing maintenance. The Steel Stud Manufacturers Association has plenty of further information on furring channels.
But they’re also surprisingly useful in the soundproofing world. You can use furring channels to decouple a wall if you’re unable to build a second, separate set of wall studs.
In short, the channels attach to the studs and then you attach the drywall. This adds mass and, providing you use the correct clips, will do almost the same job as full manual decoupling. Considering the price and effort involved, it’s a much more popular option for decoupling.
Because furring channels add mass and help with decoupling, they help with STC and IIC ratings. STC stands for Sound Transmission Class, which refers to a surface’s ability to reduce airborne sound transmission. Higher STC ratings mean less noise passes through the structure.
IIC is Impact Isolation Class, referring to a structure’s ability to attenuate impact sounds. These include footsteps, so IIC is often reserved for floors and ceilings. Again, higher IIC values mean better sound attenuation. You can learn more about IIC Rating in my dedicated post here.
The 2 Types of Furring Channels
As you may have already guessed, hat channels and resilient channels are both furring channels. Here’s a quick breakdown of the products, which we’ll build upon later.
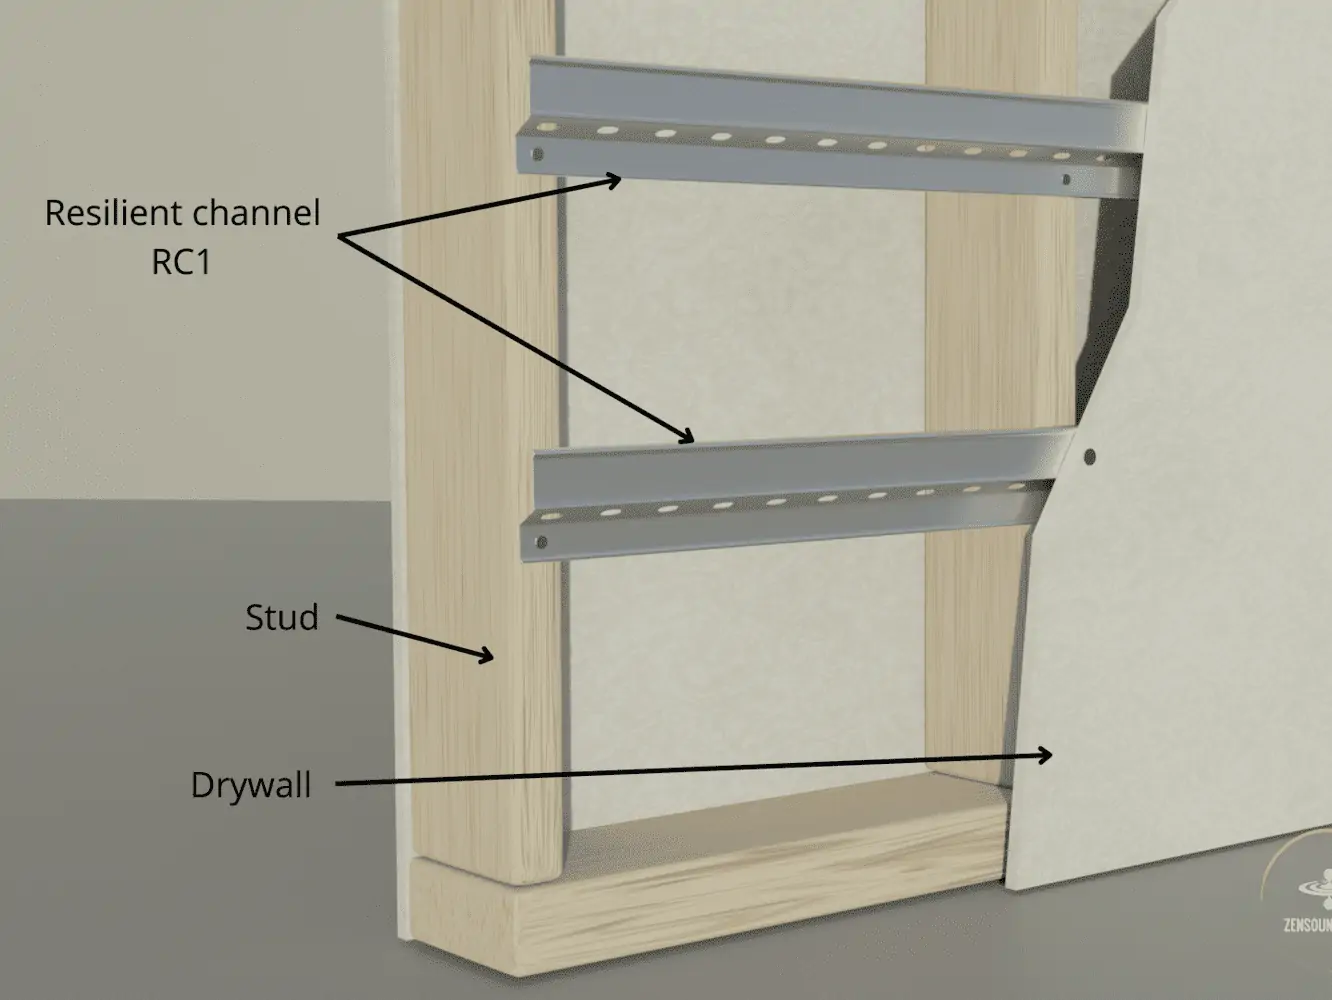
Resilient Channels
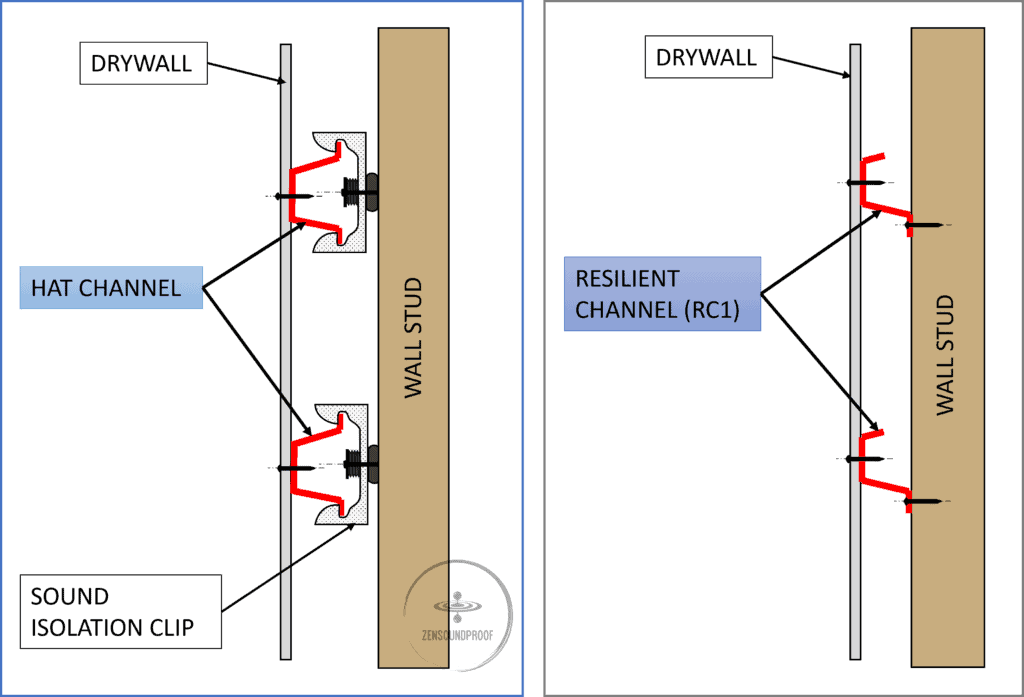
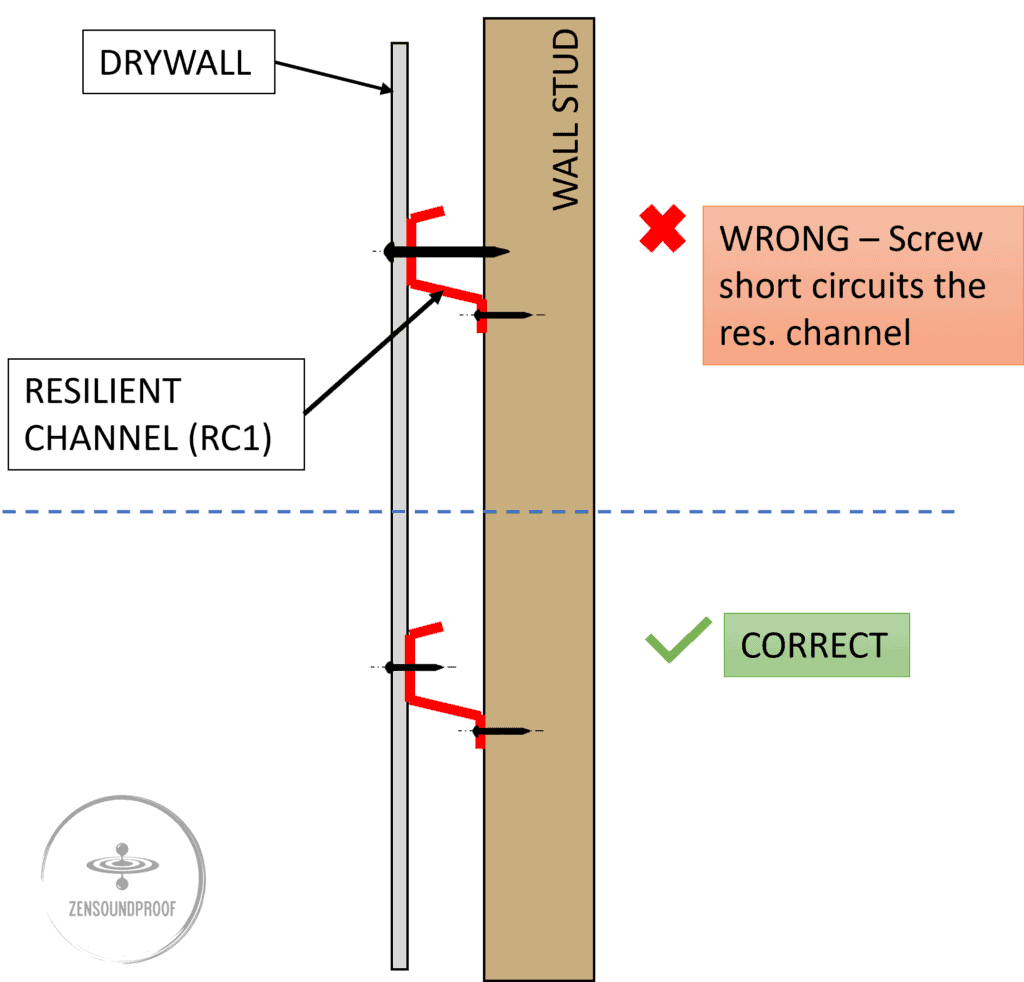
A resilient channel is a strip of metal that has a right-angle strip and then a zigzag section. They typically have one leg that attaches to the studs, while the drywall attaches to the main strip. Think of a resilient channel as being baseball cap shaped.
However, we have both RC1 and RC2 channels. RC1 have one leg, whereas RC2 have two. As such, RC1 is better for soundproofing because it has less in contact with the studs, reducing the area through which sound waves can transmit.
On the other hand, RC2s can bear more load because of the extra leg. This is useful if you want to include several layers of drywall and need the full weight supported (such as in a ceiling setup).
Resilient channels are often made of galvanized steel, meaning they can range from rigid to slightly more flexible. Contrary to what you might think, flexibility works in our favor when decoupling. It can help reduce vibrations passing through the structure because a flexible material vibrates more. In turn, sound waves expend more energy.
They come in a range of lengths, widths, and depths. Typically, the length will be 1.5m or 3m, while a width of 35mm is fairly standard. There are also different gauges (thicknesses) for different loads – typical gauge values are 25 and 20. For example, you’d need a higher gauge product for ceiling decoupling (because thickness decreases as the gauge number rises).. Luckily, the metal is generally thin enough that you can cut it with metal shears.
How to Install Resilient Channel
I won’t go into too much detail about how to install resilient channels, as I’ve already covered in this article here, but a rough guide is as follows:
- Fix to the wall studs, spaced around 60cm apart vertically.
- Fill the cavity with insulation, if needed.
- Screw the drywall to the channels, ensuring you don’t penetrate into the channel itself.
Hat Channels
A hat channel is a very similar product, except it has 2 feet that fix to the studs. Think of them as shaped like a fedora rather than a baseball cap. The benefit of having 2 feet is better structural integrity and the ability to bear more load.

Again, hat channels are commonly made from galvanized steel or aluminum. Aluminum hat channels are lighter but slightly less resilient than steel. They’re easier to install than resilient channels thanks to the double feet, although we’ll discuss this in more detail below.
Stiffness and dimensions are pretty much the same as for resilient channels. Lengths of 1.5m or 3m are common, and 35mm is a standard width. Typical thicknesses range from gauge 25 down to 16. That said, you can get variations on these measurements if needed.
I won’t bother detailing the installation steps, as they’re almost identical to those given above. The only difference is that hat channels create a transmission path gap by fitting into sound clips (read below) rather than screwing directly to the wall or ceiling joists.
What is a Sound Isolator Clip?
For hat channels, we need to use mounting clips. These screw into the joists and then we pop the hat channel into it. In soundproofing projects, combining hat channels with sound isolator clips is our best option.
As the name suggests, a sound isolator clip includes material that absorbs or dampens vibrational sound energy before it passes into the hat channel. Sound clips are often made from steel or aluminum, and the most common isolator material is rubber.
Types of Sound Clip
There are 2 general categories of sound isolation clips:
Whisper Clip
These are rectangular clips with 2 screw attachments. Connected to these is the channel clip, which creates a break in the sound transmission path. While it lacks absorptive material, the simple setup of 2 bits of metal is enough to achieve a minimum STC rating of 55.
Green Glue manufactures whisper clips, which are one of the most popular types.

Green Glue and other manufacturers don’t provide any IIC measurement in testing. Therefore it’s hard to say how effective whisper clips are against impact noise.
For that, I’d recommend the below models of sound isolators. At least, manufacturers provide test reports along with IIC ratings.
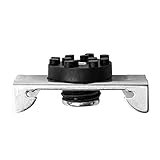
Resilient Sound Isolation Clip (RSIC)
Known as RSIC-1, these are a rectangular channel clip with a single, central screw hole. Around this is the sound absorption material, which is often a piece of rubber. They work by absorbing vibrational energy before it passes into the actual clip, and the only connection point is the screw itself.
As with whisper clips, various brands make RSIC products. However, the design is almost always the same, as is the sound control effectiveness.
Unlike whisper clips, RSICs are effective at increasing both the STC and IIC of a wall or ceiling assembly, meaning it’s both effective against airborne and impact noises. The estimate is that they add up between 10 – 20 points to both STC and IIC.
Despite having resilient in the name, it’s worth mentioning again that resilient channels don’t need sound isolator clips. The springy legs (one for RC1 and two for RC2) are what provide the sound isolation.
Other types of sound isolator clip
IsoMax. The sound isolator clip from Kinetics Noise Control is another decent alternative. It’s called IsoMax, and you can find more details here. Installation-wise, it’s very similar to the RSIC-1, except that you need 2 screws instead of 1 to install it on a joist.
In terms of noise insulation performance, it’s very close to what an RSIC-1 delivers. It’s a good alternative considering, there’s not a significant difference in price between them.

Spring isolators. They’re only meant for ceiling assemblies and do not apply to walls. Apart from decoupling surfaces, their purpose is to create a drop ceiling with some deflection (1” in general). The installation is quite different as the cold rolled is installed perpendicularly to the hat channels.
Whatsmore, you can choose the stiffness of the spring, which is easy to identify by their colors.
For more info, check out the model by Kinetics Noise Control or the one by Trademark Soundproofing.
How to Install Sound Clips
Sound isolation clips are fairly easy to install. The general steps are as follows:
- Work out how many clips you need for your structure. This’ll depend on the amount of drywall you’re fitting, but a general rule is that one RSIC can support 2 sheets of drywall up to a maximum weight of 36lbs. per clip.
- You’ll typically space them 24 inches apart vertically and 48 inches apart horizontally as a maximum. For higher mass loads, place them closer together.
- Fix a screw into the isolator clip. As mentioned, this could be one or more depending on the type of clip.
- Attach the hat channel to the clips and hang the drywall.
- Sound isolation clips are fairly easy to work with, providing you remember the basic spacing and weight requirements. These will vary depending on the product you buy, so always ensure you check the manufacturer’s specifications.
Resilient Channel vs. Hat Channel
Now that we have a decent understanding of the products, let’s compare them based on the important factors of a soundproofing project.
Price
Generally, resilient channels are the more affordable option because you only need to buy the one product. Hat channels require sound isolation clips, which aren’t super expensive, but they make hat channels the pricier option.
The channels themselves are roughly the same price. You can find them at prices ranging between $1.10 and $1.70 per foot, depending on the quantity you buy. But, as mentioned, sound clips (which can be around $3 per unit) will bump this up.
Winner: Resilient channels.
STC and IIC Ratings
Neither product has dedicated STC and IIC ratings because we generally calculate these based on the whole ceiling or wall setup. RC1 resilient channels theoretically have better STC properties because they have fewer points of contact with the wall joists. But this is negated by the addition of sound isolation clips to the hat channel setup.
Combined with other soundproofing products, such as insulation, resilient channels can have an STC rating of up to 65 (adding around 3-5 STC points on its own).
A hat channel doesn’t have an STC value because it’s not the part of the setup that handles noise isolation. However, sound clips can add up to 20 points to a structure’s STC value, which can equate to a sound reduction of up to 10dB in real-world tests.
If we consider a standard wall setup to be 2×4 wood joists, fiberglass cavity insulation, and a sheet of ⅝” thick drywall on each side, some standard STC values are:
| – ⅝” thick drywall – 2×4 wood joists – Fiberglass – ⅝” thick drywall | STC |
|---|---|
| Resilient Channels | 45 – 47 |
| Hat Channel + Sound clip RSIC-1 | 55 – 61 |
| Hat Channel + Whisper clip | 55 – 63 |
In terms of IIC, here are some rough estimates:
| – Plywood subfloor – 2×8 wood joists – 0.5” drywall | STC | IIC |
|---|---|---|
| No addition | 37 | 32 |
| + 3” Fiberglass + Resilient channel + 1 layer of drywall | 46 | 44 |
| + 3” Fiberglass + Furring channel with Sound clip (RSIC-1) + 1 layer of drywall | 55 | 49 |
If we look at the testing on the isolator clip IsoMax by Kinetic Noise Control, it shows the same trend. Even though it’s on a concrete slab assembly, the order of increase is around 17 points on the IIC:
| 6” Concrete slab | STC | IIC |
|---|---|---|
| No addition | 53 | 27 |
| + 2.5” Fiberglass + Furring channel with IsoMax clips + ⅝” Gypsum board | 66 | 44 |
Winner: Hat channels and sound clips.
Installation
Both resilient channels and hat channels follow similar installation processes. They require similar spacing and you can install both on concrete and masonry surfaces. When installing resilient channels on walls, they should be hung with the short leg facing up, so the drywall pulls away from the joists under its own weight.
But resilient channels have more that can go wrong. First, if you’re not careful during installation, you could bend the feet, reducing their efficacy. Also, it’s easier to short-circuit a resilient channel by screwing the drywall to the joist. This effectively creates a new path for the transmission of sound vibrations.
On the other hand, hat channels are relatively easy. You screw the sound clips to the joists and then clip the channels into place. Because you’re not installing the channel directly, you don’t have to be as careful. Fitting each sound isolation clip individually may take a bit longer but there’s less chance of something going wrong.
Winner: Hat channels and sound clips.
Load Bearing
As mentioned, hat channels can bear more mass than RC1 resilient channels because they have 2 points of contact. While this also means the possibility for more sound transmission, the difference isn’t massive. The same is true for RC2 channels, which are primarily used in ceiling decoupling.
Although different gauges of resilient channels have different maximum loads, a thicker gauge channel can hold 7.5lbs. per square foot. On the other hand, some sound isolator clips can bear 36lbs. each!
Winner: Hat channels and sound clips.
Common Mistakes
Resilient channels are arguably more susceptible to mistakes than hat channels. For example, it’s easier to mess up installation, either with incorrect spacing or short-circuiting the channels.
Also, it’s more likely that you’ll overload the channels. You couldn’t use them for a wall that’ll have items hung on them, such as TV cabinets, bookcases, etc. On the other hand, you could use hat channels.
Finally, trying to use resilient channels in a compact space can be a mistake. The whole setup can add up to 2” to each wall, which is very noticeable in a small room. Granted, it’s no less for hat channels, but it’s possible to compress resilient channels due to their springy feet. Doing so will compromise their STC rating, though.
While you could space your sound clips incorrectly, this is the only thing that could really go wrong. Any other common mistakes are possible in all soundproofing projects, such as not sealing gaps between drywalls or gypsum or using the correct insulation.
Winner: Hat channels and sound clips.
Which is Better: Resilient vs. Hat Channel
Based on the above criteria, it’s fair to say that hat channels and sound isolator clips are the superior choice for a soundproofing project. Importantly, they have a higher STC / IIC rating and can bear more weight.
While resilient channels are less expensive, it’s worth spending the extra money if you’re serious about decoupling a wall to reduce sound transfer.
Let’s look at some scenarios to evaluate which product is superior.
Scenario 1: Soundproofing a Basement Ceiling
Say your basement is a TV room and the ceiling currently has exposed joists. You only need a bit of noise reduction because TV sound isn’t a massive issue.
In this situation, resilient channels would be fine because a thicker gauge product can support multiple layers of drywall. Providing you insulate the ceiling cavity before installation, it should be enough to reduce the transfer of airborne sounds.
Scenario 2: Home Theater/Gaming Room
If you’re looking to soundproof a home theater or gaming room, it’s fair to assume you’ll be dealing with a wider spectrum of sound frequencies. Specifically, there will likely be more bass than you’d find coming from a standard TV.
Providing the room is large enough, hat channels and sound isolator clips would be the better option. You’ll likely have a higher budget for a project like this, and RSIC clips are decent at dealing with lower-frequency sounds.
Scenario 3: Partition Wall in an Apartment or Home
Rather than looking at specific sounds, this scenario considers soundproofing a partition wall. It could be one within your home or one you share with neighbors. Either way, a studded gypsum board partition wall has a low STC value.
If you want sound transfer to be minimized as much as possible, hat channels and RSIC-1s are the best option. However, if your DIY skills are up to it, resilient channels will provide an acceptable level of decoupling.
But in your own home, resilient channels will probably be fine. Unless you have a really uncooperative person, asking them to keep the noise down (combined with resilient channels) should do a good job.
Alternatives to Furring Channels
Although furring strips are a very effective option for sound isolation, they’re not always the most practical. Some easier alternatives include:
- Double drywall. Adding a second layer of drywall is easy enough and doesn’t compromise too much space. It can increase the STC rating up to 45.
- Add Green Glue. This seals gaps or helps with sound damping, depending on the product you buy. For example, adding a layer of drywall with the damping compound on your existing drywall can increase the STC by at least 4 points. The STC ratings for Green Glue are available on their website. They cover most configurations of wall assemblies. Check out their test results here.
- Mass loaded vinyl. MLV is a dense, limp material that effectively blocks sound transmission. It’s pretty easy to install, and, at a thickness of 1/16 of an inch, the STC is 20.
The alternatives you use will depend on the area of the room you’re trying to soundproof. Check out my DIY soundproofing solutions for walls, ceilings, and floors for plenty of options.
Final Thoughts
I hope you’ve now got some clarification on the differences between hat channels and resilient channels. My takeaway advice is that, generally, hat channels are the best option for soundproofing projects. Combined with sound isolation clips, they give you more options.
Do you have experience using any of these products or any advice for would-be soundproofers? If so, let me know your thoughts in the comments below.

3 thoughts on “Hat vs. Resilient Channels (with Sound Isolation Clips): Pros and Cons”
Really detail and strait to point
What do you think the STC would be for a double wall, with hat channel and isolation clips on the inside wall; double drywall on inner and outer wall? I always see one or the other and never combined. I wouldn’t think the law of diminishing returns applies here but maybe it does. I’m building a theater room so I want a very high STC.
Clean and simple yet thorough write-up. Nicely done! Must be an engineer doing this! If I were building a small medical office where privacy is particularly important, and I wanted to improve a wall without the added thickness of full decoupling, could I:
1) use furring channels on both sides of the 2 x 4 interior wall?
2) would putting tar paper or something similar on the studs on both sides — no internal fiberglass insulation in this setup — and then adding furring channels help or hurt do you think?