Deciding to build a quiet generator box takes a bit of work, but certainly makes a difference. I recently wrote a list of ways to quiet a noisy generator, and a soundproof generator box is easily the most effective.
So, in this article, I’ll cover in detail how to build a generator quiet box. We’ll go over why it works, what you’ll need, and the steps involved.
Can You Enclose a Generator to Make it Quieter?
You can enclose a generator to make it quieter, providing you use soundproofing materials. In short, you’ll want to block, dampen, and absorb sound waves before they reach your home or RV.
A box by itself won’t make much difference. The important things are the materials you use in it. For this, we’ll rely on the main principles of soundproofing, which I explain in my sound absorption vs. soundproofing guide.
Essentially, a generator produces both impact and airborne noise from its engine and exhaust, respectively. So, to build a generator quiet box, we’ll need to prevent both types from reaching your home.
We’ll want to use dampening and mass to reduce and block vibrations and airborne generator sound. Also, if we can add in some sound absorption, it’ll help with generator noise from the exhaust. I’ll discuss these in more detail below in relation to what we’re using.
How to Build a Quiet Box for a Portable Generator
For convenience, my guide will cover how to build a soundproof generator box for a portable generator. The same principles will apply to a fixed generator; you’ll just need a lot more soundproofing material.
Budget and Results
In terms of a budget, I’d recommend setting aside around $200. It might sound a lot, but your biggest expense will be mass loaded vinyl. To save on money, you can buy it in smaller sheets and choose the 1lb density option.
As for noise reduction results, there’s not really a concrete answer. With the right soundproofing, you could expect a reduction of up to 20dB.
Materials
I won’t include the necessary quantities to build a soundproof generator box, as it depends on the size of your generator. Make sure you measure your generator (see here) first so you know how much of each to buy.
1. Mass Loaded Vinyl
Mass loaded vinyl (or MLV) is a popular material in the soundproofing world. It’s made (unsurprisingly) of vinyl and is useful because it’s limp mass. In short, this means it doesn’t vibrate when sound waves come into contact with it.

We’re including mass loaded vinyl here because adding mass to the structure will help block sound waves. Adding mass makes it more difficult for the generator box to vibrate, which reduces the transmission of sound waves.
In theory, you could use vehicle sound deadening mats instead. They’re made from butyl which is a type of Vinyl. It’s quite a dense material and so can add mass to the structure. But I’d probably steer clear of them for a generator quiet box in most situations. Most types of sound deadening mats have a layer of foil for thermal reflection, which could cause your generator to not evacuate calories efficiently.
2. Acoustic Foam
We’ll also include acoustic foam in our soundproof box. For this, I’m going with open-cell foam rather than closed-cell foam. What’s the difference, other than the cells?

Open-cell foam is the kind you see in acoustic tiles, such as those in a recording studio. It provides sound absorption. Sound waves enter the open-cell structure and get trapped because of all the angled surfaces. The vibrational energy is converted into heat, and the sound wave loses its power. In turn, noise doesn’t disappear but is more muffled.
Closed cell foam is around 3 times denser than open cell foam. Soundproofing-wise, both open-cell and closed cell foams are good sound absorbers. But, they are not equally good for different frequency ranges.
Closed cells are better for low frequency sounds. While it’s useful in some situations, it can also block heat and gas. Considering we’re insulating a generator, which produces heat and gas as waste products, it’s not ideal.
We’re using foam to absorb airborne sound waves before they escape the generator box. As such, open-cell foam is the best choice.
3. Green Glue
Green Glue is another popular soundproofing product. It comes in 2 varieties: a sealant and a damping compound.

The sealant is a soundproof version of normal caulk. The biggest difference is that it’s viscoelastic, meaning it never sets completely solid. As such, it helps to block sound waves escaping through small gaps.
The damping compound dissipates a sound wave’s vibrational energy. Rather than sealing gaps, you’d use it as a layer within a structure. Picture Green Glue as a soft layer in between two hard layers of wood in a wall. The soft layer will prevent the sound waves from transmitting from one wall to another. Green Glue has done tests to show the difference it makes in a normal wall construction.
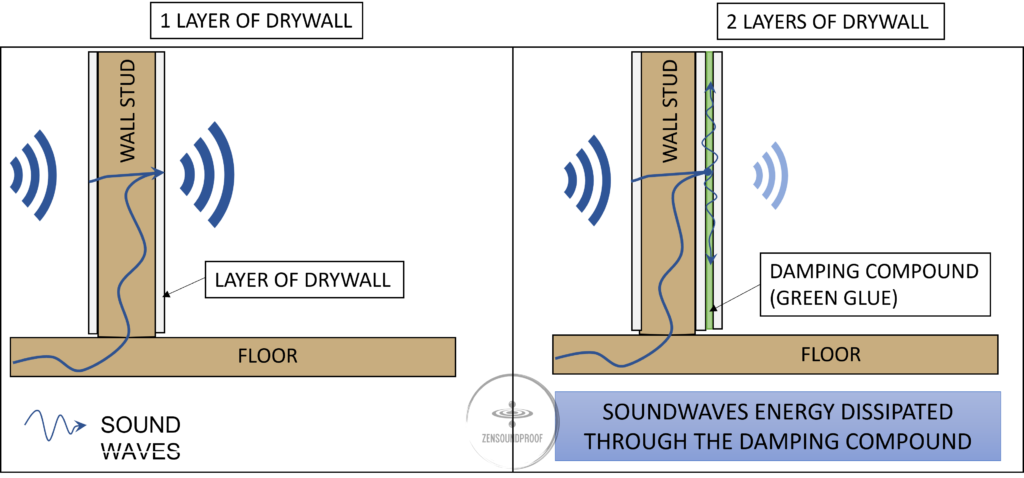
On its own, Green Glue won’t do loads to reduce the noise your generator makes. When used alongside other soundproofing, though, it’s an effective addition to a generator enclosure.
4. Wood
To build the box, we’ll need some kind of wood. Generally, the options are plywood or medium density fiberboard (MDF). Plywood is less dense than medium density fiberboard, meaning it’s less effective at blocking sound transmission.
But, in the amount we’re using with the addition of soundproofing, it makes very little difference which one you pick.


I find MDF is easier to work with because, unlike plywood, it doesn’t splinter when you cut it. But, you’ll want to coat it with something, as it absorbs water easily.
Along with these, you’ll also need:
- Measuring tape
- Saw or table saw
- Normal glue
- Screws and nails
- Hammer
- Screwdriver
- Craft knife
- Ducting
Method for a DIY Quiet Generator Box
Now that we have everything ready, let’s go through the method for how to build a soundproof generator enclosure. I won’t provide exact measurements, as these depend on the size of your generator. But, I’ll make it clear when you need to increase the measurements you take.
Step 1: Measuring
Speaking of, measuring is the obvious place to start. Your soundproof box must be big enough to cover your generator with some room to spare.
Measure the height, width, and depth of your generator. The measurements don’t need to be super accurate, providing they’re bigger rather than smaller.
You’ll also need a lid (or top piece), which you can calculate using the width and depth. I’d avoid a bottom for the box, though, so you can lift it off easily. Instead, just put your generator on a rubber mat.
Plus, you’ll want to add at least 2 inches onto each measurement. This is to account for the materials you’re using. For example, foam tiles are often an inch thick, and mass loaded vinyl is around 1/8” thick. So, double these and add them to the measurements you just took.
Say your generator measures 22 x 16 x 20 inches. In this case, you’ll want to increase the measurements to at least 24 x 18 x 22 inches.
Step 2: Cut the Wood
Now that you have measurements, it’s time to cut out the pieces for your generator quiet box. If using plywood, choose a fine-tooth saw to avoid tearout.
This is where MDF becomes a better option – it’s easier to cut. Use a pencil and set square to mark everything out, and consider adding an X onto the waste side. Doing so means you cut on the correct side of the line and don’t lose any wood.
It’s worth marking each piece once you’ve cut it so you know what goes where.
And remember, measure twice, cut once!
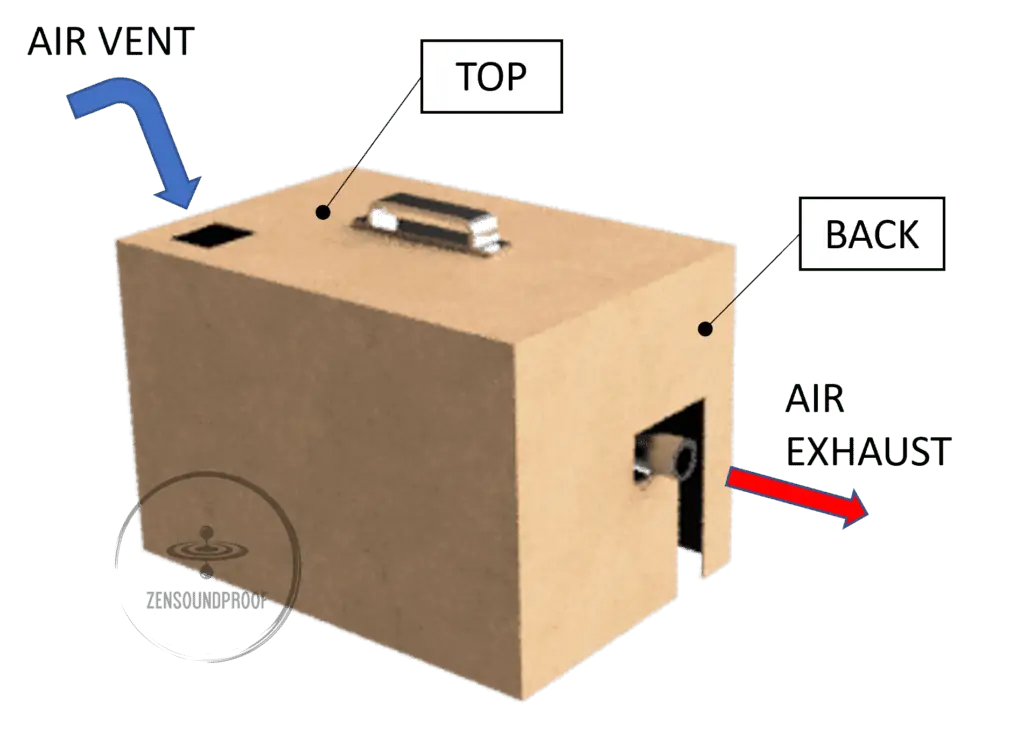
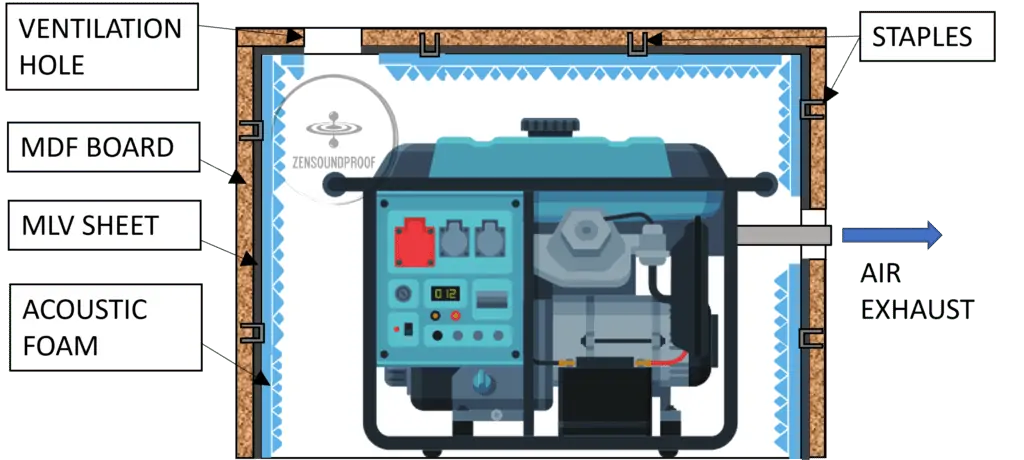
Step 3: Ventilation Holes
Next, you need to cut some ventilation holes in your box pieces. Without them, your generator will overheat and break.
Mark out one on the top piece and one on the back side. The exhaust vent will need to go near the generator exhaust pipe.
I’d recommend putting the top hole at the front and to one side and the exhaust hole on the opposite side. For example, if your top hole is in the front left corner, put the exhaust hole in the bottom right.
You’ll obviously need to cut vent holes in the soundproofing material, but you can do this with a craft knife once they’re stuck down.
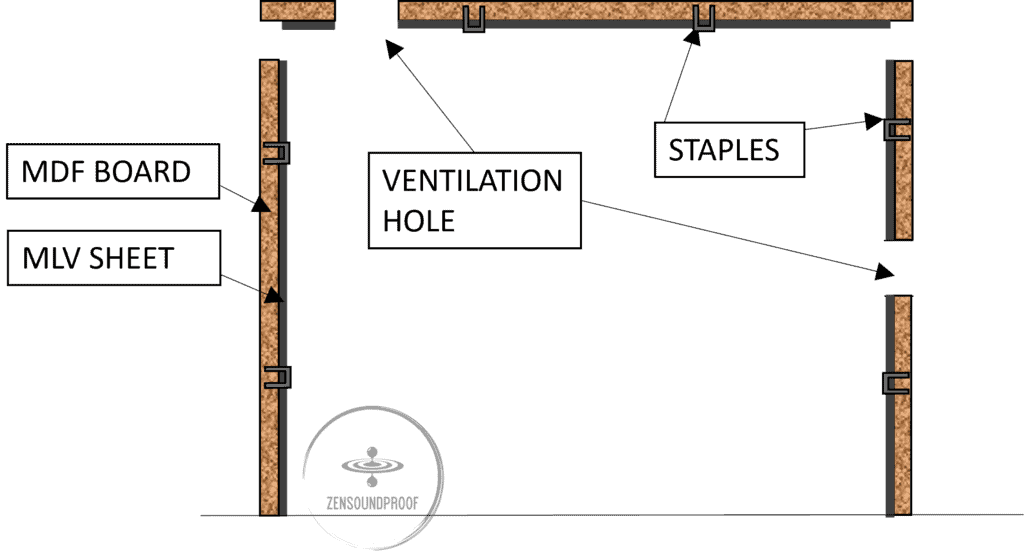
Step 4: Mass Loaded Vinyl
Lay your pieces of fiberboard on the floor so you can stick the MLV to the inside. A layer of Green Glue damping compound helps but isn’t completely necessary.
Cut the MLV to size for each piece of wood, and then fix the vinyl in place. You can use staples or small tacks for this.
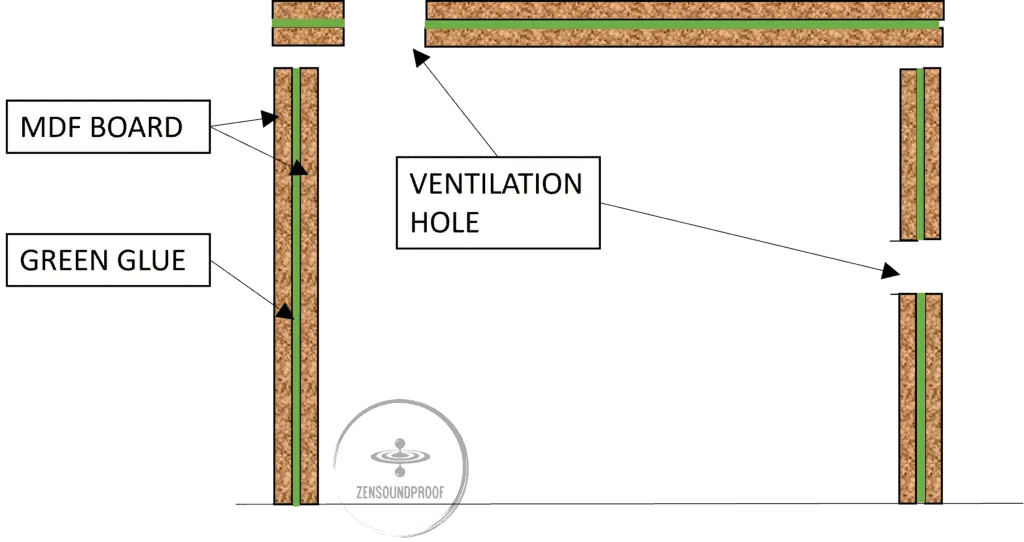
Instead of MLV, you can stick two layers of MDF together. In between the 2 layers you can spray some green glue compound. It can be a cheaper option if you want to avoid spending on MLV which is fairly expensive.
Despite having glue in the name, don’t rely on Green Glue as an adhesive. Therefore, use nails or staples to hold the 2 layers of MDF together.
Once you’ve stuck everything down, use some acoustic caulk around the edges of the MLV. This just helps to seal any small gaps and will improve the overall soundproofing quality.
You’ll want to leave a small lip free around each piece of wood. This is so you can fix them together when you assemble the box. At most, it’ll need to be as wide as the wood’s thickness. For example, if your fiberboard is ½” thick, leave a half-inch border around each piece.
Step 5: Acoustic Foam
The next layer is your foam. It needs to be the top layer of your soundproofing materials, so it can absorb airborne sound waves before they make contact with the generator quiet box.
I recommend using a spray adhesive rather than normal glue. Normal glue can block the foam’s cells, rendering it useless. Spray a thin layer onto the MLV and stick the foam tiles down.
Step 6: Build the Box
Once everything is stuck down and dry, it’s time to assemble your generator quiet box. It’s easiest to put together a long side to a short side and repeat, so you have 2 right angles.
Then, fix these together. You can use screws or nails to attach the pieces together. I recommend screws, so you can take your soundproof box apart as needed. Alternatively, fix some corner braces on the outside.
You’ll also want to seal the corners inside using caulk. Again, it’s easiest to do this as you go, although you could turn the box upside down and do it once it’s assembled.
Step 7: Adding Ducting
Adding ducting to your ventilation holes can improve airflow, although it’s not strictly necessary. One advantage is that you can bend the ducting to reduce noise emissions coming from the ventilation holes.
If you want ultimate airflow in your soundproof box, consider installing inline fans. They’ll help improve airflow, but will obviously add extra noise. Check out my article on quiet inline fans to find the best one for this purpose.
And that’s it! You’re now the proud owner of a DIY generator quiet box.
A Ready-Made Soundproof Generator Box: The Zombie Box
If you don’t feel like building a generator quiet box and would prefer something ready-made, you’re in luck. There’s a product called the Zombie Box, which manufacturers claim is the only patented generator noise reduction box.
The box is weatherproof and water-resistant and also includes a powered fan for ventilation. Better yet, the fan plugs into the generator, meaning everything is self-contained.
There are different sizes for all portable generator types. Currently, there isn’t an option for fixed generators, although the company also makes a noise fence. This’ll help with fixed generators but won’t reduce noise in the same way.
A Zombie Box can reduce generator noise emissions by up to 18dB, which is nearly 4 times as quiet. But, it depends on many other factors, so the company never guarantees a specific decibel reduction.
It doesn’t state what the box is made from, presumably because it’s patented. However, it is heavy. The mini box weighs 100lbs, so it clearly uses a lot of mass to block generator sound emissions.
The biggest downside, though, is the price. The cheapest model (for a mini generator) is nearly $1,000, and an XL box is $2,159.
- Convenient alternative to a DIY solution.
- Effective noise reduction.
- Includes powered fan.
- Expensive.
- Not suitable for all types of generator.
The bottom line is that the Zombie Box is pricey but effective at noise reduction. As with many other things, you’re paying for convenience. Plus, as the company states, it’s the only patented model on the market, meaning it can charge whatever it wants.
Final Thoughts on Building a Generator Quiet Box
I hope this guide has given you some useful tips on how to build a DIY quiet generator box. It’s not a difficult job providing you have some DIY skills. Of course, if you’ve got the budget, the Zombie Box is a ready-made alternative.
Do you have any other tips for building a DIY soundproof generator box? Perhaps you’ve made one and have recommendations for materials. If so, I’d love to hear from you!

2 thoughts on “7 Easy Steps to Build a Quiet Generator Box: Why it Works”
It would be great to have this downloadable in a .PDF document since many of us can’t drag a laptop or anything else where we’re building things. I would love to have that as a guide!
This is a really good guide and very helpful! Invaluable information and guidance!
Thankyou very much!